HP Nc4010 HP Compaq nx5000 Notebook PC - Maintenance and Service Guide - Page 117
T5M3.0×4.0 screws, that secure the hard drive to the hard
 |
View all HP Nc4010 manuals
Add to My Manuals
Save this manual to your list of manuals |
Page 117 highlights
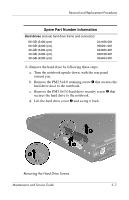
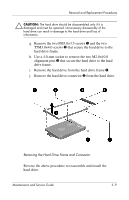
Removal and Replacement Procedures Ä CAUTION: The hard drive should be disassembled only if it is damaged and must be repaired. Unnecessary disassembly of the hard drive can result in damage to the hard drive and loss of information. g. Remove the two PM3.0×3.5 screws 1 and the two T5M3.0×4.0 screws 2 that secure the hard drive to the hard drive frame. h. Use a 4.0-mm socket to remove the two M2.0×10.0 alignment pins 3 that secure the hard drive to the hard drive frame. i. Remove the hard drive from the hard drive frame 4. j. Remove the hard drive connector 5 from the hard drive. Removing the Hard Drive Frame and Connector Reverse the above procedure to reassemble and install the hard drive. Maintenance and Service Guide 5-9
-
 1
1 -
2
-
3
-
4
-
5
-
6
-
7
-
8
-
9
-
10
-
11
-
12
-
13
-
14
-
15
-
16
-
17
-
18
-
19
-
20
-
21
-
22
-
23
-
24
-
25
-
26
-
27
-
28
-
29
-
30
-
31
-
32
-
33
-
34
-
35
-
36
-
37
-
38
-
39
-
40
-
41
-
42
-
43
-
44
-
45
-
46
-
47
-
48
-
49
-
50
-
51
-
52
-
53
-
54
-
55
-
56
-
57
-
58
-
59
-
60
-
61
-
62
-
63
-
64
-
65
-
66
-
67
-
68
-
69
-
70
-
71
-
72
-
73
-
74
-
75
-
76
-
77
-
78
-
79
-
80
-
81
-
82
-
83
-
84
-
85
-
86
-
87
-
88
-
89
-
90
-
91
-
92
-
93
-
94
-
95
-
96
-
97
-
98
-
99
-
100
-
101
-
102
-
103
-
104
-
105
-
106
-
107
-
108
-
109
-
110
-
111
-
 112
112 -
 113
113 -
 114
114 -
 115
115 -
 116
116 -
 117
117 -
 118
118 -
 119
119 -
 120
120 -
 121
121 -
 122
122 -
123
-
124
-
125
-
126
-
127
-
128
-
129
-
130
-
131
-
132
-
133
-
134
-
135
-
136
-
137
-
138
-
139
-
140
-
141
-
142
-
143
-
144
-
145
-
146
-
147
-
148
-
149
-
150
-
151
-
152
-
153
-
154
-
155
-
156
-
157
-
158
-
159
-
160
-
161
-
162
-
163
-
164
-
165
-
166
-
167
-
168
-
169
-
170
-
171
-
172
-
173
-
174
-
175
-
176
-
177
-
178
-
179
-
180
-
181
-
182
-
183
-
184
-
185
-
186
-
187
-
188
-
189
-
190
-
191
-
192
-
193
-
194
-
195
-
196
-
197
-
198
-
199
-
200
-
201
-
202
-
203
-
204
-
205
-
206
-
207
-
208
-
209
-
210
-
211
-
212
-
213
-
214
-
215
-
216
-
217
-
218
-
219
-
220
-
221
-
222
-
223
 |
 |

Removal and Replacement Procedures
Maintenance and Service Guide
5–9
Ä
CAUTION:
The hard drive should be disassembled only if it is
damaged and must be repaired. Unnecessary disassembly of the
hard drive can result in damage to the hard drive and loss of
information.
g.
Remove the two PM3.0×3.5 screws
1
and the two
T5M3.0×4.0 screws
2
that secure the hard drive to the
hard drive frame.
h.
Use a 4.0-mm socket to remove the two M2.0×10.0
alignment pins
3
that secure the hard drive to the hard
drive frame.
i.
Remove the hard drive from the hard drive frame
4
.
j.
Remove the hard drive connector
5
from the hard drive.
Removing the Hard Drive Frame and Connector
Reverse the above procedure to reassemble and install the
hard drive.