HP Officejet 5500 HP Officejet 5500 series All-in-One - (English/Simplified Ch - Page 2
officejet 5500 series all-in-one - power cord
 |
View all HP Officejet 5500 manuals
Add to My Manuals
Save this manual to your list of manuals |
Page 2 highlights
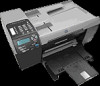
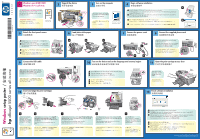
*Q3434-90196* *Q3434-90196* Q3434-90196 1 Macintosh users START HERE This side of the poster is for Macintosh users only. Follow the steps on this poster in order. Macintosh OS 9, OS X 2 Unpack the device Macintosh 3 Attach the front panel covers a Align the larger cover over the buttons on the top of the HP Officejet and snap into place. b Align the smaller cover over the buttons 1 on the front of the HP Officejet and snap into place. Make sure all the buttons can move freely. 2 4 Load plain white paper a b c 5 Connect the supplied phone cord Connect the supplied phone cord to the open 1-LINE jack on the left. To connect other equipment such as an answering machine, or to use a different cord, see the Fax Setup chapter in the Reference Guide. 9 Open the print-carriage access door 6 Connect the power cords c a b 10 Insert and align the print cartridges 7 Connect the USB cable If you have an iMac, the USB port is on the side. Do not connect the HP Officejet to a USB port on a keyboard or a nonpowered USB hub. 8 Turn on the device and set the language and country/region a Press the On button to turn on the device. Wait for the display prompt. b Select your language, then press the OK button. c Select your country/region, then press the OK button. Macintosh setup poster hp officejet 5500 series all-in-one Lift the print-carriage access door. The print carriage slides to the middle. 11 Install the software a Turn on your Macintosh and wait for it to finish starting up. Insert the Macintosh HP Officejet CD. Door Tri-color Black a Remove the bright pink tape from the print cartridges. Do not touch the gold-colored contacts or retape the cartridges. b Hold the black print cartridge with the large HP label and the raised markings on top. Slide the cartridge at a slight angle into the right side of the print carriage. Press firmly until the print cartridge snaps into place. c Hold the tri-color print cartridge with the large HP label and the raised markings on top. Slide the cartridge at a slight angle into the left side of the print carriage. Press firmly until the print cartridge snaps into place. Make sure that both print cartridges are secure. d Close the print-carriage access door and press the OK button. Within a few minutes, a print cartridge alignment page prints. Place the alignment page face down in the left front corner of the glass. Close the lid. e Press the OK button. When "Alignment is complete" appears on the display, alignment is complete. Discard or recycle the alignment page. b Double-click the HP All-In-One Installer icon on the desktop. hp_all-in-one_installer c Follow the onscreen instructions. You may have to restart your Macintosh during setup. Be sure to complete the setup assistant. 12 Try the HP Officejet Congratulations! You are now ready to use the HP Officejet. Select the HP Director icon in the dock to get started. If you encounter problems during setup, see the Reference Guide. www.hp.com/support Copyright Hewlett-Packard Company 2003 Printed in Singapore/Malaysia
-
 1
1 -
 2
2
 |
 |