HP Officejet J5700 User Guide - Microsoft Windows - Page 102
Print reports, Print fax confirmation reports
 |
View all HP Officejet J5700 manuals
Add to My Manuals
Save this manual to your list of manuals |
Page 102 highlights
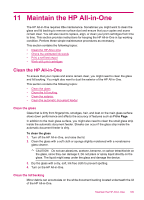
Chapter 10 Protocol (FoIP). You probably use a FoIP service (provided by your telephone company) if you: • Dial a special access code along with the fax number, or • Have an IP converter box that connects to the Internet and provides analog phone ports for the fax connection. NOTE: You can only send and receive faxes by connecting a phone cord to the 1LINE port on the back of the HP All-in-One. This means that your connection to the Internet must be done either through a converter box (which supplies regular analog phone jacks for fax connections) or your telephone company. The FoIP service might not work properly when the HP All-in-One is sending and receiving faxes at high speed (33600 bps). If you experience problems sending and receiving faxes, use a slower fax speed. You can do this by changing the Fax Speed setting from Fast (the default) to Medium. You should also check with your telephone company to make sure their Internet phone service supports faxing. If they do not support faxing, you might encounter intermittent problems when trying to send and receive faxes through the Internet. Related topics Set the fax speed Print reports You can set up the HP All-in-One to print error reports and confirmation reports automatically for each fax you send and receive. You can also manually print system reports as you need them; these reports provide useful system information about the HP All-in-One. By default, the HP All-in-One is set to print a report only if there is a problem with sending or receiving a fax. A confirmation message that indicates whether a fax was successfully sent appears briefly on the display after each transaction. This section contains the following topics: • Print fax confirmation reports • Print fax error reports • Print the fax log • Print other reports Print fax confirmation reports If you need printed confirmation that your faxes were successfully sent, follow these instructions to enable fax confirmation before sending any faxes. Select either On Fax Send or Send & Receive. The default fax confirmation setting is Off. This means that the HP All-in-One will not print a confirmation report for each fax sent or received. A confirmation message indicating whether a fax was successfully sent appears briefly on the display after each transaction. 100 Use the fax features
-
 1
1 -
2
-
3
-
4
-
5
-
6
-
7
-
8
-
9
-
10
-
11
-
12
-
13
-
14
-
15
-
16
-
17
-
18
-
19
-
20
-
21
-
22
-
23
-
24
-
25
-
26
-
27
-
28
-
29
-
30
-
31
-
32
-
33
-
34
-
35
-
36
-
37
-
38
-
39
-
40
-
41
-
42
-
43
-
44
-
45
-
46
-
47
-
48
-
49
-
50
-
51
-
52
-
53
-
54
-
55
-
56
-
57
-
58
-
59
-
60
-
61
-
62
-
63
-
64
-
65
-
66
-
67
-
68
-
69
-
70
-
71
-
72
-
73
-
74
-
75
-
76
-
77
-
78
-
79
-
80
-
81
-
82
-
83
-
84
-
85
-
86
-
87
-
88
-
89
-
90
-
91
-
92
-
93
-
94
-
95
-
96
-
 97
97 -
 98
98 -
 99
99 -
 100
100 -
 101
101 -
 102
102 -
 103
103 -
 104
104 -
 105
105 -
 106
106 -
 107
107 -
108
-
109
-
110
-
111
-
112
-
113
-
114
-
115
-
116
-
117
-
118
-
119
-
120
-
121
-
122
-
123
-
124
-
125
-
126
-
127
-
128
-
129
-
130
-
131
-
132
-
133
-
134
-
135
-
136
-
137
-
138
-
139
-
140
-
141
-
142
-
143
-
144
-
145
-
146
-
147
-
148
-
149
-
150
-
151
-
152
-
153
-
154
-
155
-
156
-
157
-
158
-
159
-
160
-
161
-
162
-
163
-
164
-
165
-
166
-
167
-
168
-
169
-
170
-
171
-
172
-
173
-
174
-
175
-
176
-
177
-
178
-
179
-
180
-
181
-
182
-
183
-
184
-
185
-
186
-
187
-
188
-
189
-
190
-
191
-
192
-
193
-
194
-
195
-
196
-
197
-
198
-
199
-
200
-
201
-
202
-
203
-
204
-
205
-
206
-
207
-
208
-
209
-
210
-
211
-
212
-
213
-
214
-
215
-
216
-
217
-
218
-
219
-
220
-
221
-
222
-
223
-
224
-
225
-
226
-
227
-
228
-
229
-
230
-
231
-
232
-
233
-
234
-
235
-
236
-
237
-
238
-
239
-
240
-
241
-
242
-
243
-
244
-
245
-
246
-
247
-
248
-
249
-
250
-
251
-
252
-
253
-
254
-
255
-
256
-
257
-
258
-
259
-
260
-
261
-
262
-
263
-
264
-
265
-
266
-
267
-
268
-
269
-
270
-
271
-
272
-
273
-
274
-
275
-
276
-
277
-
278
-
279
-
280
-
281
-
282
-
283
-
284
-
285
-
286
 |
 |
