HP Officejet v40 HP Officejet V Series - (English) Setup Poster - Page 2
Side 2 of 2 - cartridges
 |
View all HP Officejet v40 manuals
Add to My Manuals
Save this manual to your list of manuals |
Page 2 highlights
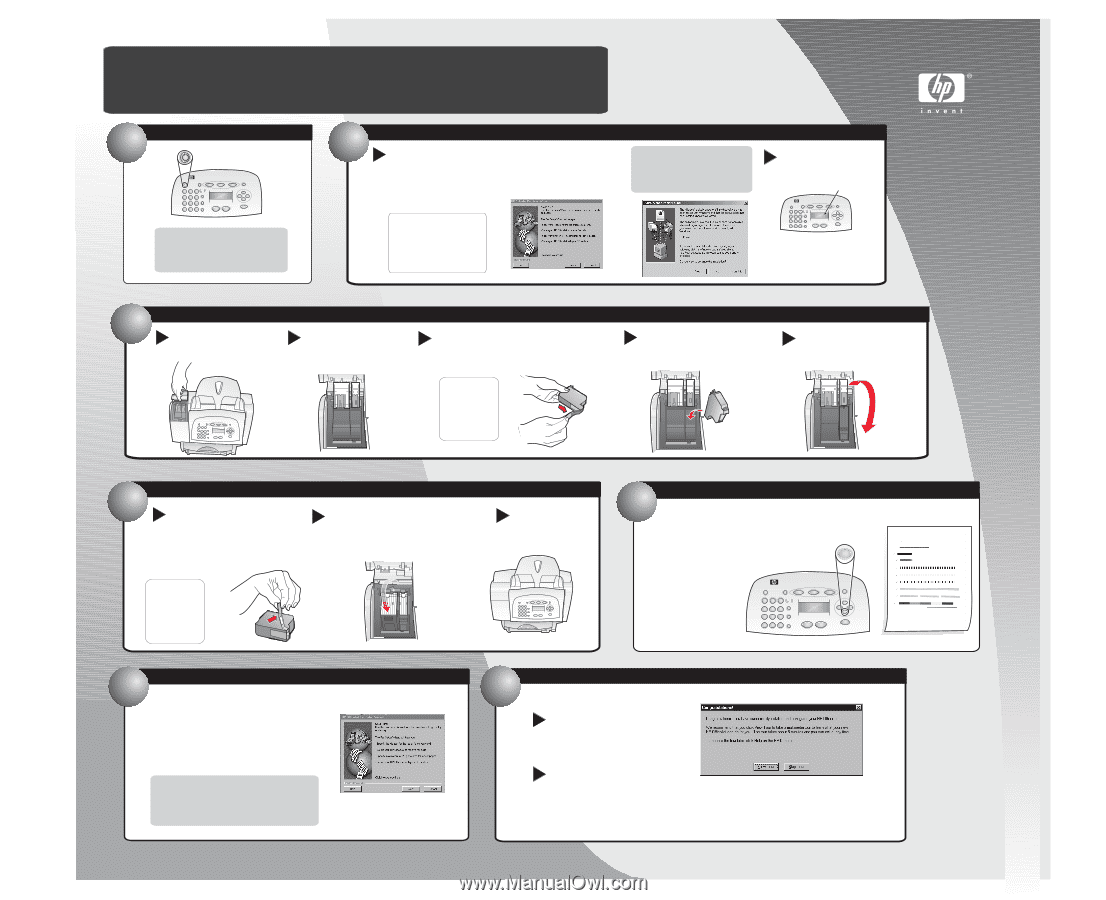
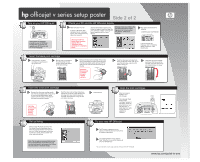
hp officejet v series setup poster Side 2 of 2 10. Turn on your HP OfficeJet On 11. Check your PC and the HP OfficeJet display a Make sure your PC is on. A series of Microsoft "New Hardware Found" messages appear. The configuration may take a few moments. 7 The Fax Setup Wizard appears next. Follow the steps to insert and align the print cartridges in steps 12 through 14 before beginning the Fax Setup Wizard. Windows 2000 Users: Before the Fax Setup Wizard, the Digital Signature Not Found screen may appear. Click Yes to continue. b The display should show the following: INSERT BLACK CARTRIDGE Note: Ignore the language prompt on your HP OfficeJet. During step 11, your PC will update your HP OfficeJet with the correct language. Important: If the Fax Setup Wizard does not appear, refer to "Additional Setup Information" in the Basic Guide. If you do not see this message, refer to "Additional Setup Information" in the Basic Guide. 12. Insert the black print cartridge a Open the door. The print- cartridge carriage moves to the access area. b Wait at least 10 seconds for the print carriage to stop moving. Raise both latches on the print carriage. c Remove the black print cartridge (thinner one) from its packaging and, being careful to touch only the black plastic, gently remove both the green pull tab and the blue tape covering the nozzles. CAUTION: Do not touch or remove the goldcolored contacts. d Push the black print cartridge firmly e Lower the right print-cartridge down into the slot on the right. As you latch down onto the top of the insert the cartridge, make sure the cartridge, and push down firmly label is facing you. until the latch locks into place. 13 Insert the color print cartridge a Remove the color print cartridge (wider b one) from its packaging and, being careful to touch only the black plastic, gently remove both the green pull tab and the blue tape covering the nozzles. Push the color print cartridge firmly down into the slot on the left. Lower the left printcartridge latch down onto the top of the cartridge, and push down firmly until the latch locks into place. c Close the door. CAUTION: Do not touch or remove the goldcolored contacts. 14 Align the print cartridges Make sure paper is loaded in your HP OfficeJet. The message "Press Enter to align cartridges" appears in the display. Press the Enter button (on your HP OfficeJet) to begin alignment. After a page prints, the alignment is complete. Enter 15. Set up faxing Return to your PC to set up faxing. The Fax Setup Wizard is the easiest way to enter the required header information for your fax. Follow the onscreen instructions to enter your name, phone number and other important settings. Note: We strongly recommend that you use the Fax Setup Wizard. If you wish, you can use the front panel to set up your fax. Follow the instructions in the Basic Guide. 16 Try your new HP OfficeJet a The Electronic registration screen appears. Follow the onscreen instructions to complete registration. b The Congratulations screen appears. Click "View Tour" to see all the features of your new HP OfficeJet. You can now print, scan, copy, and fax with your new HP OfficeJet. www.hp.com/go/all-in-one
-
 1
1 -
 2
2
 |
 |