HP P4000 9.0 HP StorageWorks P4000 SAN Solution Quick Start Guide - Page 1
HP P4000 Manual
 |
View all HP P4000 manuals
Add to My Manuals
Save this manual to your list of manuals |
Page 1 highlights
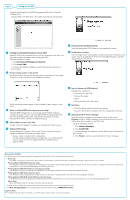
HP StorageWorks P4000 SAN Solution Quick Start Guide Step 1 Setting up the storage system 1 Install the storage system into a rack, if necessary. We recommend using the provided rail kit for installing the storage system in a rack. Safety information ! Due to the weight of the storage system, use two people to lift it into a rack. 2 Connect a keyboard and monitor (KVM) or connect to the iLO Integrated Management Console on the storage system. You will use this connection to assign a hostname and IP address to the storage system. (Optional) Connect a PC or laptop to the storage system's serial port using a null modem cable. On the PC or laptop attached to the storage system, open a session with a terminal emulation program, using the following settings: 19200, 8-N-1 3 Make certain that all the drives are seated and latched. 4 Connect the power cord(s) to the storage system and plug into the power source(s). Warning Use only the power cord(s) supplied with the storage system. Other power cords may not fit correctly and may cause problems maintaining power to the storage system. 5 Power on the storage system. or Step 1 Setting up the virtual SAN appliance Insert the HP StorageWorks P4000 VSA CD in the CD drive. The installer should launch automatically. Installing the P4000 VSA for ESX: 1 Select Install VSA for ESX. 2 Use the VI client to deploy the VSA OVF. 3 Configure the data disk: • Virtual device node must be SCSI (1:0) • Mode must be Independent > Persistent 4 Power on the VSA. 5 Set the IP address and host name of the VSA. 6 Repeat for each VSA. 7 After installation is complete, continue with Step 2, Setting up the network. Installing the P4000 VSA for Hyper-V: 1 Select Install VSA for Hyper-V. 2 After installation is complete, continue with Step 3, Setting up the SAN. Step 2 Setting up the network Prerequisites Before configuring the network settings on individual storage systems, have the following information ready: • Host names • IP addresses, subnet mask and gateway 1 Logging into the configuration interface Type start, and then press Enter. Press Enter again to log in. Use the tab key to move through the fields and menu options in the configuration interface. 2 Configuration interface main menu Tab to network TCP/IP settings and press Enter. 3 Selecting an interface to configure Tab to select the network interface that you want to configure (eth0, port1, or seth0) and press Enter. 4 Change the host name and set IP address Use the backspace key to delete the default host name and assign your own. Set the IP address, subnet mask and gateway. Best practice Manually assign IP addresses to the storage systems. Using DHCP to obtain an IP address is not recommended unless using reserved addresses. 5 Verify IP address Ping the IP address of the storage system from another host on the network to verify that it is operating correctly. 6 Repeat for each storage system. *AX696-96031* Printed in Puerto Rico Step 3
-
 1
1 -
 2
2
 |
 |