HP PageWide Managed Color MFP P77950 On-Site Installation Guide - Page 16
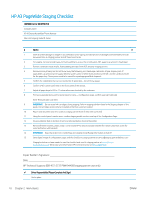
HP A3 Wide Staging Checklist
 |
View all HP PageWide Managed Color MFP P77950 manuals
Add to My Manuals
Save this manual to your list of manuals |
Page 16 highlights
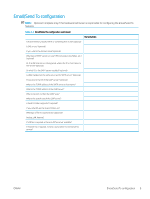
HP A3 PageWide Staging Checklist CARRIER Partner INFORMATION Company name HP A3 Device Assembler/Phone Number Main Unit staging model #, Serial # Device X 1 Note all visible damage on shipper's documentation prior signing and take photos of damage and Immediately send all documentation to staging partner and HP Command Center. 2 For staging, remove enough tape and foam padding to access the control panel, ADF, paper tray, and print head wiper. 3 Remove cardboard inside tray(s), foam padding and tape from ADF, and any shipping screws. 4 Remove during staging, but do not throw away the following: print head wiper restraints, stapler shipping lock (if applicable), cap protecting the supply delivery system, piece of white foam protecting the ADF, and the cardboard insert for the paper tray. These pieces need to be saved for repackaging and final shipment. 5 Confirm the stabilization bars are accounted for (if applicable - do not throw away). 6 Confirm LPDC (can be confirmed on the front panel of the device). 7 Adjust all paper trays to 8.5 to 11 unless otherwise directed by the customer 8 Firmware upgrade (Using control panel reports menu - Configuration page, confirm upgrade DateCode) Enter firmware date code here: 9 IMPORTANT: Do not install ink cartridges during staging. Perform staging activities listed in the Staging chapter of this guide. Ink cartridges should only be installed at the final customer location. 10 Report and document any error codes to staging partner (Even if they were corrected) 11 Using the control panel reports menu, confirm staging model number near top of the Configuration Page. 12 Ensure stabilizer feet on bottom of unit are retracted before moving the printer. 13 Remove finisher brackets, plastic wrap / corner board HP A3 device and pad / blanket for transit / place lock screw for external finisher with brackets 14 IMPORTANT: Does the Order Form, Config Page and staging model Badge information all match? 15 Send digital image of configuration pages and this checklist to staging partner at service@staging partnerdelivery.com Staging technician or team needs to scan the checklist and send to staging partner at server@stagin partnerdelivery.com Otherwise send information HP Command Center at [email protected] Copier Builder's Signature Date HP Technical Support: 888-472-2737 PIN# 94408 (staging partner use only) ✓ Driver Responsibility (Please Complete And Sign) Unit in place 10 Chapter 2 Worksheets ENWW
-
 1
1 -
2
-
3
-
4
-
5
-
6
-
7
-
8
-
9
-
10
-
 11
11 -
 12
12 -
 13
13 -
 14
14 -
 15
15 -
 16
16 -
 17
17 -
 18
18 -
 19
19 -
 20
20 -
 21
21 -
22
-
23
-
24
-
25
-
26
-
27
-
28
-
29
-
30
-
31
-
32
-
33
-
34
-
35
-
36
-
37
-
38
-
39
-
40
-
41
-
42
-
43
-
44
-
45
-
46
-
47
-
48
-
49
-
50
-
51
-
52
-
53
-
54
-
55
-
56
-
57
-
58
-
59
-
60
-
61
-
62
-
63
-
64
-
65
-
66
-
67
-
68
-
69
-
70
-
71
-
72
-
73
-
74
-
75
-
76
-
77
-
78
-
79
-
80
-
81
-
82
-
83
-
84
-
85
-
86
-
87
-
88
-
89
-
90
-
91
-
92
-
93
-
94
-
95
-
96
-
97
-
98
-
99
-
100
-
101
-
102
-
103
-
104
-
105
-
106
-
107
-
108
-
109
-
110
-
111
-
112
-
113
-
114
-
115
-
116
-
117
-
118
 |
 |
