HP Pavilion 13-r050ca HP Pavilion x2 Detachable Notebook PC HP Split x2 Detach - Page 76
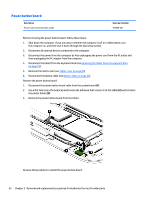
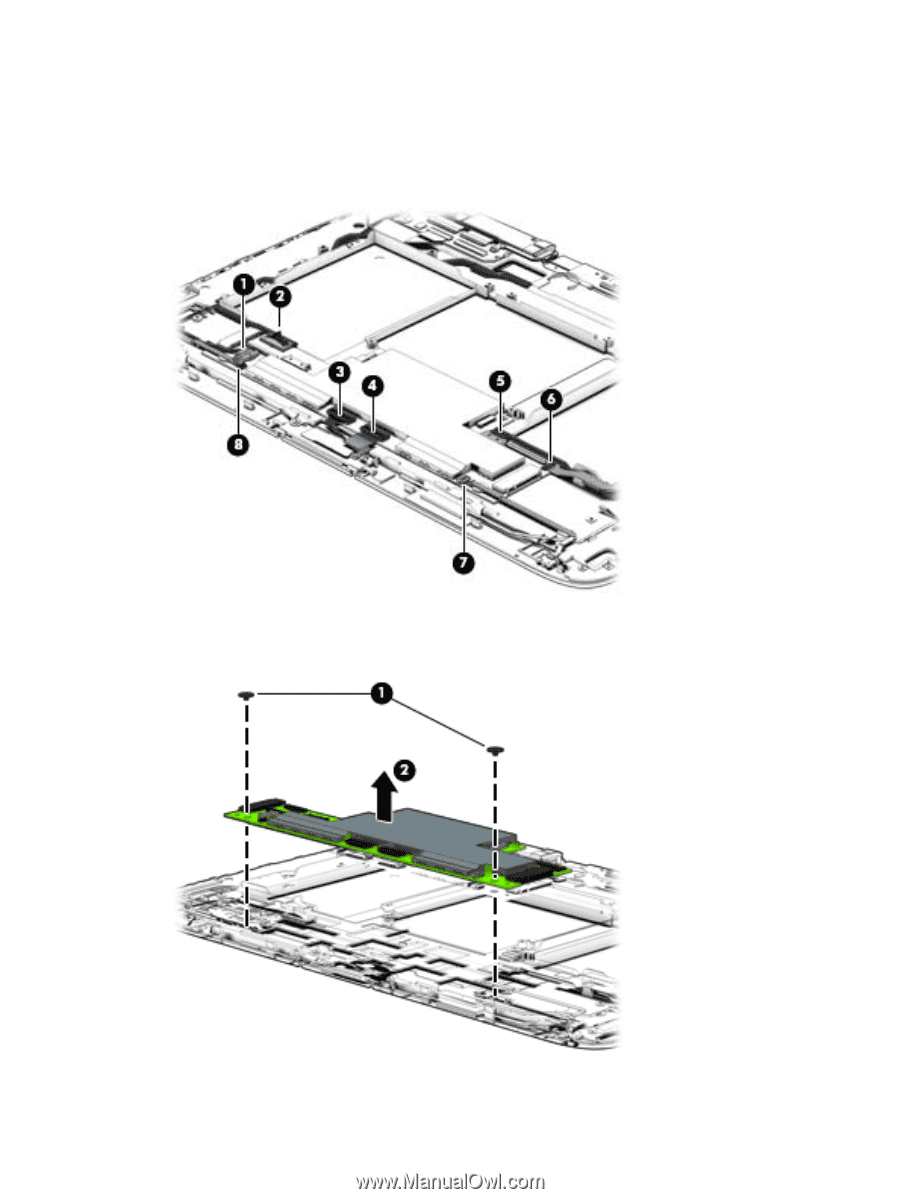
Lift the system board, out of the tablet.
 |
View all HP Pavilion 13-r050ca manuals
Add to My Manuals
Save this manual to your list of manuals |
Page 76 highlights
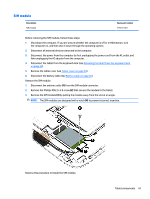
(5): Power connector/SIM board cable (6): Power connector/SIM board cable (7): Power button board cable (8): Volume board cable 2. Remove the two Phillips PM 2.0x3.0 screws (1) that secure the system board to the tablet. 3. Lift the system board (2) out of the tablet. Reverse this procedure to install the system board. 66 Chapter 5 Removal and replacement procedures for Authorized Service Provider parts
-
 1
1 -
2
-
3
-
4
-
5
-
6
-
7
-
8
-
9
-
10
-
11
-
12
-
13
-
14
-
15
-
16
-
17
-
18
-
19
-
20
-
21
-
22
-
23
-
24
-
25
-
26
-
27
-
28
-
29
-
30
-
31
-
32
-
33
-
34
-
35
-
36
-
37
-
38
-
39
-
40
-
41
-
42
-
43
-
44
-
45
-
46
-
47
-
48
-
49
-
50
-
51
-
52
-
53
-
54
-
55
-
56
-
57
-
58
-
59
-
60
-
61
-
62
-
63
-
64
-
65
-
66
-
67
-
68
-
69
-
70
-
 71
71 -
 72
72 -
 73
73 -
 74
74 -
 75
75 -
 76
76 -
 77
77 -
 78
78 -
 79
79 -
 80
80 -
 81
81 -
82
-
83
-
84
-
85
-
86
-
87
-
88
-
89
-
90
-
91
-
92
-
93
-
94
-
95
 |
 |
(5):
Power connector/SIM board cable
(6):
Power connector/SIM board cable
(7):
Power button board cable
(8):
Volume board cable
2.
Remove the two Phillips PM 2.0x3.0 screws
(1)
that secure the system board to the tablet.
3.
Lift the system board
(2)
out of the tablet.
Reverse this procedure to install the system board.
66
Chapter 5
Removal and replacement procedures for Authorized Service Provider parts