HP Pavilion 15-ab100 Maintenance and Service Guide - Page 66
Discrete graphics, Remove the heat sink
 |
View all HP Pavilion 15-ab100 manuals
Add to My Manuals
Save this manual to your list of manuals |
Page 66 highlights
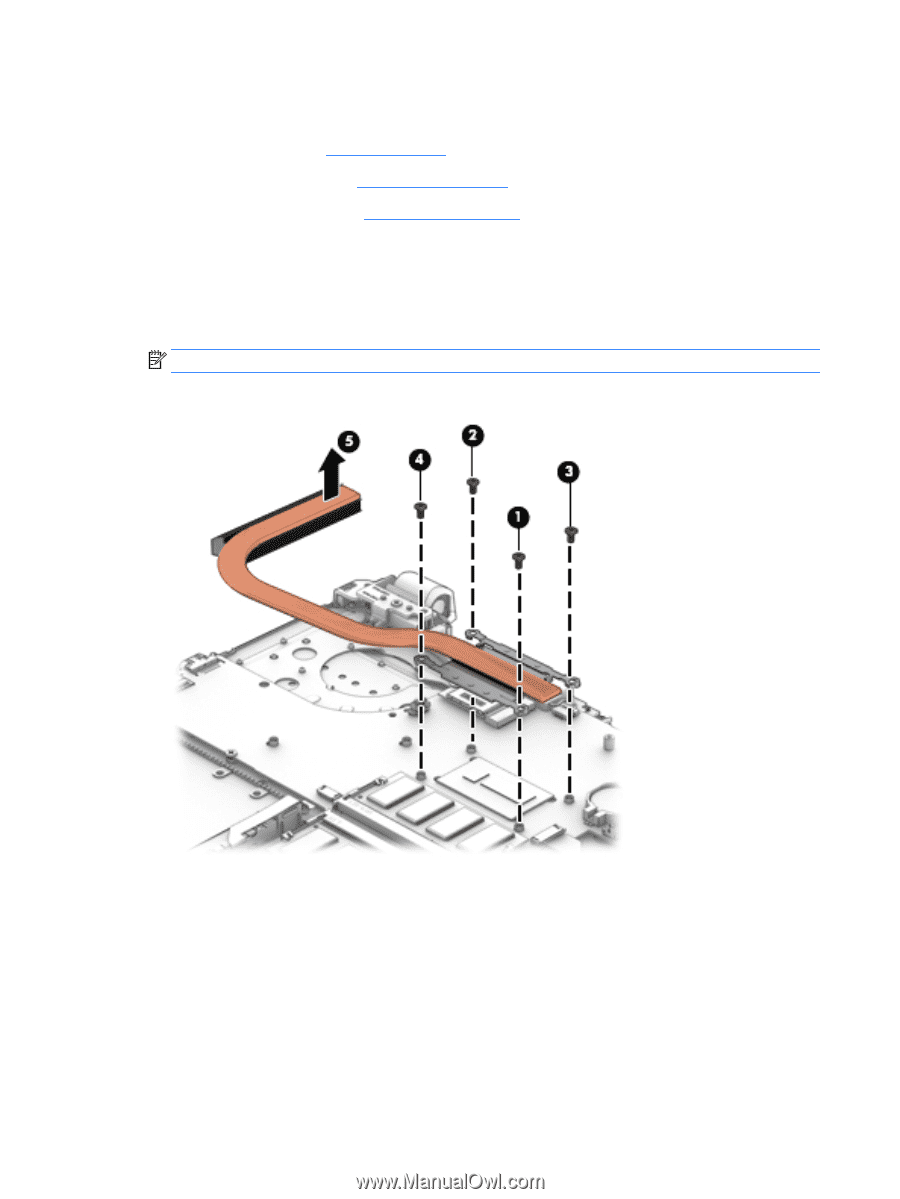
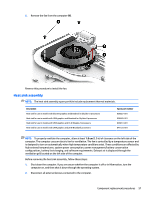
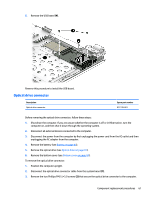
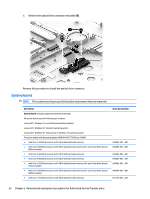
3. Disconnect the power from the computer by first unplugging the power cord from the AC outlet and then unplugging the AC adapter from the computer. 4. Remove the battery (see Battery on page 40). 5. Remove the optical drive (see Optical drive on page 41). 6. Remove the bottom cover (see Bottom cover on page 44). To remove the heat sink assembly: 1. Position the system board upside down. 2. If you have a model with UMA graphics, in the order indicated, remove the four Phillips PM2.0×3.0 screws (1) - (4) that secure the heat sink to the system board. NOTE: The heat sink on models with discrete graphics have two additional screws. 3. Remove the heat sink (5) from the system board. ● Discrete graphics: Thermal paste is used on the processor and associated heat sink area (1)(2), as well as the graphics chip and associated heat sink area (3)(4). 58 Chapter 6 Removal and replacement procedures for Authorized Service Provider parts
-
 1
1 -
2
-
3
-
4
-
5
-
6
-
7
-
8
-
9
-
10
-
11
-
12
-
13
-
14
-
15
-
16
-
17
-
18
-
19
-
20
-
21
-
22
-
23
-
24
-
25
-
26
-
27
-
28
-
29
-
30
-
31
-
32
-
33
-
34
-
35
-
36
-
37
-
38
-
39
-
40
-
41
-
42
-
43
-
44
-
45
-
46
-
47
-
48
-
49
-
50
-
51
-
52
-
53
-
54
-
55
-
56
-
57
-
58
-
59
-
60
-
 61
61 -
 62
62 -
 63
63 -
 64
64 -
 65
65 -
 66
66 -
 67
67 -
 68
68 -
 69
69 -
 70
70 -
 71
71 -
72
-
73
-
74
-
75
-
76
-
77
-
78
-
79
-
80
-
81
-
82
-
83
-
84
-
85
-
86
-
87
-
88
-
89
-
90
-
91
-
92
-
93
-
94
-
95
-
96
-
97
-
98
-
99
-
100
-
101
-
102
-
103
-
104
-
105
-
106
-
107
-
108
-
109
-
110
-
111
-
112
-
113
-
114
-
115
-
116
-
117
-
118
-
119
-
120
-
121
-
122
-
123
-
124
-
125
-
126
-
127
-
128
-
129
-
130
-
131
-
132
-
133
-
134
-
135
-
136
-
137
-
138
-
139
-
140
-
141
-
142
 |
 |