HP Pavilion TouchSmart 15-b100 HP Pavilion Sleekbook 15 and HP Pavilion Ultrab - Page 77
and lift the UMA graphics heat sink, Loosen the captive screws
 |
View all HP Pavilion TouchSmart 15-b100 manuals
Add to My Manuals
Save this manual to your list of manuals |
Page 77 highlights
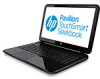
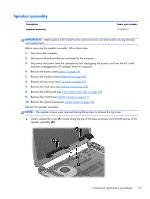
b. Thoroughly clean the thermal connections (1), (3) on the system board and the heat sink (2), (4) before replacing a heat sink onto a system board. Continue to step 3. c. Loosen the captive screws (1) and lift the UMA graphics heat sink (2) from the system board. d. Thoroughly clean the thermal connections (1) on the system board and the heat sink (2) before replacing a heat sink onto a system board. 3. Reverse this procedure to replace the heat sink. Replace the thermal material that ships with the replacement heat sink. Component replacement procedures 69
-
 1
1 -
2
-
3
-
4
-
5
-
6
-
7
-
8
-
9
-
10
-
11
-
12
-
13
-
14
-
15
-
16
-
17
-
18
-
19
-
20
-
21
-
22
-
23
-
24
-
25
-
26
-
27
-
28
-
29
-
30
-
31
-
32
-
33
-
34
-
35
-
36
-
37
-
38
-
39
-
40
-
41
-
42
-
43
-
44
-
45
-
46
-
47
-
48
-
49
-
50
-
51
-
52
-
53
-
54
-
55
-
56
-
57
-
58
-
59
-
60
-
61
-
62
-
63
-
64
-
65
-
66
-
67
-
68
-
69
-
70
-
71
-
 72
72 -
 73
73 -
 74
74 -
 75
75 -
 76
76 -
 77
77 -
 78
78 -
 79
79 -
 80
80 -
 81
81 -
 82
82 -
83
-
84
-
85
-
86
-
87
-
88
-
89
-
90
-
91
-
92
-
93
-
94
-
95
-
96
-
97
-
98
-
99
-
100
-
101
-
102
-
103
-
104
-
105
-
106
-
107
-
108
-
109
-
110
-
111
-
112
-
113
 |
 |

b.
Thoroughly clean the thermal connections
(1), (3)
on the system board and the heat sink
(2),
(4)
before replacing a heat sink onto a system board. Continue to step 3.
c.
Loosen the captive screws
(1)
and lift the UMA graphics heat sink
(2)
from the system board.
d.
Thoroughly clean the thermal connections
(1)
on the system board and the heat sink
(2)
before replacing a heat sink onto a system board.
3.
Reverse this procedure to replace the heat sink. Replace the thermal material that ships with the
replacement heat sink.
Component replacement procedures
69