HP Pavilion t3700 Getting Started Guide - Page 106
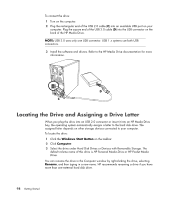
Locating the Drive and Assigning a Drive Letter
 |
View all HP Pavilion t3700 manuals
Add to My Manuals
Save this manual to your list of manuals |
Page 106 highlights
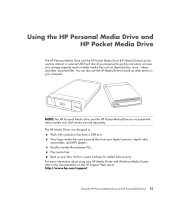
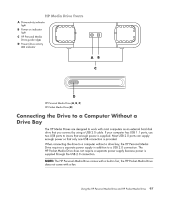
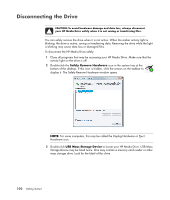
To connect the drive: 1 Turn on the computer. 2 Plug the rectangular end of the USB 2.0 cable (C) into an available USB port on your computer. Plug the square end of the USB 2.0 cable (D) into the USB connector on the back of the HP Media Drive. NOTE: USB 2.0 uses only one USB connector. USB 1.x systems use both USB connectors. 3 Install the software and drivers. Refer to the HP Media Drive documentation for more information. Locating the Drive and Assigning a Drive Letter When you plug the drive into an USB 2.0 connector or insert it into an HP Media Drive bay, the operating system automatically assigns a letter to the hard disk drive. The assigned letter depends on other storage devices connected to your computer. To locate the drive: 1 Click the Windows Start Button on the taskbar. 2 Click Computer. 3 Select the drive under Hard Disk Drives or Devices with Removable Storage. The default volume name of this drive is HP Personal Media Drive or HP Pocket Media Drive. You can rename the drive in the Computer window by right-clicking the drive, selecting Rename, and then typing in a new name. HP recommends renaming a drive if you have more than one external hard disk drive. 98 Getting Started
-
 1
1 -
2
-
3
-
4
-
5
-
6
-
7
-
8
-
9
-
10
-
11
-
12
-
13
-
14
-
15
-
16
-
17
-
18
-
19
-
20
-
21
-
22
-
23
-
24
-
25
-
26
-
27
-
28
-
29
-
30
-
31
-
32
-
33
-
34
-
35
-
36
-
37
-
38
-
39
-
40
-
41
-
42
-
43
-
44
-
45
-
46
-
47
-
48
-
49
-
50
-
51
-
52
-
53
-
54
-
55
-
56
-
57
-
58
-
59
-
60
-
61
-
62
-
63
-
64
-
65
-
66
-
67
-
68
-
69
-
70
-
71
-
72
-
73
-
74
-
75
-
76
-
77
-
78
-
79
-
80
-
81
-
82
-
83
-
84
-
85
-
86
-
87
-
88
-
89
-
90
-
91
-
92
-
93
-
94
-
95
-
96
-
97
-
98
-
99
-
100
-
 101
101 -
 102
102 -
 103
103 -
 104
104 -
 105
105 -
 106
106 -
 107
107 -
 108
108 -
 109
109 -
 110
110 -
 111
111 -
112
-
113
-
114
-
115
-
116
-
117
-
118
-
119
-
120
-
121
-
122
-
123
-
124
-
125
-
126
-
127
-
128
-
129
-
130
-
131
-
132
-
133
-
134
-
135
-
136
-
137
-
138
-
139
-
140
 |
 |
