HP Pavilion xh395 HP Pavilion Notebook - Reference Guide - Page 21
To turn on the computer, To set up Windows
 |
View all HP Pavilion xh395 manuals
Add to My Manuals
Save this manual to your list of manuals |
Page 21 highlights
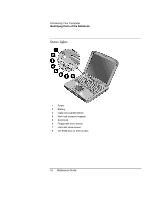
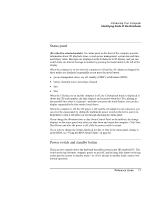
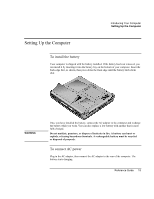
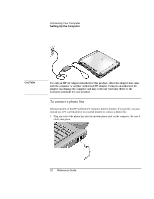
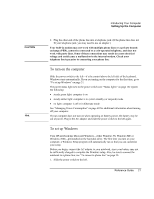
CAUTION Hint Introducing Your Computer Setting Up the Computer 2. Plug the other end of the phone line into a telephone jack. (If the phone line does not fit your telephone jack, you may need to use an adapter.) Your built-in modem may not work with multiple phone lines or a private branch exchange (PBX), cannot be connected to a coin-operated telephone, and does not work with party lines. Some of these connections may result in excess electrical voltage and could cause a malfunction in the internal modem. Check your telephone line type prior to connecting your phone line. To turn on the computer Slide the power switch to the left-it's the control above the left side of the keyboard. Windows starts automatically. If you are turning on the computer for the first time, go to "To set up Windows" on page 21. The power status light next to the power switch (see "Status lights" on page 16) reports the following: = steady green light: computer is on = steady amber light: computer is in system standby (or suspend) mode = no light: computer is off or in hibernate mode See "Managing Power Consumption" on page 48 for additional information about turning off your computer. If your computer does not turn on when operating on battery power, the battery may be out of power. Plug in the AC adapter and slide the power switch to the left again. To set up Windows Your HP notebook has Microsoft Windows-either Windows 98, Windows ME or Windows 2000-preinstalled on the hard disk drive. The first time you turn on your computer, a Windows Setup program will automatically run so that you can customize your setup. Before you begin, connect the AC adapter to your notebook, since your battery may not be sufficiently charged to complete the Windows setup. Also, be sure to connect the notebook to a phone line; see "To connect a phone line" on page 20. 1. Slide the power switch to the left. Reference Guide 21
-
 1
1 -
2
-
3
-
4
-
5
-
6
-
7
-
8
-
9
-
10
-
11
-
12
-
13
-
14
-
15
-
 16
16 -
 17
17 -
 18
18 -
 19
19 -
 20
20 -
 21
21 -
 22
22 -
 23
23 -
 24
24 -
 25
25 -
 26
26 -
27
-
28
-
29
-
30
-
31
-
32
-
33
-
34
-
35
-
36
-
37
-
38
-
39
-
40
-
41
-
42
-
43
-
44
-
45
-
46
-
47
-
48
-
49
-
50
-
51
-
52
-
53
-
54
-
55
-
56
-
57
-
58
-
59
-
60
-
61
-
62
-
63
-
64
-
65
-
66
-
67
-
68
-
69
-
70
-
71
-
72
-
73
-
74
-
75
-
76
-
77
-
78
-
79
-
80
-
81
-
82
-
83
-
84
-
85
-
86
-
87
-
88
-
89
-
90
-
91
-
92
-
93
-
94
-
95
-
96
-
97
-
98
-
99
-
100
-
101
-
102
-
103
-
104
-
105
-
106
-
107
-
108
-
109
-
110
-
111
-
112
-
113
-
114
-
115
-
116
-
117
-
118
-
119
-
120
-
121
-
122
-
123
-
124
-
125
-
126
-
127
-
128
-
129
-
130
-
131
-
132
-
133
-
134
-
135
-
136
-
137
-
138
-
139
-
140
-
141
-
142
-
143
-
144
-
145
-
146
-
147
-
148
-
149
-
150
-
151
-
152
-
153
 |
 |