HP Photosmart 230 HP Photosmart 230 series printers - (Multiple Languages) Set - Page 1
HP Photosmart 230 Manual
 |
View all HP Photosmart 230 manuals
Add to My Manuals
Save this manual to your list of manuals |
Page 1 highlights
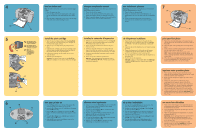
hp photosmart 230 setup guide installation installatiegids 1 (a) (b) (c) (d) (e) (f) 2 (j) (i) (h) (g) unpack your printer a. Printer b. Power adapter c. Faceplates d. Print cartridge (HP #57) e. Software and Printer Help on CD f. Setup Guide g. Software Setup & Product Support booklet h. Basics Guide i. Sample photo paper j. Sample index cards attach the faceplate 1. Select the faceplate that shows the language you want to use. 2. Position the printer so it is facing you. 3. Hold the faceplate in position above the printer, slightly angled away from you. 4. Slide the rear tabs into the rear of the recessed area. 5. Bend the sides of the faceplate very slightly, and snap in the side and front tabs. 3 (d) (a) (b) (c) *Q3000-90154* Q3000-90154 connect the power adapter Make sure you place the printer at least 25 cm (10 inches) away from any obstruction to allow space for the paper to move during printing. 1. Insert the round end of the power adapter (a) into the power adapter connection on the back of your printer. 2. Connect the adapter plug (b) for your area to the power adapter. 3. Plug the power adapter (c) into a working electrical outlet. Important: Make sure the power adapter cord does not block the rear paper path (d). déballez votre imprimante a. Imprimante b. Adaptateur secteur c. Façades d. Cartouche d'impression (HP n° 57) e. CD-ROM contenant le logiciel et l'aide en ligne f. Guide d'installation g. Brochure Configuration du logiciel et assistance produit h. Guide des fonctions de base i. Echantillon de papier photo j. Echantillon de planches-contact fixez la façade 1. Choisissez la façade correspondant à votre langue de travail. 2. Placez-vous face à l'imprimante. 3. Maintenez la façade au-dessus de l'imprimante, légèrement inclinée vers l'avant. 4. Insérez les onglets arrière de la façade dans les encoches prévues à cet effet. 5. Courbez très légèrement les bords de la façade et enclenchez les onglets avant et latéraux. branchez l'adaptateur secteur Assurez-vous que votre imprimante soit au moins située à 25 cm de tout obstacle susceptible de gêner la trajectoire du papier lors de l'impression. 1. Insérez l'extrémité arrondie de l'adaptateur secteur (a) dans la prise réservée à cet effet, à l'arrière de l'imprimante. 2. Enclenchez l'adaptateur (b) propre à votre pays sur l'adaptateur secteur. 3. Branchez l'adaptateur secteur (c) sur une prise de courant en bon état de marche. Important : Assurez-vous que le cordon d'alimentation de l'adaptateur secteur ne bloque pas la trajectoire du papier à l'arrière de l'imprimante (d). de printer uitpakken a. Printer b. Netadapter c. Frontjes d. Inktpatroon (HP #57) e. Software en Help bij printer op cd-rom f. Installatiegids g. Boekje Software-installatie & productondersteuning h. Beknopte handleiding i. Voorbeeldfotopapier j. Voorbeeldindexkaarten het frontje bevestigen 1. Neem het frontje met de taal die u wilt gebruiken. 2. Plaats de printer met de voorzijde naar u gericht. 3. Houd het frontje, enigszins van u af gericht, boven de printer. 4. Schuif de achterste nokjes in de achterzijde van het verzonken gedeelte. 5. Buig het frontje licht om aan de zijkanten en schuif de nokjes aan de zijkant en de voorkant op hun plaats. de netadapter aansluiten Plaats de printer minimaal 25 cm bij andere objecten vandaan, zodat er voldoende ruimte is voor het papier. 1. Steek het ronde eind van de netadapter (a) in de hiervoor bestemde aansluiting achter op de printer. 2. Steek de adapterstekker (b) voor uw gebied in de netadapter. 3. Steek de netadapter (c) in een werkend stopcontact. Belangrijk: zorg ervoor dat het snoer van de netadapter de papierbaan aan de achterzijde (d) niet blokkeert. www.hp.com/cposupport/loc/regional.html See your Basics Guide for more information on printing your digital photos and using your printer. In some countries this guide is in CD format instead of print. See your Software Setup & Product Support booklet for instructions on installing the software for this printer on your computer or to find information on contacting HP. See your HP Photosmart Printer Help for information on using this printer with your computer, including saving photos from a memory card to the computer. Printed in Germany 06/02 • Printed on recycled paper © 2002 Hewlett-Packard Company Windows is a registered trademark of Microsoft Corporation Macintosh is a registered trademark of Apple Computer, Inc. www.hp.com/cposupport/loc/regional.html Pour de plus amples informations sur les procédures d'impression de vos photos numériques et sur l'utilisation de votre imprimante, consultez le Guide des fonctions de base. Dans certains pays, ce guide n'est pas disponible au format papier mais sur CD-ROM. Pour savoir comment installer le logiciel de l'imprimante sur votre ordinateur ou comment contacter hp, reportezvous à la brochure Configuration du logiciel et assistance produit. Consultez l'aide en ligne de l'imprimante hp photosmart pour de plus amples informations sur l'utilisation de cette imprimante avec votre ordinateur et notamment sur la procédure à suivre pour enregistrer les photos d'une carte mémoire sur un ordinateur. Imprimé en Allemagne 02/06 •Imprimé sur papier recyclé © 2002 Hewlett-Packard Company Windows est une marque déposée de Microsoft Corporation. Macintosh est une marque déposée d'Apple Computer, Inc. www.hp.com/cposupport/loc/regional.html Raadpleeg de Beknopte handleiding voor meer informatie over het afdrukken van digitale foto's en het gebruik van de printer. In sommige landen wordt deze handleiding alleen op cd-rom geleverd. Raadpleeg het boekje Software-installatie & productondersteuning voor aanwijzingen over het installeren van de software voor de printer op uw computer of voor informatie over het contact opnemen met HP. Raadpleeg de Help bij de HP Photosmart-printer voor informatie over het gebruik van de printer bij uw computer, bijvoorbeeld voor het op de computer opslaan van foto's vanaf een geheugenkaart. Gedrukt in Duitsland, juni 2002 • Gedrukt op gerecycled papier © 2002 Hewlett-Packard Company Windows is een geregistreerd handelsmerk van Microsoft Corporation Macintosh is een geregistreerd handelsmerk van Apple Computer, Inc.
-
 1
1 -
 2
2
 |
 |