HP Photosmart 230 HP Photosmart 230 series printers - (Multiple Languages) Set - Page 2
de inktpatroon installeren
 |
View all HP Photosmart 230 manuals
Add to My Manuals
Save this manual to your list of manuals |
Page 2 highlights
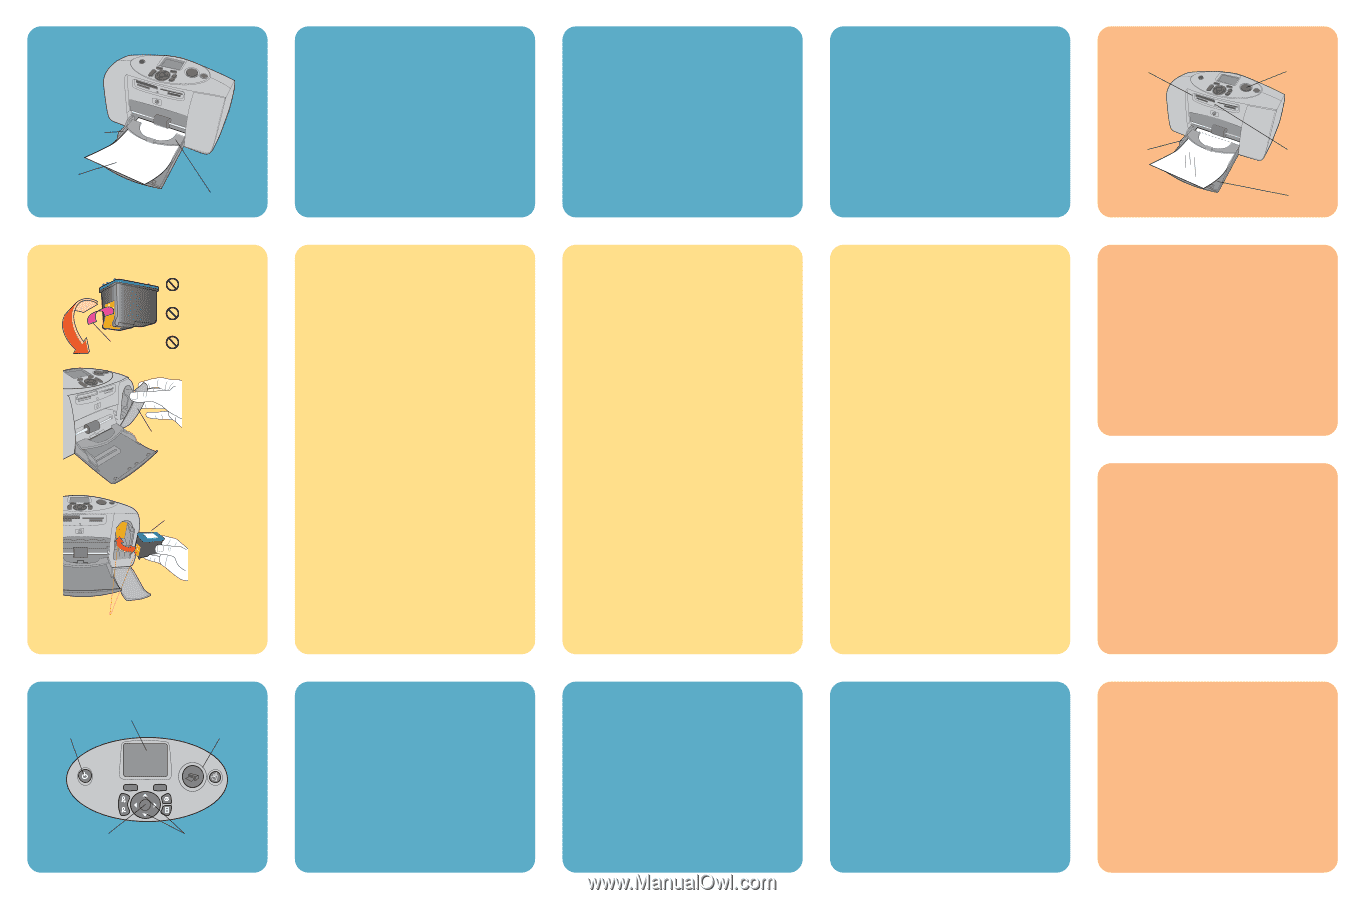
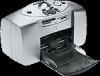
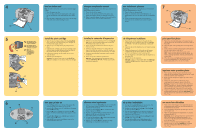
4 (c) load an index card chargez une planche-contact een indexkaart plaatsen 7 Note: The index card will be used to print a calibration page Remarque : La planche-contact sera utilisée pour imprimer une Opmerking: de indexkaart wordt gebruikt voor het afdrukken in step 6. page d'étalonnage à l'étape 6. van een kalibratiepagina in stap 6. (c) (e) 1. Open the paper tray door. 1. Ouvrez le volet du bac papier. 1. Open de klep van de papierlade. 2. Place an index card from the sample pack on the paper 2. Placez une des planches-contact fournies dans le bac 2. Plaats een indexkaart uit het voorbeeldpakket in de tray (a) and slide the card underneath the output guide papier (a) et faîtes-la glisser sous le guide de sortie (b). papier-lade (a) en schuif de kaart onder de uitvoergeleider (b). 3. Réglez le guide de largeur du papier (c) contre le bord de (b). 3. Move the paper width guide (c) to fit close to the left edge la planche-contact, sans faire plier cette dernière. 3. Schuif de papierbreedtegeleider (c) dicht tegen de of the index card without bending the card. linkerzijde van de indexkaart aan zonder de kaart te buigen. (b) (d) (a) (b) (a) 5 (a) COPIES ZOOM SIZE OK CANCEL MENU Do not touch the ink nozzles or the copper contacts! Ne touchez ni les buses d'encre ni les contacts en cuivre ! Raak de inktsproeiers en de koperen contactpunten niet aan! (b) OOM PRINT CANCEL MENU (c) (d) 6 (b) (a) (e) (d) (c) install the print cartridge 1. Open the print cartridge package. Pull the pink pull-tab (a) to remove the clear tape from the print cartridge. Do not remove the copper contacts. 2. Open the print cartridge door (b) by pulling the door down. 3. Insert the print cartridge (c) into the print cartridge cradle with the copper contacts (d) facing toward the inside of the printer and the ink nozzles facing down. 4. Push the print cartridge into the cradle until you feel it snap into place. 5. Close the print cartridge door. Important: Your printer works only with the HP #57 tricolor print cartridge. Do not use any other print cartridge. turn your printer on 1. Press the Power button (a) on the top of the printer. The Select Language menu appears on the LCD (b). 2. Using the Up or Down arrow (c), highlight your language. Press the OK button (d). 3. Press the Up arrow to highlight Yes and press the OK button. The Select Country/Region menu appears on the LCD. 4. Using the Up or Down arrow, highlight your country or region. Press the OK button. 5. Press the OK button to print a calibration page on the previously loaded index card. installez la cartouche d'impression 1. Déballez la cartouche d'impression. Tirez sur la languette rose (a) pour retirer la bande adhésive de la cartouche. Ne retirez pas les contacts en cuivre. 2. Ouvrez le volet de la cartouche d'impression (b) en le tirant vers le bas. 3. Insérez la cartouche d'impression (c) dans le berceau réservé à cet effet, les contacts en cuivre (d) tournés vers l'intérieur de l'imprimante et les buses d'encre vers le bas. 4. Poussez la cartouche dans le berceau jusqu'à ce qu'elle s'enclenche. 5. Fermez le volet de la cartouche d'impression. Important : Votre imprimante ne fonctionne qu'avec la cartouche trichromique HP n°57. N'utilisez aucune autre cartouche d'impression. allumez votre imprimante 1. Appuyez sur le bouton Alimentation (a) situé sur la façade de l'imprimante. Le menu de sélection de la langue apparaît sur l'écran LCD (b). 2. A l'aide des flèches Haut ou Bas (c), sélectionnez votre langue. Appuyez sur OK (d). 3. Appuyez sur la flèche Haut pour sélectionner Oui, puis appuyez sur OK. Le menu de sélection de votre pays/région s'affiche sur l'écran LCD. 4. A l'aide des flèches Haut ou Bas, sélectionnez votre pays ou votre région. Appuyez sur OK. 5. Appuyez sur le bouton OK pour imprimer une page d'étalonnage sur la planche-contact chargée. de inktpatroon installeren 1. Open het pak met de inktpatroon. Verwijder de doorzichtige tape van de inktpatroon door aan het roze lipje (a) te trekken. Verwijder de koperkleurige contactpunten niet. 2. Open het vak met de inktpatroon door de klep (b) omlaag te trekken. 3. Plaats de inktpatroon (c) in de houder met de koperen contactpunten (d) naar de binnenkant van de printer gericht en de inktsproeiers naar beneden gericht. 4. Duw de inktpatroon in de houder totdat de inktpatroon op zijn plaats klikt. 5. Sluit het vak met de inktpatroon. Belangrijk: u kunt voor deze printer alleen de driekleurige inktpatroon HP #57 gebruiken. Gebruik geen andere inktpatroon. de printer inschakelen 1. Druk op de knop Aan/Uit (a) boven op de printer. Het menu Taal verschijnt op het LCD-scherm (b). 2. Markeer uw taal met de pijl omhoog of de pijl omlaag (c). Druk op de knop OK (d). 3. Druk op de pijl omhoog om de optie Ja te markeren en druk op de knop OK. Het menu Land/regio selecteren verschijnt op het LCD-scherm. 4. Markeer uw land of regio met de pijl omhoog of de pijl omlaag. Druk op de knop OK. 5. Druk op de knop OK om een kalibratiepagina af te drukken op de indexkaart die u eerder hebt geladen. print your first photo 1. Place a few sheets of photo paper in the paper tray (a) with the glossy side up and the tab closest to the inside of the printer. 2. Move the paper width guide (b) close to the edge of the paper. 3. Insert a memory card that contains digital camera photos into the correct memory card slot (c). Note: Push the memory card into the printer until it stops-it does not insert all the way into the printer. The memory card light (d) flashes while the printer reads the memory card. 4. When the memory card light stops flashing and remains on, press the Print button (e). The first photo on the memory card prints at 10 x 15 cm (4 x 6 inch). imprimez votre première photo 1. Placez quelques feuilles de papier photo dans le bac papier (a), la face brillante orientée vers le haut et l'onglet inséré au maximum dans l'imprimante. 2. Réglez le guide de largeur du papier (b) contre le bord des feuilles. 3. Insérez une carte mémoire contenant des photos numériques dans le logement réservé à cet effet (c). Remarque : Poussez la carte mémoire dans l'imprimante jusqu'à ce qu'elle bute ; elle ne s'insère pas entièrement dans l'imprimante. Le voyant de la carte mémoire (d) clignote pendant que l'imprimante lit la carte mémoire. 4. Lorsque le voyant de la carte mémoire cesse de clignoter et reste allumé, appuyez sur le bouton Imprimante (e). La première photo de la carte mémoire s'imprime au format 10 x 15 cm. uw eerste foto afdrukken 1. Plaats enkele vellen fotopapier in de papierlade (a) met de glanzende zijde naar boven en de tab het dichts bij de binnenkant van de printer. 2. Schuif de papierbreedtegeleider (b) dicht tegen de rand van het papier aan. 3. Plaats een geheugenkaart met digitale foto's in de juiste geheugenkaartsleuf (c). Opmerking: duw de geheugenkaart in de printer tot deze stopt. De kaart gaat niet helemaal de printer in. De indicator voor de geheugenkaart (d) knippert terwijl de printer de kaart leest. 4. Wanneer de indicator stopt met knipperen en blijft branden, drukt u op de knop Afdrukken (e). De eerste foto op de geheugenkaart heeft een afmeting van 10 x 15 cm.
-
 1
1 -
 2
2
 |
 |