HP Photosmart 7510 User Guide - Page 30
Replace the cartridges
 |
View all HP Photosmart 7510 manuals
Add to My Manuals
Save this manual to your list of manuals |
Page 30 highlights
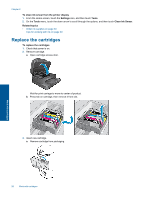
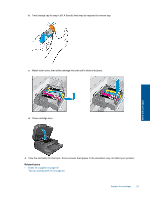
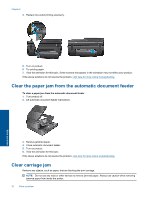
Chapter 8 To clean ink smear from the printer display 1. From the Home screen, touch the Settings icon, and then touch Tools. 2. On the Tools menu, touch the down arrow to scroll through the options, and then touch Clean Ink Smear. Related topics • Order ink supplies on page 30 Tips for working with ink on page 30 Replace the cartridges To replace the cartridges 1. Check that power is on. 2. Remove cartridge. a. Open cartridge access door. Wait for print carriage to move to center of product. b. Press tab on cartridge, then remove it from slot. 3. Insert new cartridge. a. Remove cartridge from packaging. Work with cartridges 28 Work with cartridges
-
 1
1 -
2
-
3
-
4
-
5
-
6
-
7
-
8
-
9
-
10
-
11
-
12
-
13
-
14
-
15
-
16
-
17
-
18
-
19
-
20
-
21
-
22
-
23
-
24
-
 25
25 -
 26
26 -
 27
27 -
 28
28 -
 29
29 -
 30
30 -
 31
31 -
 32
32 -
 33
33 -
 34
34 -
 35
35 -
36
-
37
-
38
-
39
-
40
-
41
-
42
-
43
-
44
-
45
-
46
-
47
-
48
-
49
-
50
-
51
-
52
-
53
-
54
-
55
-
56
-
57
-
58
-
59
-
60
 |
 |

To clean ink smear from the printer display
1.
From the Home screen, touch the
Settings
icon, and then touch
Tools
.
2.
On the
Tools
menu, touch the down arrow to scroll through the options, and then touch
Clean Ink Smear
.
Related topics
•
Order ink supplies on page 30
Tips for working with ink on page 30
Replace the cartridges
To replace the cartridges
1.
Check that power is on.
2.
Remove cartridge.
a
.
Open cartridge access door.
Wait for print carriage to move to center of product.
b
.
Press tab on cartridge, then remove it from slot.
3.
Insert new cartridge.
a
.
Remove cartridge from packaging.
Chapter 8
28
Work with cartridges
Work with cartridges