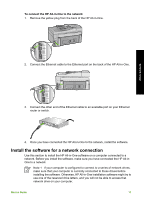
HP Photosmart C6100 Basics Guide - Page 10
Use the HP Photosmart software, Label, Name and Description, Scan Menu, Copy Menu, Photo Fix - mac
 |
View all HP Photosmart C6100 manuals
Add to My Manuals
Save this manual to your list of manuals |
Page 10 highlights
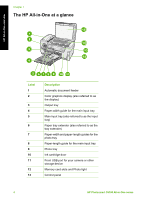
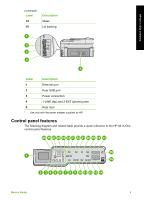
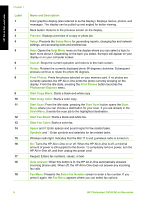
HP All-in-One overview (continued) Label 20 21 22 23 24 25 26 27 28 29 Name and Description Scan Menu: Opens the Scan Menu where you can select a destination for your scan. Copy Menu: Selects copy options, such as number of copies, paper size, and paper type. Photo Fix: Automatically adjusts a photo for viewing or printing when turned on. Features include color effects, photo brightness, frames, and red-eye removal. Press Photo Fix to turn the feature off and on. By default, this feature is turned on. Photosmart Express: Launches the Photosmart Express menu for printing, saving, editing, and sharing photos. Reprints: Scans a photo and prints it. Zoom Out: Zooms out to show more of a photo or multiple photos at the same time, on the display. Zoom In: Zooms in to enlarge the image on the display. You can also use this button to adjust the crop box when printing. Direction pad: Allows you to navigate through menu options by pressing the up, down, left, or right arrow buttons. If you are zooming in on a photo, you can also use the arrow buttons to pan around the photo and select a different area to print. OK: Selects a menu, setting, or value displayed on the display. Attention light: Indicates a problem occurred. See the display for more information. Use the HP Photosmart software You can use the HP Photosmart software (Windows) or the HP Photosmart Mac software (Mac) that you installed with the HP All-in-One to access many features not available from the control panel. The software provides a fast and easy way to make prints of your photos or to purchase prints online. It also provides access to other basic software features, such as saving, viewing, and sharing your photos. For more information about the software, see the onscreen Help. Basics Guide 7
-
 1
1 -
2
-
3
-
4
-
 5
5 -
 6
6 -
 7
7 -
 8
8 -
 9
9 -
 10
10 -
 11
11 -
 12
12 -
 13
13 -
 14
14 -
 15
15 -
16
-
17
-
18
-
19
-
20
-
21
-
22
-
23
-
24
-
25
-
26
-
27
-
28
-
29
-
30
-
31
-
32
-
33
-
34
-
35
-
36
-
37
-
38
-
39
-
40
-
41
-
42
-
43
-
44
-
45
-
46
-
47
-
48
-
49
-
50
-
51
-
52
-
53
-
54
-
55
-
56
-
57
-
58
-
59
-
60
-
61
-
62
-
63
-
64
-
65
-
66
-
67
-
68
-
69
-
70
-
71
-
72
-
73
-
74
-
75
-
76
-
77
-
78
-
79
-
80
-
81
-
82
-
83
-
84
-
85
-
86
-
87
-
88
-
89
-
90
-
91
-
92
-
93
-
94
-
95
-
96
-
97
-
98
-
99
-
100
-
101
-
102
-
103
-
104
-
105
-
106
-
107
-
108
-
109
-
110
-
111
-
112
-
113
-
114
-
115
-
116
-
117
-
118
 |
 |