HP Photosmart C6100 Basics Guide - Page 64
Make a copy, Scan an image, Scan an original to a computer - paper jam
 |
View all HP Photosmart C6100 manuals
Add to My Manuals
Save this manual to your list of manuals |
Page 64 highlights
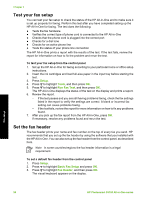
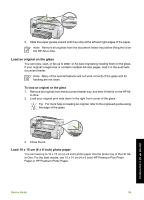
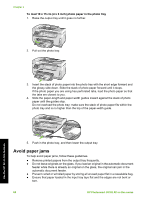
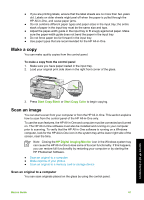
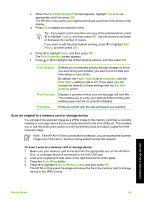
● If you are printing labels, ensure that the label sheets are no more than two years old. Labels on older sheets might peel off when the paper is pulled through the HP All-in-One, and cause paper jams. ● Do not combine different paper types and paper sizes in the input tray; the entire stack of paper in the input tray must be the same size and type. ● Adjust the paper-width guide in the input tray to fit snugly against all paper. Make sure the paper-width guide does not bend the paper in the input tray. ● Do not force paper too far forward in the input tray. ● Use paper types that are recommended for the HP All-in-One. Make a copy You can make quality copies from the control panel. To make a copy from the control panel 1. Make sure you have paper loaded in the input tray. 2. Load your original print side down in the right front corner of the glass. Use the HP All-in-One features 3. Press Start Copy Black or Start Copy Color to begin copying. Scan an image You can start a scan from your computer or from the HP All-in-One. This section explains how to scan from the control panel of the HP All-in-One only. To use the scan features, the HP All-in-One and computer must be connected and turned on. The HP All-in-One software must also be installed and running on your computer prior to scanning. To verify that the HP All-in-One software is running on a Windows computer, look for the HP All-in-One icon in the system tray at the lower right side of the screen, near the time. Note Closing the HP Digital Imaging Monitor icon in the Windows system tray can cause the HP All-in-One to lose some of its scan functionality. If this happens, you can restore full functionality by restarting your computer or by starting the HP Photosmart Software. ● Scan an original to a computer ● Make reprints of your photos ● Scan an original to a memory card or storage device Scan an original to a computer You can scan originals placed on the glass by using the control panel. Basics Guide 61
-
 1
1 -
2
-
3
-
4
-
5
-
6
-
7
-
8
-
9
-
10
-
11
-
12
-
13
-
14
-
15
-
16
-
17
-
18
-
19
-
20
-
21
-
22
-
23
-
24
-
25
-
26
-
27
-
28
-
29
-
30
-
31
-
32
-
33
-
34
-
35
-
36
-
37
-
38
-
39
-
40
-
41
-
42
-
43
-
44
-
45
-
46
-
47
-
48
-
49
-
50
-
51
-
52
-
53
-
54
-
55
-
56
-
57
-
58
-
 59
59 -
 60
60 -
 61
61 -
 62
62 -
 63
63 -
 64
64 -
 65
65 -
 66
66 -
 67
67 -
 68
68 -
 69
69 -
70
-
71
-
72
-
73
-
74
-
75
-
76
-
77
-
78
-
79
-
80
-
81
-
82
-
83
-
84
-
85
-
86
-
87
-
88
-
89
-
90
-
91
-
92
-
93
-
94
-
95
-
96
-
97
-
98
-
99
-
100
-
101
-
102
-
103
-
104
-
105
-
106
-
107
-
108
-
109
-
110
-
111
-
112
-
113
-
114
-
115
-
116
-
117
-
118
 |
 |