HP Photosmart C8100 Getting Started Guide
HP Photosmart C8100 - All-in-One Printer Manual
 |
View all HP Photosmart C8100 manuals
Add to My Manuals
Save this manual to your list of manuals |
HP Photosmart C8100 manual content summary:
- HP Photosmart C8100 | Getting Started Guide - Page 1
Ethernet) network users: you must follow the instructions in this setup guide to be successful adding the HP All-in-One to your network. FR Utilisateurs d'un réseau améliorer l'affichage. 3 * * HP Photosmart C8100 All-in-One series * Basics Guide EN Verify the box contents. The contents of - HP Photosmart C8100 | Getting Started Guide - Page 2
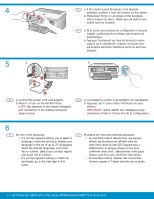
to turn on the HP All-in-One. NOTE: Pay attention to the helpful messages and animations in ink • Si vous êtes invité à installer des cartouches cartridges, go to the next step in this d'encre, passez à l'étape suivante de ce guide. guide. 2 • HP Photosmart C8100 All-in-One series/HP Photosmart - HP Photosmart C8100 | Getting Started Guide - Page 3
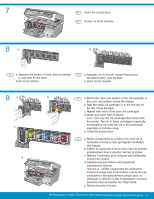
ink cartridges. d. Make sure each latch is secure. Note: Use only the ink cartridges that came with the printer. The ink in these cartridges is specially formulated to mix with the ink . e. Fermez la porte d'accès. HP Photosmart C8100 Tout-en-un série/HP Photosmart C8100 All-in-One series • 3 - HP Photosmart C8100 | Getting Started Guide - Page 4
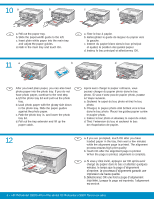
gauche. c. Insérez du papier blanc dans le bac principal et ajustez la position des guides papier. d. Insérez le bac principal et sélectionnez OK. 11 a b d EN Lorsque la page est imprimée, l'alignement est terminé. 4 • HP Photosmart C8100 All-in-One series/HP Photosmart C8100 Tout-en-un série - HP Photosmart C8100 | Getting Started Guide - Page 5
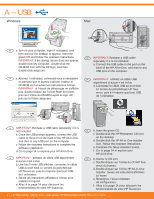
.11/Wireless ou C - Ethernet/Wired) and follow the instructions in this Setup Guide. et suivez les instructions du guide de configuration. 14 A - USB EN Use the instructions in Section A of this guide if you want to connect the HP All-in-One directly to one computer. (Do not connect the USB cable - HP Photosmart C8100 | Getting Started Guide - Page 6
EN b. Insert the green CD. c. Double-click the HP Photosmart CD icon on the desktop. d. Double-click the HP All-in-One Installer icon. Follow the onscreen instructions. e. Complete the Setup Assistant screen. f. Go to page 14 to explore your HP All-in-One. FR b. Insérez le CD vert. c. Double-cliquez - HP Photosmart C8100 | Getting Started Guide - Page 7
EN USB Troubleshooting FR Dépannage USB www.hp.com/support EN Problem: (Windows) The Microsoft Add Hardware screen appears. Action: Cancel all screens. Unplug the USB cable, and then insert the green HP All-in-One CD. Refer to Section A. EN Problem: (Windows only) You did not see the screen - HP Photosmart C8100 | Getting Started Guide - Page 8
HP provides a web-based tool called the Wireless Network Assistant [URL: www.hp.com/go/networksetup (English only)] that can help retrieve this information for some systems fil. Setup Welcome to Photosmart Express Copy Scan CD/DVD EN b. Using the touch screen of your HP All-in-One, touch Setup in the - HP Photosmart C8100 | Getting Started Guide - Page 9
: touchez .@! • Lorsque vous avez terminé : touchez Terminer EN h. Go to Section D of this Setup Guide to install your software. FR h. Allez à la section D du guide de configuration pour installer votre logiciel. HP Photosmart C8100 Tout-en-un série/HP Photosmart C8100 All-in-One series • 9 - HP Photosmart C8100 | Getting Started Guide - Page 10
e. Go to Section D of this Setup Guide to install your software. Important: Your computer and the HP All-in-One must be on the same active, working network entre HP Tout-en-un et le modem câble. Connectez-le uniquement au routeur. 10 • HP Photosmart C8100 All-in-One series/HP Photosmart C8100 Tout-en- - HP Photosmart C8100 | Getting Started Guide - Page 11
wait for the desktop to appear. b. Insert the green CD. c. Double-click the HP Photosmart CD icon on the desktop. d. Double-click the HP All-in-One Installer icon. Follow the onscreen instructions. e. Complete the Setup Assistant Screen. FR a. Allumez l'ordinateur, connectez-vous si nécessaire et - HP Photosmart C8100 | Getting Started Guide - Page 12
et le réseau). your computer and the network). EN Network Troubleshooting FR Dépannage du réseau EN Problem: While you install the HP All-in-One software, you see the error message Printer Not Found. Action: • The HP All-in-One may not be connected to your network. For a wireless connection - HP Photosmart C8100 | Getting Started Guide - Page 13
www.hp.com/support EN Problem: After you run the Wireless Setup Wizard from the HP All-in-One control panel, the HP All-in-One cannot connect to the network. Action: • You can print a diagnostic report that may help identify the problem. Run the Wireless Network Test from the HP All-in-One control - HP Photosmart C8100 | Getting Started Guide - Page 14
EN Problem: You see the error message Invalid WEP key or Invalid WPA passphrase when Now that your HP Photosmart software program is installed on your computer, you can try out one of the features on the HP All-in-One. FR Découverte des fonctionnalités FR Une fois le logiciel HP Tout-en-un install - HP Photosmart C8100 | Getting Started Guide - Page 15
çu avant screen appears. impression s'affiche. g. Touch Print Preview. g. Sélectionnez Aperçu avant impression. h. To print the photo, touch Print. h. Pour imprimer la photo, sélectionnez Imprimer. HP Photosmart C8100 Tout-en-un série/HP Photosmart C8100 All-in-One series • 15 - HP Photosmart C8100 | Getting Started Guide - Page 16
of the HP All-in-One. FR Pour plus d'informations, reportez-vous au Guide d'utilisation du HP Photosmart série C8100 Touten-un, ainsi qu'à l'écran d'aide, qui fournit des instructions détaillées sur l'utilisation de toutes les fonctionnalités du périphérique HP Tout-en-un. © 2007 Hewlett-Packard
-
 1
1 -
 2
2 -
 3
3 -
 4
4 -
 5
5 -
 6
6 -
 7
7 -
8
-
9
-
10
-
11
-
12
-
13
-
14
-
15
-
16
 |
 |
HP Photosmart C8100 All-in-One series
2
1
802.11
Ethernet
USB
3
/HP Photosmart C8100 Tout-en-un série
Commencez ici
Retirez le ruban adhésif et le
fi
lm protecteur
du couvercle, ainsi que de l’avant et de l’arrière
du périphérique.
Soulevez l’écran graphique couleur et retirez
le
fi
lm protecteur. Vous pouvez positionner l’écran
pour améliorer l’af
fi
chage.
a.
b.
Utilisateurs d’un réseau sans
fi
l (802.11) ou câblé
(Ethernet)
:
suivez les instructions du guide
de con
fi
guration pour ajouter le périphérique
HP Tout-en-un sur votre réseau.
Utilisateurs de câbles USB
:
ne connectez
pas le câble USB avant la
section A
.
Véri
fi
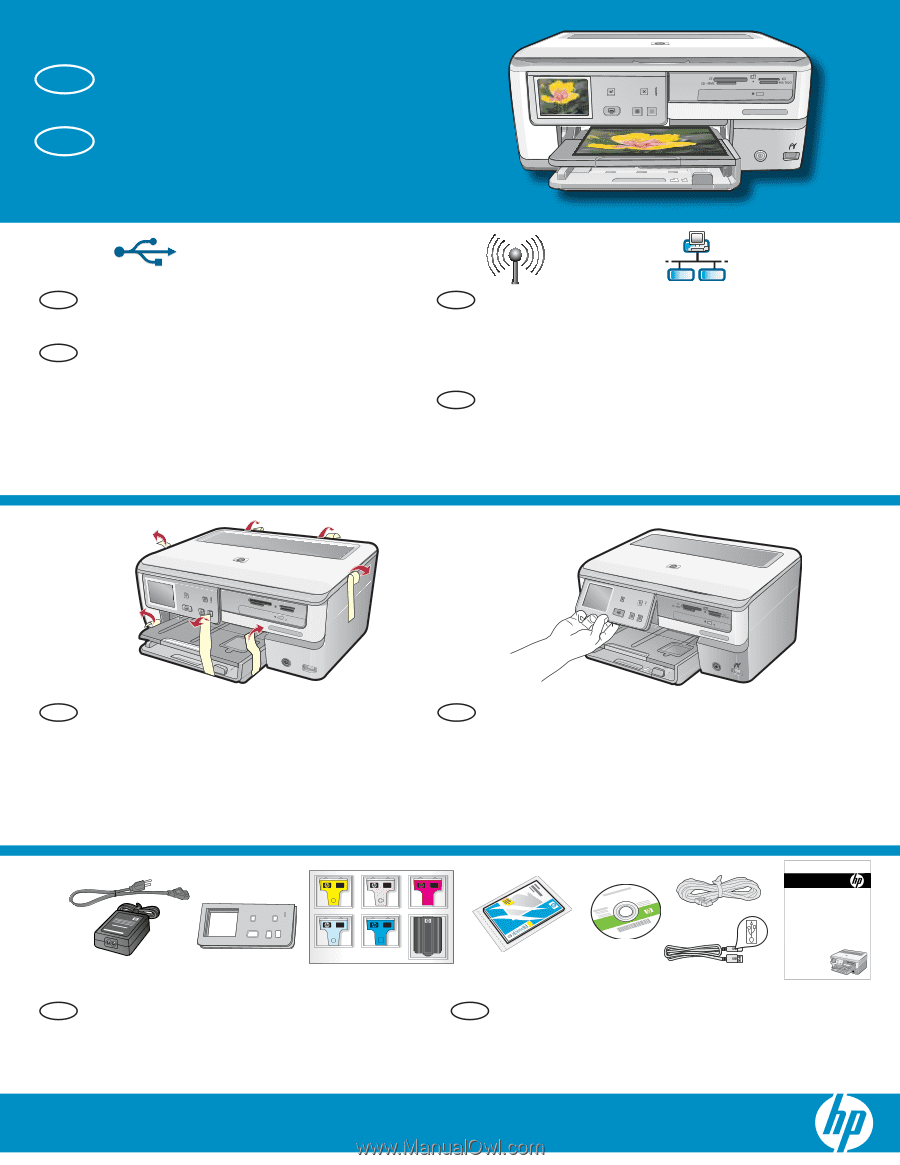
ez le contenu du carton. Le contenu du carton
peut varier.
*Peut être inclus
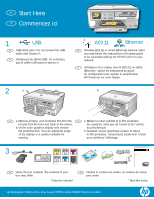
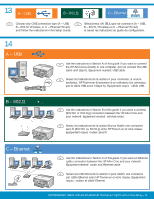
Start Here
Remove all tape, and protective
fi
lm from the
lid and from the front and back of the device.
Lift the color graphics display and remove
the protective
fi
lm. You can adjust the angle
of the display to a position suitable for
viewing.
a.
b.
USB cable users
: Do not connect the USB
cable until
Section A
.
Wireless (802.11) or wired (Ethernet) network users
:
you must follow the instructions in this setup guide
to be successful adding the HP All-in-One to your
network.
Verify the box contents. The contents of your
box may differ.
*May be included
a
b
*
*
*
EN
EN
EN
FR
FR
FR
EN
FR
EN
FR
HP Photosmart C8100 All-in-One series
Basics Guide