HP Photosmart C8100 Getting Started Guide - Page 1
HP Photosmart C8100 - All-in-One Printer Manual
 |
View all HP Photosmart C8100 manuals
Add to My Manuals
Save this manual to your list of manuals |
Page 1 highlights
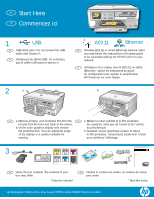
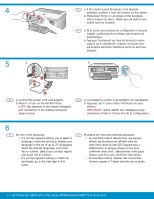
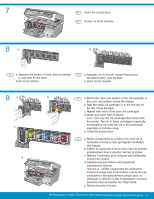
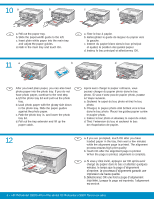
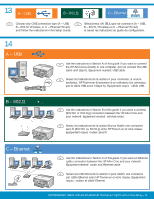
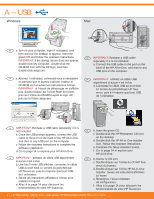
EN Start Here FR Commencez ici 1 EN FR USB USB cable users: Do not connect the USB cable until Section A. Utilisateurs de câbles USB : ne connectez pas le câble USB avant la section A. 2 a 802.11 Ethernet EN Wireless (802.11) or wired (Ethernet) network users: you must follow the instructions in this setup guide to be successful adding the HP All-in-One to your network. FR Utilisateurs d'un réseau sans fil (802.11) ou câblé (Ethernet) : suivez les instructions du guide de configuration pour ajouter le périphérique HP Tout-en-un sur votre réseau. b EN a. Remove all tape, and protective film from the FR a. Retirez le ruban adhésif et le film protecteur lid and from the front and back of the device. du couvercle, ainsi que de l'avant et de l'arrière b. Lift the color graphics display and remove du périphérique. the protective film. You can adjust the angle b. Soulevez l'écran graphique couleur et retirez of the display to a position suitable for le film protecteur. Vous pouvez positionner l'écran viewing. pour améliorer l'affichage. 3 * * HP Photosmart C8100 All-in-One series * Basics Guide EN Verify the box contents. The contents of your box may differ. *May be included FR Vérifiez le contenu du carton. Le contenu du carton peut varier. *Peut être inclus HP Photosmart C8100 All-in-One series/HP Photosmart C8100 Tout-en-un série
-
 1
1 -
 2
2 -
 3
3 -
 4
4 -
 5
5 -
 6
6 -
 7
7 -
8
-
9
-
10
-
11
-
12
-
13
-
14
-
15
-
16
 |
 |