HP Photosmart D5300 Basics Guide - Page 6
Find more information, Load paper, Setup Guide, Onscreen Help, To load full-size paper - driver
 |
View all HP Photosmart D5300 manuals
Add to My Manuals
Save this manual to your list of manuals |
Page 6 highlights
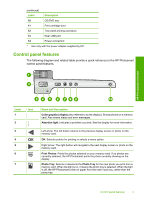
HP Photosmart overview Chapter 1 (continued) Label Icon 8 9 Name and Description Red-Eye Removal: Turns the Red-Eye Removal feature On or Off. By default, this feature is turned off. When the feature is turned on, the HP Photosmart automatically corrects red eye coloring in the photo currently shown on the display. Cancel: Stops the current operation and returns to the main screen. 10 On: Turns the HP Photosmart on or off. When the HP Photosmart is off, a minimal amount of power is still supplied to the device. You can further reduce power consumption by holding down the On button for 3 seconds. This will put the HP Photosmart in Standby/Off state. To completely remove power, turn the HP Photosmart off, and then unplug the power cord. Find more information A variety of resources, both printed and onscreen, provide information about setting up and using the HP Photosmart. • Setup Guide The Setup Guide provides instructions for setting up the HP Photosmart and installing software. Make sure you follow the steps in the Setup Guide in order. If you have problems during setup, see Troubleshooting in the last section of the Setup Guide, or see "Troubleshooting and support" on page 14 in this guide. • Onscreen Help The onscreen Help provides detailed instructions on features of the HP Photosmart that are not described in this Basics Guide, including features that are only available using the software you installed with the HP Photosmart. • www.hp.com/support If you have Internet access, you can get help and support from the HP Web site. This Web site offers technical support, drivers, supplies, and ordering information. Load paper This section describes the procedure for loading different types and sizes of paper into the HP Photosmart for your printouts. TIP: To help prevent rips, wrinkles, and curled or bent edges, store all paper flat in a resealable bag. If the paper is not stored properly, extreme changes in temperature and humidity might result in curled paper that does not work well in the HP Photosmart. To load full-size paper 1. Raise the output tray to load paper into the main input tray. 4 HP Photosmart overview
-
 1
1 -
 2
2 -
 3
3 -
 4
4 -
 5
5 -
 6
6 -
 7
7 -
 8
8 -
 9
9 -
 10
10 -
 11
11 -
 12
12 -
13
-
14
-
15
-
16
-
17
-
18
-
19
-
20
-
21
-
22
-
23
-
24
-
25
-
26
-
27
-
28
-
29
 |
 |
