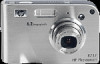
HP Photosmart R717 HP Photosmart R717 Digital Camera with HP Instant Share - Q
HP Photosmart R717 Manual
 |
View all HP Photosmart R717 manuals
Add to My Manuals
Save this manual to your list of manuals |
HP Photosmart R717 manual content summary:
- HP Photosmart R717 | HP Photosmart R717 Digital Camera with HP Instant Share - Q - Page 1
HP Photosmart R717 Digital Camera with HP Instant Share Quick Start Guide Guía de comienzo rápido 4" X 6" FRONT COVER - HP Photosmart R717 | HP Photosmart R717 Digital Camera with HP Instant Share - Q - Page 2
TahitiUM.book Page 4 Sunday, January 4, 2004 2:47 PM - HP Photosmart R717 | HP Photosmart R717 Digital Camera with HP Instant Share - Q - Page 3
English T2QSG.fm Page 1 Tuesday, January 11, 2005 5:50 PM HP Photosmart R717 Digital Camera with HP Instant Share Quick Start Guide 1 - HP Photosmart R717 | HP Photosmart R717 Digital Camera with HP Instant Share - Q - Page 4
globalcitizenship/environment/recycle/index.html For future reference, please enter the following information: Model Number (on the front of the camera) Serial Number (10-digit number on the bottom of the camera) Date the camera was purchased Printed in China 2 HP Photosmart R717 Quick Start Guide - HP Photosmart R717 | HP Photosmart R717 Digital Camera with HP Instant Share - Q - Page 5
English T2QSG.fm Page 3 Tuesday, January 11, 2005 5:50 PM 1. Attach the Wrist Strap S Attach the wrist strap to the wrist strap mount on the side of the camera as shown. 3 - HP Photosmart R717 | HP Photosmart R717 Digital Camera with HP Instant Share - Q - Page 6
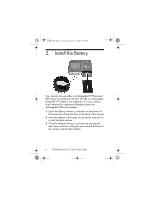
the back of the camera. 2. Insert the battery in the larger slot as shown, and push it in until the latch catches. 3. Close the Battery/Memory card door by pushing the door down and then sliding the door toward the front of the camera until the door latches. 4 HP Photosmart R717 Quick Start Guide - HP Photosmart R717 | HP Photosmart R717 Digital Camera with HP Instant Share - Q - Page 7
the thin cord from the AC adapter to the power adapter connector on the side of the camera as shown. The Power/Memory light on the back of the camera will start blinking to show that the battery is charging. When the Power/Memory light stops blinking, the battery is fully charged, and you - HP Photosmart R717 | HP Photosmart R717 Digital Camera with HP Instant Share - Q - Page 8
Power/Memory light to the left of the switch turns solid green. The HP logo also displays on the Image Display as the camera powers up. 2. Scroll to the language that you want by using the buttons on the Controller . 3. Press the button to select the highlighted language. 6 HP Photosmart R717 - HP Photosmart R717 | HP Photosmart R717 Digital Camera with HP Instant Share - Q - Page 9
the continent where you live. The Language and Region settings determine the defaults for the date format and the format of the video signal for displaying camera images on a television. 1. Scroll to the region that you want by using the buttons. 2. Press the button to select the highlighted region - HP Photosmart R717 | HP Photosmart R717 Digital Camera with HP Instant Share - Q - Page 10
screen appears, asking if the correct date and time have been set. If the date and time are correct, press the button to select Yes. 8 HP Photosmart R717 Quick Start Guide - HP Photosmart R717 | HP Photosmart R717 Digital Camera with HP Instant Share - Q - Page 11
7. Install and Format a Memory Card (Optional) Your camera contains internal memory that allows you to store images and video clips. However, you can use a memory card (purchased separately) instead to store images and video clips. 1. Turn off the camera and open the Battery/Memory card door on the - HP Photosmart R717 | HP Photosmart R717 Digital Camera with HP Instant Share - Q - Page 12
the formatting, the Total Images Summary screen is displayed. To remove the memory card from the camera, first turn the camera off. Then open the Battery/Memory card door, press down on the top edge of the memory card, and it will spring outward from the slot. 10 HP Photosmart R717 Quick Start Guide - HP Photosmart R717 | HP Photosmart R717 Digital Camera with HP Instant Share - Q - Page 13
solid green when focus is locked. 3. Press the Shutter button all the way down to take the picture. You will hear a shutter click when the camera takes the picture. The Power/Memory light blinks as the camera writes the image to memory. The image appears for several seconds on the - HP Photosmart R717 | HP Photosmart R717 Digital Camera with HP Instant Share - Q - Page 14
in the viewfinder. 2. To start recording video, press and release the Video button on the top of the camera. 3. To stop recording video, press and release the Video button again; otherwise, the video will continue recording until the camera runs out of memory. 12 HP Photosmart R717 Quick Start Guide - HP Photosmart R717 | HP Photosmart R717 Digital Camera with HP Instant Share - Q - Page 15
.fm Page 13 Tuesday, January 11, 2005 5:50 PM 10. Review Images and Video Clips You will use Playback to review the images and video clips. 1. Press the Playback button. The most recently taken or reviewed image or video clip appears on the Image Display. 2. Use the buttons to scroll through your - HP Photosmart R717 | HP Photosmart R717 Digital Camera with HP Instant Share - Q - Page 16
Image Zone Express. HP Image Zone Express lacks some features contained in the full version. For example, with HP Image Zone Express you cannot set up HP Instant Share destinations, as described in Set Up HP Instant Share Destinations in the Camera (Optional). 14 HP Photosmart R717 Quick Start Guide - HP Photosmart R717 | HP Photosmart R717 Digital Camera with HP Instant Share - Q - Page 17
the HP Customer Support website for more information: www.hp.com/support. Windows 1. Close all programs and temporarily disable any virus protection software running on your computer. 2. Insert the HP Image Zone software CD into the CD Drive of your computer and follow the on-screen instructions. If - HP Photosmart R717 | HP Photosmart R717 Digital Camera with HP Instant Share - Q - Page 18
the software transfer the images from the camera to the computer. 4. Disconnect the camera from the computer. NOTE: If using the dock, make sure you use the dock insert with the GREEN sticker on it. To connect the dock insert to the dock, see the dock User's Manual. 16 HP Photosmart R717 Quick - HP Photosmart R717 | HP Photosmart R717 Digital Camera with HP Instant Share - Q - Page 19
to your computer. Use the following steps to set up online destinations in your camera. You must have the full version of the HP Image Zone software on your computer to use this part of the HP Instant Share feature on your camera. NOTE: You will need an Internet connection to complete this procedure - HP Photosmart R717 | HP Photosmart R717 Digital Camera with HP Instant Share - Q - Page 20
Share destinations. See the section titled Sending Images to Destinations in Chapter 4 of the camera User's Manual for details about how to do this. To learn how to view the User's Manual on the HP Image Zone CD, see the next page of this Quick Start Guide. 18 HP Photosmart R717 Quick Start Guide - HP Photosmart R717 | HP Photosmart R717 Digital Camera with HP Instant Share - Q - Page 21
folder of the HP Image Zone software CD. Additional Assistance • For tips and tools to help you use your camera more effectively, visit www.hp.com/photosmart. • HP online service and support is your easy, fast, and direct web resource for product assistance, diagnostics, and driver downloads. It is - HP Photosmart R717 | HP Photosmart R717 Digital Camera with HP Instant Share - Q - Page 22
T2QSG.fm Page 20 Tuesday, January 11, 2005 5:50 PM 20 HP Photosmart R717 Quick Start Guide - HP Photosmart R717 | HP Photosmart R717 Digital Camera with HP Instant Share - Q - Page 23
Español T2QSG.fm Page 1 Thursday, January 13, 2005 9:37 AM Cámara digital HP Photosmart R717 con HP Instant Share Guía de comienzo rápido 1 - HP Photosmart R717 | HP Photosmart R717 Digital Camera with HP Instant Share - Q - Page 24
.html Introduzca la siguiente información para referencias futuras: Número de modelo (en la parte delantera de la cámara) Número de serie (número de 10 dígitos en la parte inferior de la cámara) Fecha de adquisición de la cámara Impreso en China 2 Guía de comienzo rápido de la HP Photosmart R717 - HP Photosmart R717 | HP Photosmart R717 Digital Camera with HP Instant Share - Q - Page 25
Español T2QSG.fm Page 3 Thursday, January 13, 2005 9:37 AM 1. Fijación de la muñequera S Ajuste la muñequera en el soporte para la muñeca de la parte lateral de la cámara, como se muestra en la ilustración. 3 - HP Photosmart R717 | HP Photosmart R717 Digital Camera with HP Instant Share - Q - Page 26
újela hacia dentro hasta que la traba quede enganchada. 3. Cierre la tapa de las pilas/tarjeta de memoria presionando hacia dentro y deslícela hacia la parte delantera de la cámara hasta que quede cerrada. 4 Guía de comienzo rápido de la HP Photosmart R717 - HP Photosmart R717 | HP Photosmart R717 Digital Camera with HP Instant Share - Q - Page 27
1. Conecte el cable de alimentación al adaptador de ca HP. Si hay más de un cable de alimentación en la caja, utilice el cable apropiado para las de la cámara. 3. Conecte el cable fino del adaptador de ca al conector del adaptador de alimentación de la parte lateral de la cámara como se - HP Photosmart R717 | HP Photosmart R717 Digital Camera with HP Instant Share - Q - Page 28
luz verde que permanece encendida. Al encenderse la cámara, el logotipo HP aparece en la pantalla de imagen. 2. Desplácese hasta el idioma deseado con los botones del controlador . 3. Presione el botón resaltado. para seleccionar el idioma 6 Guía de comienzo rápido de la HP Photosmart R717 - HP Photosmart R717 | HP Photosmart R717 Digital Camera with HP Instant Share - Q - Page 29
T2QSG.fm Page 7 Thursday, January 13, 2005 9:37 AM 5. Selección de la región Español Cuando haya elegido el idioma, deberá seleccionar el continente en el que vive. Los ajustes de Idioma y Región determinan la configuración de la fecha y la hora, y el formato de la señal de vídeo para visualizar - HP Photosmart R717 | HP Photosmart R717 Digital Camera with HP Instant Share - Q - Page 30
que se le pregunta si la fecha y hora establecidas son correctas. Si es así, presione el botón para seleccionar Sí. 8 Guía de comienzo rápido de la HP Photosmart R717 - HP Photosmart R717 | HP Photosmart R717 Digital Camera with HP Instant Share - Q - Page 31
Instalación y formateado de una tarjeta de memoria (opcional) La cámara digital dispone de memoria interna que le permite almacenar imágenes y videoclips. y abra la tapa de las pilas y de la tarjeta de memoria de la parte inferior de la cámara. 2. Introduzca la tarjeta de memoria en la ranura peque - HP Photosmart R717 | HP Photosmart R717 Digital Camera with HP Instant Share - Q - Page 32
las pilas/tarjeta de memoria y presione el borde superior de la tarjeta, que saltará fuera de la ranura. 10 Guía de comienzo rápido de la HP Photosmart R717 - HP Photosmart R717 | HP Photosmart R717 Digital Camera with HP Instant Share - Q - Page 33
Con la cámara encendida, encuadre el sujeto de la imagen en el visor. 2. Sujete la cámara firmemente con ambas manos y presione el disparador de la parte superior de la cámara hasta la mitad de su recorrido. La cámara mide y bloquea el enfoque y la exposición. La luz verde del indicador luminoso del - HP Photosmart R717 | HP Photosmart R717 Digital Camera with HP Instant Share - Q - Page 34
presione y suelte el botón Vídeo , que se encuentra en la parte superior de la cámara. 3. Para detener la grabación, presione y suelte otra vez el botón Vídeo ; de lo contrario, el vídeo continúa grabándose hasta que la cámara se quede sin memoria. 12 Guía de comienzo rápido de la HP Photosmart R717 - HP Photosmart R717 | HP Photosmart R717 Digital Camera with HP Instant Share - Q - Page 35
Español T2QSG.fm Page 13 Thursday, January 13, 2005 9:37 AM 10. Revisión de imágenes y videoclips Para revisar las imágenes y los videoclips se utiliza Reproducción. 1. Presione el botón Reproducción . La última imagen o el último videoclip que se haya tomado o visualizado aparecerá en la pantalla - HP Photosmart R717 | HP Photosmart R717 Digital Camera with HP Instant Share - Q - Page 36
por correo electrónico. Requisitos para un sistema con Windows Para instalar correctamente el software HP Image Zone, deberá disponer en su equipo de al menos 64 MB de RAM y tener instalado Windows 2000, XP, 98, 98 SE o Me, e Internet Explorer 5.5 Service Pack 2 o posterior. Si su equipo cumple los - HP Photosmart R717 | HP Photosmart R717 Digital Camera with HP Instant Share - Q - Page 37
13, 2005 9:37 AM Asistencia técnica para HP Image Zone Si tiene dificultades para instalar o utilizar el software HP Image Zone, encontrará más información en el sitio Web de asistencia técnica al cliente de HP: www.hp.com/ support. Windows 1. Cierre todos los programas y desactive temporalmente - HP Photosmart R717 | HP Photosmart R717 Digital Camera with HP Instant Share - Q - Page 38
de acoplamiento HP Photosmart serie R opcional (consulte la NOTA siguiente). 2. Si utiliza el cable USB, encienda la cámara. Si utiliza la base de acoplamiento, presione el botón Guardar/Imprimir de la base. 3. Siga las instrucciones mostradas en la pantalla para que el software transfiera las - HP Photosmart R717 | HP Photosmart R717 Digital Camera with HP Instant Share - Q - Page 39
estos pasos para configurar destinos en línea en la cámara. Debe tener instalada en el equipo la versión completa de HP Image Zone para poder utilizar esta parte de HP Instant Share en la cámara. NOTA: Deberá conectarse a Internet para completar este proceso. 1. Encienda la cámara, presione el bot - HP Photosmart R717 | HP Photosmart R717 Digital Camera with HP Instant Share - Q - Page 40
ítulo 4 del Manual de usuario de la cámara para obtener detalles sobre cómo hacerlo. Si desea información sobre cómo visualizar el Manual de usuario contenido en el CD de HP Image Zone, consulte la siguiente página de esta Guía de comienzo rápido. 18 Guía de comienzo rápido de la HP Photosmart R717 - HP Photosmart R717 | HP Photosmart R717 Digital Camera with HP Instant Share - Q - Page 41
muchas más. El CD del software HP Image Zone contiene copias del Manual de usuario de la cámara en varios idiomas diferentes. Para ver el Manual de usuario: 1. Introduzca el CD del software HP Image Zone en la unidad de CD del equipo. 2. En Windows: Haga clic en Ver Manual de usuario en la página - HP Photosmart R717 | HP Photosmart R717 Digital Camera with HP Instant Share - Q - Page 42
T2QSG.fm Page 20 Thursday, January 13, 2005 9:37 AM 20 Guía de comienzo rápido de la HP Photosmart R717 - HP Photosmart R717 | HP Photosmart R717 Digital Camera with HP Instant Share - Q - Page 43
TahitiUM.book Page 4 Sunday, January 4, 2004 2:47 PM - HP Photosmart R717 | HP Photosmart R717 Digital Camera with HP Instant Share - Q - Page 44
© 2005 Hewlett-Packard Development Company, L.P. Printed in China www.hp.com L2038-90157 4" X 6" BACK COVER
-
 1
1 -
 2
2 -
 3
3 -
 4
4 -
 5
5 -
 6
6 -
 7
7 -
8
-
9
-
10
-
11
-
12
-
13
-
14
-
15
-
16
-
17
-
18
-
19
-
20
-
21
-
22
-
23
-
24
-
25
-
26
-
27
-
28
-
29
-
30
-
31
-
32
-
33
-
34
-
35
-
36
-
37
-
38
-
39
-
40
-
41
-
42
-
43
-
44
 |
 |

4" X 6" FRONT COVER
Quick Start Guide
Guía de comienzo rápido
HP Photosmart R717
Digital Camera with HP Instant Share