HP Photosmart R727 Quick Start Guide
HP Photosmart R727 Manual
 |
View all HP Photosmart R727 manuals
Add to My Manuals
Save this manual to your list of manuals |
HP Photosmart R727 manual content summary:
- HP Photosmart R727 | Quick Start Guide - Page 1
HP Photosmart R725/R727 Digital Camera English - HP Photosmart R727 | Quick Start Guide - Page 2
English Legal and notice information © Copyright 2006 Hewlett-Packard Development Company, L.P. The information contained herein is subject to change without notice. The only warranties for HP products and services are set forth in the express warranty statements accompanying such products and - HP Photosmart R727 | Quick Start Guide - Page 3
front and bottom 8 Camera dock insert 8 2 Setting up your camera 9 Install the battery 9 Charge the battery 9 Turn on the camera 9 Choose the language 10 Set the region 10 Set the date and time 10 Install and format an optional memory card 11 Install the software 11 3 Taking pictures - HP Photosmart R727 | Quick Start Guide - Page 4
, including: - Extending battery life - A description of the power indicator icons ● Troubleshooting ● Getting assistance from HP ● Camera specifications Accessing the electronic User Guide The electronic User Guide is on the HP Photosmart Software CD. 4 HP Photosmart R725/R727 Digital Camera - HP Photosmart R727 | Quick Start Guide - Page 5
to help you use your camera more effectively, visit www.hp.com/photosmart (English only) or www.hp.com. ● For product assistance, diagnostics, and driver downloads 24x7, visit www.hp.com/support. ● For help with the HP Photosmart Software, see the online help for the HP Photosmart Software. Getting - HP Photosmart R727 | Quick Start Guide - Page 6
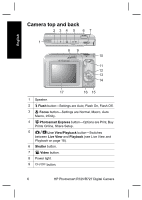
Photosmart Express button-Options are Print, Buy Prints Online, Share Setup. 5 Live View/Playback button-Switches between Live View and Playback (see Live View and Playback on page 18). 6 Shutter button. 7 Video button. 8 Power light. 9 button. 6 HP Photosmart R725/R727 Digital Camera - HP Photosmart R727 | Quick Start Guide - Page 7
English 10 Wrist strap mount. 11 Zoom lever (Digital and Optical)-In Live View, press to zoom in images. buttons-Scrolls through menus and 14 button-Displays camera menus, selects options, and confirms actions. 15 Battery Charging light. 16 Delete button-Accesses the Delete function while - HP Photosmart R727 | Quick Start Guide - Page 8
. Camera dock insert If you purchase an optional HP Photosmart camera dock, it will come with multiple clear inserts. When setting up the dock for use with this camera, use the dock insert with the round blue tag. See the dock User Guide for instructions. 8 HP Photosmart R725/R727 Digital Camera - HP Photosmart R727 | Quick Start Guide - Page 9
. 3. Close the Battery/Memory card door. Note Turn the camera off before removing the battery. Fully charge the battery before using it the first time. Charge the battery You can charge the battery in the camera, using the AC adapter. Connect the AC power adapter to the camera, then plug it - HP Photosmart R727 | Quick Start Guide - Page 10
the Region setting determines the default date format and the format of the video signal for displaying camera images on a television. Use to choose the region you want, then press . Set the and format settings are correct, then press again to confirm. 10 HP Photosmart R725/R727 Digital Camera - HP Photosmart R727 | Quick Start Guide - Page 11
format an optional memory card This camera supports standard and high speed, HP-branded Secure Digital (SD) memory cards, 8MB to 2GB. 1. Turn off the camera and open the Battery/Memory card door. 2. Insert the optional memory card in the smaller slot as shown. Make sure the memory card snaps into - HP Photosmart R727 | Quick Start Guide - Page 12
finished installing, re-enable virus protection software. Macintosh 1. Insert the HP Photosmart Software CD into the CD drive. 2. Double-click the CD icon on the computer desktop. 3. Double-click the installer icon, then follow the on- screen instructions. 12 HP Photosmart R725/R727 Digital Camera - HP Photosmart R727 | Quick Start Guide - Page 13
English 3 Taking pictures and recording video clips Live View allows you to frame pictures and video clips in the Image Display. Take a still picture 1. Press until appears briefly in the upper right corner of the Image Display. This indicates you are in Live View. 2. Frame the subject for - HP Photosmart R727 | Quick Start Guide - Page 14
4. To stop recording video, press and release the Video button again. English 14 HP Photosmart R725/R727 Digital Camera - HP Photosmart R727 | Quick Start Guide - Page 15
and deleting images and video clips Review images and video clips You can review and work with images and video clips in Playback. 1. Press until appears in . 3. Press to display the Delete sub-menu. 4. Use to select This Image, then press . Reviewing and deleting images and video clips 15 - HP Photosmart R727 | Quick Start Guide - Page 16
dock User Guide). 1. Turn off the camera, then connect it to the computer using the USB cable that came with your camera. 2. Turn on the camera and follow the instructions on the computer screen to transfer the images. For more information, see the Help feature in the HP Photosmart Software. Print - HP Photosmart R727 | Quick Start Guide - Page 17
and printer using the USB cable that came with your camera. 3. Turn on the camera. 4. When the camera is connected to the printer, the Print Setup Menu displays on the camera. To change the settings, use on the camera to select a menu option, then use on the camera to change the setting - HP Photosmart R727 | Quick Start Guide - Page 18
. Menus When you press from either Playback or Live View, you access the tabbed camera menus, as shown in the example screen. Use to move to the desired menu. Within a menu, use to move to specific selections. To exit the menu, press at any time. 18 HP Photosmart R725/R727 Digital Camera - HP Photosmart R727 | Quick Start Guide - Page 19
clips you capture with your camera. Shooting Modes (Auto Mode, Landscape, Portrait, Theatre, Panorama Right, Panorama Left, Action, Night Portrait, Night Scenery, Beach, Snow, Sunset, Document) Self-Timer Red-Eye Removal Exposure Compensation Adaptive Lighting Bracketing Image Quality Video - HP Photosmart R727 | Quick Start Guide - Page 20
Top Ten Tips Camera Accessories Camera Buttons Using Shooting Modes Using Design Gallery Sharing Images Printing Images Recording Audio Clips Recording Video Clips Reviewing Images and Videos Extracting Prints from Video Deleting Images Transferring Images 20 HP Photosmart R725/R727 Digital Camera - HP Photosmart R727 | Quick Start Guide - Page 21
English Menu Options ● Managing Batteries ● Getting Assistance ● Camera Shortcuts ● About... When you press while in Live View or Playback, you see the Photosmart Express menu. Menu Photosmart Express allows you to share your photos with friends and relatives. Options ● Print ● Buy Prints - HP Photosmart R727 | Quick Start Guide - Page 22
English 22 HP Photosmart R725/R727 Digital Camera - HP Photosmart R727 | Quick Start Guide - Page 23
Appareil photo numérique HP Photosmart R725/R727 Français - HP Photosmart R727 | Quick Start Guide - Page 24
Français Informations légales et remarques © Copyright 2006 Hewlett-Packard Development Company, L.P. Les informations contenues dans le présent document sont sujettes à modification sans préavis. Les seules garanties pour les produits et services HP sont énoncées dans les déclarations de garantie - HP Photosmart R727 | Quick Start Guide - Page 25
Veuillez noter les informations suivantes pour référence ultérieure : ● Numéro de modèle (indiqué en façade de l'appareil photo ● Numéro de série (sous l'appareil photo Date d'achat : _________ Français - HP Photosmart R727 | Quick Start Guide - Page 26
images et des clips vidéo 18 Suppression d'une image 18 5 Transfert et impression d'images 20 Transfert d'images 20 Impression d'images à partir de l'appareil photo 21 6 Guide de référence rapide de l'appareil photo 22 4 Appareil photo numérique HP Photosmart R725/R727 - HP Photosmart R727 | Quick Start Guide - Page 27
prise en main rapide Guide de l'utilisateur au format électronique Ce guide imprimé vous Le Guide de l'utilisateur au permettra : format électronique ● D'utiliser votre appareil comprend : photo rapidement ● Des descriptions de ● D'installer le logiciel HP Photosmart ● De vous familiariser - HP Photosmart R727 | Quick Start Guide - Page 28
é sur votre ordinateur : ● Sous Windows : lancez le Centre de solutions HP et cliquez sur Aide et support. ● Sous Macintosh : lancez le HP Device Manager et sélectionnez Guide de l'utilisateur dans le menu contextuel Informations et paramètres. 6 Appareil photo numérique HP Photosmart R725/R727 - HP Photosmart R727 | Quick Start Guide - Page 29
obtenir une assistance produit, des tests de diagnostic et des pilotes à télécharger 24 heures sur 24 et 7 jours sur 7, consultez le site Web à l'adresse www.hp.com/support. ● Pour obtenir une assistance pour le logiciel HP Photosmart, consultez l'aide en ligne correspondante. Dessus et arrière de - HP Photosmart R727 | Quick Start Guide - Page 30
Mise au point - Les paramètres sont Normal, Macro, Macro auto, Infini. 4 Bouton Photosmart Express - Les options sont Imprimer, Commander des tirages en ligne, Config Partage. 5 Bouton Pr Permettent de parcourir les menus et les images. 8 Appareil photo numérique HP Photosmart R725/R727 - HP Photosmart R727 | Quick Start Guide - Page 31
14 Bouton - Permet d'afficher les menus de l'appareil photo, de sélectionner les options et de confirmer les actions. 15 Voyant de charge de la batterie. 16 Bouton Supprimer - Permet d'accéder à la fonction Supprimer lorsque vous êtes en mode Lecture. 17 Ecran. Façade et dessous de l'appareil photo - HP Photosmart R727 | Quick Start Guide - Page 32
d'adaptation transparents. Pour utiliser la station d'accueil avec cet appareil photo, mettez en place le kit d'adaptation comportant une pastille bleue. Reportez-vous au Guide de l'utilisateur de la station d'accueil pour obtenir des instructions. 10 Appareil photo numérique HP Photosmart R725/R727 - HP Photosmart R727 | Quick Start Guide - Page 33
Chargement de la batterie Vous pouvez charger la batterie directement dans l'appareil photo, en utilisant l'adaptateur secteur. Connectez l'adaptateur secteur à l'appareil photo, puis branchez-le sur une prise électrique. Lorsque le voyant de charge de la batterie clignote, la batterie est en cours - HP Photosmart R727 | Quick Start Guide - Page 34
Français cesse de clignoter (au bout de 2 à 3 heures), la batterie est entièrement chargée. Mise en marche de l'appareil photo Pour mettre en marche votre appareil photo, appuyez pour sélectionner la région de votre choix, puis appuyez sur . 12 Appareil photo numérique HP Photosmart R725/R727 - HP Photosmart R727 | Quick Start Guide - Page 35
une carte mémoire (en option) Cet appareil photo prend en charge les cartes mémoire SD (Secure Digital) de marque HP, de 8 Mo à 2 Go (standard et haute vitesse). 1. Eteignez l'appareil photo et ouvrez le volet du compartiment de la batterie/carte mémoire. 2. Insérez la carte mémoire (en option) dans - HP Photosmart R727 | Quick Start Guide - Page 36
qualité d'image, ajout de couleurs et d'effets spéciaux, etc.). Si vous rencontrez des difficultés pour installer le logiciel HP Photosmart, consultez le site Web du centre d'assistance clientèle HP pour plus d'informations : www.hp.com/support. 14 Appareil photo numérique HP Photosmart R725/R727 - HP Photosmart R727 | Quick Start Guide - Page 37
Premier. 1. Fermez tous les programmes et désactivez temporairement tout logiciel antivirus. 2. Insérez le CD HP Photosmart Software dans le lecteur de CD-ROM et suivez les instructions à l'écran. Si la fenêtre d'installation ne s'affiche pas, cliquez sur Démarrer, puis sur Exécuter et saisissez - HP Photosmart R727 | Quick Start Guide - Page 38
ajouter un commentaire audio de 60 secondes maximum, maintenez le déclencheur enfoncé, puis relâchez-le lorsque l'enregistrement est terminé. 16 Appareil photo numérique HP Photosmart R725/R727 - HP Photosmart R727 | Quick Start Guide - Page 39
Enregistrement d'un clip vidéo 1. Appuyez sur jusqu'à ce que apparaisse brièvement dans l'angle supérieur droit de l'écran. Cela indique que vous êtes en mode Prévisualisation. 2. Cadrez le sujet. 3. Appuyez sur le bouton Vidéo et relâchez-le. 4. Pour arrêter l'enregistrement de la vidéo, - HP Photosmart R727 | Quick Start Guide - Page 40
en mode Lecture. 2. Utilisez pour sélectionner une image ou un clip vidéo. 3. Appuyez sur pour afficher le sous-menu Supprimer. 18 Appareil photo numérique HP Photosmart R725/R727 - HP Photosmart R727 | Quick Start Guide - Page 41
4. Utilisez pour sélectionner Cette image, puis appuyez sur . Français Revisualisation et suppression des images et des clips vidéo 19 - HP Photosmart R727 | Quick Start Guide - Page 42
d'une station d'accueil HP Photosmart (en option) (voir le Guide de l'utilisateur de la station d'accueil). 1. Eteignez l'appareil photo, puis connectezle à l'ordinateur à l'aide du câble USB fourni avec l'appareil. 2. Allumez l'appareil photo et suivez les instructions qui apparaissent à l'écran - HP Photosmart R727 | Quick Start Guide - Page 43
Français Impression d'images à partir de l'appareil photo Vous pouvez connecter l'appareil photo à n'importe quelle imprimante compatible PictBridge pour imprimer des photos et des images provenant d'un clip vidéo. 1. Vérifiez que l'imprimante est sous tension, qu'elle contient du papier et qu' - HP Photosmart R727 | Quick Start Guide - Page 44
l'appareil photo. Pour plus d'informations sur les fonctionnalités de cet appareil photo, consultez le Guide de l'utilisateur au format électronique. Prévisualisation et Lecture ● Le mode Prévisualisation vous , comme illustré dans cet exemple. 22 Appareil photo numérique HP Photosmart R725/R727 - HP Photosmart R727 | Quick Start Guide - Page 45
Bracketing Qualité d'image Qualité vidéo Rafale Balance des blancs Zone de mise au point auto Mesure AE Sensibilité ISO Saturation Piqué Contraste Inclure date/heure Guide de référence rapide de l'appareil photo 23 - HP Photosmart R727 | Quick Start Guide - Page 46
propose des conseils ● pour prendre vos photos. 10 conseils Accessoires de l'appareil Boutons de l'appareil Modes de prise de vue 24 Appareil photo numérique HP Photosmart R725/R727 - HP Photosmart R727 | Quick Start Guide - Page 47
de clips vidéo ● Suppression d'images ● Transfert d'images ● Gestion des batteries ● Obtenir de l'assistance ● Raccourcis de l'appareil photo ● A propos de ou du mode Lecture, vous affichez le menu Photosmart Express. Menu Options Photosmart Express ● vous permet de partager vos ● photos - HP Photosmart R727 | Quick Start Guide - Page 48
Français 26 Appareil photo numérique HP Photosmart R725/R727 - HP Photosmart R727 | Quick Start Guide - Page 49
Fotocamera digitale HP Photosmart R725/R727 Italiano - HP Photosmart R727 | Quick Start Guide - Page 50
Hewlett-Packard Development Company, LP Le informazioni contenute in questo documento sono soggette a modifica senza preavviso. Le uniche garanzie per i prodotti e i servizi HP aggiuntiva. HP non sarà ritenuta responsabile di eventuali omissioni o errori tecnici o editoriali qui contenuti. Windows® è - HP Photosmart R727 | Quick Start Guide - Page 51
della regione 11 Impostazione della data e dell'ora 11 Installazione e formattazione di una scheda di memoria opzionale 12 Installazione del software 13 3 Foto e videoclip 15 Scatto delle foto 15 Registrazione di videoclip 15 4 Visione e cancellazione di immagini e videoclip 17 Visione di - HP Photosmart R727 | Quick Start Guide - Page 52
di: ● Iniziare subito ad utilizzare la fotocamera ● Installare il software HP Photosmart ● Imparare a conoscere le funzioni di base della fotocamera La Guida problemi ● Informazioni per richiedere l'assistenza HP ● Specifiche della fotocamera Italiano 4 Fotocamera digitale HP Photosmart R725/R727 - HP Photosmart R727 | Quick Start Guide - Page 53
software HP Photosmart (HP Photosmart Software CD). Per visualizzare la Guida d'uso: 1. Inserire il CD del software HP Photosmart nell'unità CD del computer. 2. In Windows www.hp.com/photosmart (solo inglese) oppure www.hp.com. ● Per richiedere assistenza per il prodotto, scaricare i driver o - HP Photosmart R727 | Quick Start Guide - Page 54
● Per assistenza sull'uso del software HP Photosmart, consultare la guida online del software HP Photosmart. Parte superiore e posteriore della fotocamera 234 5 6 7 1 89 10 11 12 13 14 17 16 15 1 Altoparlante. 2 Pulsante flash: Le impostazioni sono Auto, Flash On, Flash - HP Photosmart R727 | Quick Start Guide - Page 55
Riproduzione (vedere Vista dal vivo e Riproduzione a pagina 20). 6 Pulsante otturatore. 7 Pulsante video. 8 Spia di accensione. 9 Pulsante . 10 Cinghietta da polso. 11 Leva zoom (digitale e ottico): Nella vista dal vivo, premere per aumentare l'ingrandimento oppure per diminuirlo. Nella - HP Photosmart R727 | Quick Start Guide - Page 56
/scheda di memoria. 8 Connettore USB. 9 Connettore dell'adattatore di alimentazione. Inserto dell'alloggiamento per la fotocamera L'alloggiamento opzionale HP Photosmart viene fornito con più inserti. Quando si prepara l'alloggiamento perché possa essere utilizzato con questa fotocamera, utilizzare - HP Photosmart R727 | Quick Start Guide - Page 57
circolare blu. Vedere la guida d'uso dell'alloggiamento per le istruzioni. Italiano Informazioni preliminari 9 - HP Photosmart R727 | Quick Start Guide - Page 58
la spia smette di lampeggiare e resta accesa con luce fissa significa che la batteria è completamente carica (l'operazione di ricarica dura circa 2-3 ore). 10 Fotocamera digitale HP Photosmart R725/R727 - HP Photosmart R727 | Quick Start Guide - Page 59
Accensione della fotocamera Per accendere la fotocamera, premere il pulsante . Scelta della lingua Usare per evidenziare la lingua desiderata e quindi premere . Italiano Impostazione della regione Insieme all'impostazione della Lingua, quella della Regione determina il formato predefinito - HP Photosmart R727 | Quick Start Guide - Page 60
Installazione e formattazione di una scheda di memoria opzionale Questa fotocamera supporta schede di memoria HP Secure Digital (SD), sia standard che ad alta velocità, da 8 MB a 2 GB. 1. fotocamera, tutte le nuove immagini e i videoclip Italiano 12 Fotocamera digitale HP Photosmart R725/R727 - HP Photosmart R727 | Quick Start Guide - Page 61
speciali, ecc.). Se durante l'installazione o l'uso del software HP Photosmart si verificano dei problemi, visitare il sito Web per l'assistenza clienti HP per richiedere maggiori informazioni: www.hp.com/support. Windows Se il computer Windows non soddisfa i requisiti di sistema indicati sulla - HP Photosmart R727 | Quick Start Guide - Page 62
antivirus. Macintosh 1. Inserire il CD del software HP Photosmart nell'unità CD. 2. Fare doppio clic sull'icona del CD sulla scrivania. 3. Fare doppio clic sull'icona del programma di installazione e seguire le istruzioni visualizzate. Italiano 14 Fotocamera digitale HP Photosmart R725/R727 - HP Photosmart R727 | Quick Start Guide - Page 63
3 Foto e videoclip Italiano La modalità Vista dal vivo consente di inquadrare le foto e i videoclip sul display LCD. Scatto delle foto 1. Premere fino a quando nell'angolo superiore destro del display LCD non appare . Ciò indica che è attiva la modalità Vista dal vivo. 2. Inquadrare il - HP Photosmart R727 | Quick Start Guide - Page 64
3. Premere e rilasciare il pulsante video . 4. Per interrompere la registrazione, premere e rilasciare di nuovo il pulsante video . Italiano 16 Fotocamera digitale HP Photosmart R725/R727 - HP Photosmart R727 | Quick Start Guide - Page 65
4 Visione e cancellazione di immagini e videoclip Visione di immagini e videoclip In modalità Riproduzione è possibile rivedere e manipolare foto e videoclip. 1. Premere fino a quando nell'angolo superiore destro del display LCD non appare . Ciò indica che è attiva la modalità Riproduzione. - HP Photosmart R727 | Quick Start Guide - Page 66
la fotocamera. 2. Accendere la fotocamera e seguire le istruzioni visualizzate sullo schermo del computer per trasferire le immagini. Per ulteriori informazioni, consultare la guida online del software HP Photosmart. Italiano 18 Fotocamera digitale HP Photosmart R725/R727 - HP Photosmart R727 | Quick Start Guide - Page 67
estratte dai videoclip. 1. Verificare che la stampante sia accesa, che la carta sia caricata e che non siano visualizzati messaggi di errore relativi alla stampante. 2. Collegare la fotocamera e la stampante usando il cavo USB fornito con la fotocamera. 3. Accendere la fotocamera. 4. Dopo - HP Photosmart R727 | Quick Start Guide - Page 68
menu desiderato. All'interno di un menu, usare per spostarsi sulle opzioni desiderate. Per chiudere il menu, premere in un qualsiasi momento . 20 Fotocamera digitale HP Photosmart R725/R727 - HP Photosmart R727 | Quick Start Guide - Page 69
I menu e le opzioni sono: Menu Opzioni Cattura consente di ● regolare le impostazioni della fotocamera che incidono sulle caratteristiche di immagini e videoclip che si cattureranno con la fotocamera. ● ● ● Modalità di scatto (Automatica, Panorama, Ritratto, Teatro, Panoramica verso - HP Photosmart R727 | Quick Start Guide - Page 70
● gli scatti. ● ● 10 utili suggerimenti Accessori Pulsanti fotocamera Uso delle modalità di scatto Utilizzo della galleria degli effetti Condivisione immagini Stampa immagini Registrazione clip audio Registrazione videoclip Italiano 22 Fotocamera digitale HP Photosmart R725/R727 - HP Photosmart R727 | Quick Start Guide - Page 71
● Cancellazione immagini ● Trasferimento immagini ● Manutenzione batterie ● Assistenza ● Accesso rapido ● Info su... Quando si preme mentre è attiva la modalità Vista dal vivo o Riproduzione, viene visualizzato il menu Photosmart Express. Menu Photosmart Express consente di condividere le foto con - HP Photosmart R727 | Quick Start Guide - Page 72
Italiano 24 Fotocamera digitale HP Photosmart R725/R727 - HP Photosmart R727 | Quick Start Guide - Page 73
HP Photosmart R725/R727 Digitalkamera Deutsch - HP Photosmart R727 | Quick Start Guide - Page 74
Hewlett-Packard Development Company, L.P. Die Informationen in diesem Dokument können ohne vorherige Ankündigung geändert werden. Für HP Produkte keine weiteren Gewährleistungen. HP haftet nicht für technische oder redaktionelle Fehler oder Auslassungen in diesem Dokument. Windows® ist eine in den - HP Photosmart R727 | Quick Start Guide - Page 75
10 Aufladen der Batterie 10 Einschalten der Kamera 11 Auswählen der Sprache 11 Einstellen der Region 11 Einstellen von Datum und Uhrzeit 12 Einsetzen und Formatieren einer optionalen Speicherkarte 12 Installieren der Software 13 3 Aufnehmen von Bildern und Videoclips 15 Aufnehmen eines - HP Photosmart R727 | Quick Start Guide - Page 76
Kamera ● Beschreibungen aller ● Installation der Kamerafunktionen HP Photosmart-Software ● Beschreibung der ● Vorstellung der Symbole auf der Stromversorgungss ymbole ● Fehlerbehebung ● Unterstützung durch HP ● Technische Daten der Kamera Deutsch 4 HP Photosmart R725/R727 Digitalkamera - HP Photosmart R727 | Quick Start Guide - Page 77
Benutzerhandbuch Das elektronische Benutzerhandbuch befindet sich auf der HP Photosmart Software CD. So zeigen Sie das Benutzerhandbuch an: 1. Legen Sie die HP Photosmart Software CD in das CD-Laufwerk Ihres Computers ein. 2. Unter Windows: Klicken Sie auf der Hauptseite der Installationsanzeige auf - HP Photosmart R727 | Quick Start Guide - Page 78
Treiber-Downloads erhalten Sie rund um die Uhr (24x7) unter www.hp.com/support. ● Weitere Hilfe zur HP Photosmart-Software finden Sie in der Onlinehilfe für die HP PhotosmartSoftware sind "Normaler Fokus", "Makro", "Autom. Makro" und "Unendlich". Deutsch 6 HP Photosmart R725/R727 Digitalkamera - HP Photosmart R727 | Quick Start Guide - Page 79
4 Photosmart Express (Taste) - Die verfügbaren Optionen sind: Drucken, Abzüge online Video (Taste). 8 Netzkontrollleuchte. 9 (Ein-/Aus-Taste). 10 Befestigung für Halteschlaufe. 11 Zoom-Hebel (digital und optisch) - Drücken Sie im Modus Vorschau auf das Symbol , um einzuzoomen, oder auf - HP Photosmart R727 | Quick Start Guide - Page 80
7 Klappe des Batterie-/Speicherkartenfachs 8 USB-Anschluss 9 Netzteilanschluss Dockingeinsatz für die Kamera Wenn Sie eine optionale HP Photosmart KameraDockingstation erwerben, wird diese mit mehreren leeren Einsätzen geliefert. Verwenden Sie zum 8 HP Photosmart R725/R727 Digitalkamera Deutsch - HP Photosmart R727 | Quick Start Guide - Page 81
Einrichten der optionalen Dockingstation für diese Kamera, den Dockingeinsatz mit dem runden blauen Etikett. Die zugehörigen Anweisungen finden Sie im Benutzerhandbuch für die Dockingstation. Deutsch Erste Schritte 9 - HP Photosmart R727 | Quick Start Guide - Page 82
Aufladen der Batterie Über das Netzteil können Sie eine in die Kamera eingesetzte Batterie aufladen. Schließen Sie das Netzteil an der Kamera und anschließend an einer Netzsteckdose an. Während des Ladevorgangs blinkt die Ladekontrollleuchte der Kamera. Die Batterie ist 10 HP Photosmart R725/R727 - HP Photosmart R727 | Quick Start Guide - Page 83
vollständig aufgeladen, wenn die Kontrollleuchte permanent leuchtet (nach ungefähr 2 bis 3 Stunden). Einschalten der Kamera Drücken Sie zum Einschalten der Kamera die Taste (Ein/Aus). Auswählen der Sprache Mit den Tasten wählen Sie die gewünschte Sprache aus. Drücken Sie anschließend die Taste . - HP Photosmart R727 | Quick Start Guide - Page 84
und Formatieren einer optionalen Speicherkarte Diese Kamera unterstützt Secure Digital (SD) Speicherkarten der Marke HP (Standard und High Speed) mit 8 MB bis hin Sie die Klappe des Batterie-/ Speicherkartenfachs, und schalten Sie die Kamera ein. Deutsch 12 HP Photosmart R725/R727 Digitalkamera - HP Photosmart R727 | Quick Start Guide - Page 85
ät sowie Hinzufügen von Farben und Spezialeffekten). Sollten bei der Installation oder der Verwendung der HP Photosmart-Software Probleme auftreten, lesen Sie die Informationen auf der Website der HP Kundenunterstützung (HP Customer Care): www.hp.com/support. Deutsch Einrichten Ihrer Kamera 13 - HP Photosmart R727 | Quick Start Guide - Page 86
. Macintosh 1. Legen Sie die HP Photosmart Software CD in das CD-Laufwerk ein. 2. Doppelklicken Sie auf dem Desktop auf das CDSymbol. 3. Doppelklicken Sie auf das Symbol des Installationsprogramms, und befolgen Sie die angezeigten Anweisungen. Deutsch 14 HP Photosmart R725/R727 Digitalkamera - HP Photosmart R727 | Quick Start Guide - Page 87
3 Aufnehmen von Bildern und Videoclips Die Vorschau ermöglicht das Erfassen von Motiven für Bilder und Videoclips über die Bildanzeige. Aufnehmen eines Einzelbilds 1. Drücken Sie die Taste , bis das Symbol für kurze Zeit rechts oben in der Bildanzeige erscheint. Dadurch wird angezeigt, dass sich die - HP Photosmart R727 | Quick Start Guide - Page 88
lassen Sie diese wieder los. 4. Drücken Sie die Taste Video erneut, und lassen Sie diese wieder los, um die Videoaufnahme zu beenden. Deutsch 16 HP Photosmart R725/R727 Digitalkamera - HP Photosmart R727 | Quick Start Guide - Page 89
4 Betrachten und Löschen von Bildern und Videoclips Betrachten von Bildern und Videoclips Im Modus Wiedergabe können Sie Bilder und Videoclips betrachten und mit diesen arbeiten. 1. Drücken Sie die Taste , bis das Symbol für kurze Zeit rechts oben in der Bildanzeige erscheint. Dadurch wird - HP Photosmart R727 | Quick Start Guide - Page 90
4. Wählen Sie mit den Tasten die Option Dieses Bild aus. Drücken Sie danach die Taste . Deutsch 18 HP Photosmart R725/R727 Digitalkamera - HP Photosmart R727 | Quick Start Guide - Page 91
ist, verwenden Sie die im Folgenden beschriebene Methode, um Bilder und Videoclips auf Ihren Computer zu übertragen. Wenn die HP Photosmart-Software nicht installiert ist, verwenden Sie eine Alternativmethode, die im elektronischen Benutzerhandbuch beschrieben ist. Tipp Sie können diese Aufgabe auch - HP Photosmart R727 | Quick Start Guide - Page 92
aus. Ändern Sie dann die jeweilige Einstellung mit den Tasten an der Kamera. 5. Drücken Sie die Taste , um den Druckvorgang zu starten. Deutsch 20 HP Photosmart R725/R727 Digitalkamera - HP Photosmart R727 | Quick Start Guide - Page 93
6 Kurzreferenz für Kamerafunktionen Das folgende Kapitel dient als Kurzreferenz für die Kamerafunktionen. Weitere Informationen zu diesen Kamerafunktionen finden Sie im elektronischen Benutzerhandbuch. Vorschau und Wiedergabe ● Die Vorschau ermöglicht das Erfassen von Motiven für Bilder und - HP Photosmart R727 | Quick Start Guide - Page 94
, Dokument) Selbstauslöser Rote Augen entfernen Belichtungskompensation Adaptive Beleuchtung Bereich Bildqualität Videoqualität Burst Weißabgleich Autofokusbereich auf der Kamera ● Diashow anzeigen gespeichert sind. ● Panorama zusammensetzen Deutsch 22 HP Photosmart R725/R727 Digitalkamera - HP Photosmart R727 | Quick Start Guide - Page 95
dient ● zum Ändern der ● Funktionsweise der Kamera. ● ● ● ● ● ● ● ● ● Anzeigehelligkeit Lautstärke Fokus-Hilfslicht Display-Timeout Direkte Wiedergabe Digital-Zoom Datum und Zeit USB-Konfiguration TV-Konfiguration Sprache Einstellungen zurücksetzen Die Hilfe enthält Beschreibungen der - HP Photosmart R727 | Quick Start Guide - Page 96
wird das Menü Photosmart Express angezeigt. Menü Photosmart Express dient zum gemeinsamen Nutzen von Fotos mit Freunden und Familienangehörigen. Optionen ● Drucken ● Abzüge online erwerben ● Alle Bilder gemeinsam nutzen ● Menü "Share" einrichten Deutsch 24 HP Photosmart R725/R727 Digitalkamera - HP Photosmart R727 | Quick Start Guide - Page 97
Cámara digital HP Photosmart R725/R727 Español - HP Photosmart R727 | Quick Start Guide - Page 98
Hewlett-Packard Development Company, L.P. La información que aparece en este documento está sujeta a cambios sin previo aviso. Las únicas garantías de los productos y servicios de HP adicional. HP no se hará responsable de los errores u omisiones técnicos o editoriales aquí contenidos. Windows® es - HP Photosmart R727 | Quick Start Guide - Page 99
idioma 11 Selección de la región 11 Ajuste de la fecha y la hora 11 Instalación y formateo de una tarjeta de memoria opcional 12 Instale el software 13 3 Toma de imágenes y grabación de videoclips 15 Toma de una imagen fija 15 Grabación de un videoclip 16 4 Revisión y eliminación de imágenes - HP Photosmart R727 | Quick Start Guide - Page 100
de todas cámara rápidamente las funciones de la ● Instalar el software cámara HP Photosmart ● Una descripción de los ● Familiarizarse con las iconos de la ón ● Resolución de problemas ● Obtención de asistencia de HP ● Especificaciones de la cámara 4 Cámara digital HP Photosmart R725/R727 - HP Photosmart R727 | Quick Start Guide - Page 101
disco HP Photosmart Software CD. Para ver la Guía del usuario: 1. Introduzca el HP Photosmart Software CD en la unidad de CD-ROM del equipo. 2. En Windows: Haga la cámara de manera más eficaz, visite www.hp.com/photosmart (sólo en inglés) o www.hp.com. ● Si desea obtener asistencia para productos, - HP Photosmart R727 | Quick Start Guide - Page 102
Español ● Para ayuda con el software HP Photosmart, consulte la ayuda en línea para el software HP Photosmart. Cámara, parte superior y posterior 234 5 6 7 1 89 10 11 12 13 14 17 Vista en directo y Reproducción en la página 21). 6 Botón del Disparador. 6 Cámara digital HP Photosmart R725/R727 - HP Photosmart R727 | Quick Start Guide - Page 103
Español 7 Botón Vídeo. 8 Indicador luminoso de alimentación. 9 Botón . 10 Soporte para muñequera. 11 Palanca de zoom (digital y óptico): En Vista en directo, pulse para acercar la imagen o pulse para alejar la imagen. En Reproducción, pulse el para ampliar la imagen seleccionada o pulse - HP Photosmart R727 | Quick Start Guide - Page 104
Accesorio de la base para la cámara Si adquiere una base de acoplamiento HP Photosmart opcional, vendrá suministrado con varios adaptadores transparentes. Al instalar la base de acoplamiento para utilizarla con esta cámara, utilice el adaptador de la base 8 Cámara digital HP Photosmart R725/R727 - HP Photosmart R727 | Quick Start Guide - Page 105
con la etiqueta azul redonda. Para obtener más instrucciones, consulte la Guía del usuario de la base. Español Procedimientos iniciales 9 - HP Photosmart R727 | Quick Start Guide - Page 106
la pila parpadea, significa que la pila se está cargando; la pila está totalmente cargada cuando el indicador permanece encendido fijamente (aproximadamente 2 y 3 horas). 10 Cámara digital HP Photosmart R725/R727 - HP Photosmart R727 | Quick Start Guide - Page 107
Español Encendido de la cámara. Para encender la cámara, pulse el botón . Elección del idioma Utilice y para elegir el idioma que desea y pulse . Selección de la región Los ajustes de Idioma y Región determinan la configuración predeterminada de la fecha y la hora, y el formato de la señal de - HP Photosmart R727 | Quick Start Guide - Page 108
una tarjeta de memoria opcional Esta cámara admite tarjetas de memoria de alta velocidad y estándar, Secure Digital (SD) de marca HP, de 8 MB a 2 GB. 1. Apague la cámara y abra la tapa de la pila/ ágenes guardadas en ella, extraiga la tarjeta de memoria. 12 Cámara digital HP Photosmart R725/R727 - HP Photosmart R727 | Quick Start Guide - Page 109
colores y efectos especiales y más). Si tiene dificultades para instalar o utilizar el software HP Photosmart, encontrará más información en el sitio Web de Atención al cliente de HP: www.hp.com/ support. Windows Si su equipo Windows no cubre los requisitos del sistema indicados en el embalaje de la - HP Photosmart R727 | Quick Start Guide - Page 110
2. Haga doble clic en el icono del CD en el escritorio del equipo. 3. Haga doble clic en el icono del instalador y, a continuación, siga las instrucciones mostradas en la pantalla. Español 14 Cámara digital HP Photosmart R725/R727 - HP Photosmart R727 | Quick Start Guide - Page 111
Español 3 Toma de imágenes y grabación de videoclips Vista en directo permite encuadrar imágenes y videoclips desde la Pantalla de imagen. Toma de una imagen fija 1. Pulse hasta que aparezca brevemente en la esquina superior derecha de la Pantalla de imagen. Esto indica que está en el modo - HP Photosmart R727 | Quick Start Guide - Page 112
modo Vista en directo. 2. Encuadre el sujeto. 3. Pulse y libere el botón Vídeo . 4. Para dejar de grabar vídeo, vuelva a pulsar y liberar el botón Vídeo . 16 Cámara digital HP Photosmart R725/R727 - HP Photosmart R727 | Quick Start Guide - Page 113
Español 4 Revisión y eliminación de imágenes y videoclips Revisión de imágenes y videoclips Puede revisar y tratar imágenes y videoclips en el modo Reproducción. 1. Pulse hasta que aparezca brevemente en la esquina superior derecha de la Pantalla de imagen. Esto indica que está en el modo - HP Photosmart R727 | Quick Start Guide - Page 114
4. Utilice para seleccionar Esta imagen, y pulse . Español 18 Cámara digital HP Photosmart R725/R727 - HP Photosmart R727 | Quick Start Guide - Page 115
la cámara y conéctela al equipo mediante el cable USB incluido con la cámara. 2. Encienda la cámara y siga las instrucciones en la pantalla del equipo para transferir las imágenes. Para obtener más información, consulte la Ayuda del software HP Photosmart. Transferencia e impresión de imágenes 19 - HP Photosmart R727 | Quick Start Guide - Page 116
esté encendida, que hay papel y que no hay mensajes de error en la impresora. 2. Conecte la cámara a la impresora mediante el cable USB suministrado con la cámara. 3. Encienda la cámara. cambiar el ajuste. 5. Pulse para iniciar la impresión. 20 Cámara digital HP Photosmart R725/R727 - HP Photosmart R727 | Quick Start Guide - Page 117
6 Referencia rápida de la cámara Español Utilice este capítulo como referencia rápida para las funciones de la cámara. Para obtener más información sobre estas funciones de la cámara, consulte la Guía del usuario electrónica. Vista en directo y Reproducción ● Vista en directo permite encuadrar - HP Photosmart R727 | Quick Start Guide - Page 118
automático Elim. de ojos rojos Compensación de exposición Ilum. adaptable Delimitación Calidad imagen Calidad de vídeo Ráfaga Equilibrio de blanco Área de enfoque automático Medición AE Velocidad ISO Saturación Nitidez Contraste Estampado de fecha y hora 22 Cámara digital HP Photosmart R725/R727 - HP Photosmart R727 | Quick Start Guide - Page 119
la cámara. ● Brillo de pantalla ● Volumen de sonidos ● Luz ayuda enfoque ● Mostrar tiempo de espera ● Revisión instantánea ● Zoom digital ● Fecha y hora ● Configuración USB ● Configuración TV ● Idioma ● Restablecer ajustes Ayuda proporciona descripciones de las funciones de la cámara y sugerencias - HP Photosmart R727 | Quick Start Guide - Page 120
pulsar desde Vista en directo o Reproducción, aparece el menú Photosmart Express. Menú Photosmart Express permite compartir imágenes con amigos y familiares. Opciones ● Imprimir ● Comprar copias en línea ● Compartir toda imagen ● Conf. menú Compartir... 24 Cámara digital HP Photosmart R725/R727 - HP Photosmart R727 | Quick Start Guide - Page 121
HP Photosmart R725/R727 Digitale camera Nederlands - HP Photosmart R727 | Quick Start Guide - Page 122
Hewlett-Packard Development Company, L.P. De informatie in dit document kan zonder voorafgaande kennisgeving worden gewijzigd. De enige garanties die gelden voor HP HP aanvaardt geen aansprakelijkheid voor technische fouten of redactionele fouten, drukfouten of weglatingen in deze publicatie. Windows - HP Photosmart R727 | Quick Start Guide - Page 123
instellen 10 De batterij plaatsen 10 De batterij opladen 10 De camera aanzetten 11 De taal kiezen 11 De regio instellen 11 Datum en tijd instellen 11 Een optionele geheugenkaart installeren en formatteren 12 De software installeren 13 3 Foto's maken en videoclips opnemen 15 Een foto nemen - HP Photosmart R727 | Quick Start Guide - Page 124
van deze gedrukte gids kunt u: De elektronische gebruikershandleiding bevat: ● Snel aan de slag gaan ● Beschrijvingen van alle met uw camera camerafuncties ● De HP Photosmart- ● Een beschrijving van software installeren pictogrammen op het ● Kennismaken met de LCD-scherm functies van uw - HP Photosmart R727 | Quick Start Guide - Page 125
raadplegen U vindt de elektronische gebruikershandleiding op de HP Photosmart Software CD. Zo kunt u de gebruikershandleiding bekijken: 1. Plaats de HP Photosmart Software CD in het cdrom-station van uw computer. 2. Windows: Klik op Gebruikershandleiding bekijken op de hoofdpagina van - HP Photosmart R727 | Quick Start Guide - Page 126
kunt te allen tijde terecht op www.hp.com/ support voor productassistentie, diagnoseprogramma's en downloadbare stuurprogramma's. ● Zie de online Help-informatie bij de HP Photosmartsoftware voor hulp bij de HP Photosmart-software. Bovenkant en achterkant van de camera 234 5 6 7 1 89 10 11 12 13 14 - HP Photosmart R727 | Quick Start Guide - Page 127
Nederlands 5 Knop Liveweergave/Weergave-Voor schakelen tussen Liveweergave en Weergave (zie Liveweergave en Weergave op pagina 20). 6 Sluiterknop. 7 Knop Video. 8 Aan/uit-lampje. 9 Knop . 10 Bevestigingspunt voor polsbandje. 11 Knop In-/uitzoomen (digitaal en optisch)-In Liveweergave drukt - HP Photosmart R727 | Quick Start Guide - Page 128
van de camera Als u een optioneel HP Photosmart cameradock aanschaft, wordt dit geleverd samen met enkele lichtgekleurde inzetstukken. Wanneer u het dock gereedmaakt voor gebruik met deze camera, kunt u het dockinzetstuk met het ronde blauwe merkteken 8 HP Photosmart R725/R727 Digitale camera - HP Photosmart R727 | Quick Start Guide - Page 129
gebruiken. Zie de gebruikershandleiding van het dock voor instructies. Nederlands Aan de slag 9 - HP Photosmart R727 | Quick Start Guide - Page 130
de camera uit camera en vervolgens op een stopcontact aan. De batterijoplaadindicator van de camera knippert, hetgeen aangeeft dat de batterij wordt opgeladen. De batterij is volledig opgeladen wanneer het lampje continu blijft branden (na 2 tot 3 uur). 10 HP Photosmart R725/R727 Digitale camera - HP Photosmart R727 | Quick Start Guide - Page 131
De camera aanzetten Zet de camera aan door op de knop De taal kiezen Kies de gewenste taal met en druk op . te drukken. Nederlands De regio gemarkeerde waarde aan met . 2. Ga naar de andere selecties met en herhaal stap 1 totdat de datum en tijd correct zijn ingesteld. De camera instellen 11 - HP Photosmart R727 | Quick Start Guide - Page 132
geheugenkaart installeren en formatteren De camera ondersteunt SDgeheugenkaarten (Secure Digital) van HP, standaard en hoge snelheid, van 8 MB tot 2 GB. 1. Zet de camera uit en open het vak de kaart opgeslagen in plaats van in het interne geheugen. 12 HP Photosmart R725/R727 Digitale camera - HP Photosmart R727 | Quick Start Guide - Page 133
HP Photosmart-software problemen ondervindt, kunt u voor meer informatie terecht op de website voor klantenondersteuning van HP: www.hp.com/support. Windows Als uw Windows-computer niet voldoet aan de systeemvereisten die op de verpakking van de camera worden vermeld, wordt HP Photosmart Essential - HP Photosmart R727 | Quick Start Guide - Page 134
Plaats de HP Photosmart Software CD in het cdrom-station. 2. Dubbelklik op het pictogram van het cd-rom-station op het bureaublad van de computer. 3. Dubbelklik op het pictogram van het installatieprogramma volg de aanwijzingen op het scherm. Nederlands 14 HP Photosmart R725/R727 Digitale camera - HP Photosmart R727 | Quick Start Guide - Page 135
Nederlands 3 Foto's maken en videoclips opnemen In de modus Liveweergave kunt u foto's en videoclips op het LCD-scherm inkaderen. Een foto nemen 1. Druk op totdat rechtsboven in de hoek van het LCD-scherm kort wordt weergegeven. Dit geeft aan dat Liveweergave actief is. 2. Kader het - HP Photosmart R727 | Quick Start Guide - Page 136
3. Druk de knop Video in en laat deze los. 4. U stopt de opname van de video door de knop Video nogmaals in te drukken en los te laten. Nederlands 16 HP Photosmart R725/R727 Digitale camera - HP Photosmart R727 | Quick Start Guide - Page 137
Nederlands 4 Foto's en videoclips bekijken en verwijderen Foto's en videoclips bekijken U kunt foto's en videoclips bekijken en bewerken in de modus Weergave. 1. Druk op totdat rechtsboven in de hoek van het LCD-scherm kort wordt weergegeven. Dit geeft aan dat Weergave actief is. 2. Blader - HP Photosmart R727 | Quick Start Guide - Page 138
sluit de camera en de computer op elkaar aan met de bij de camera geleverde USB-kabel. 2. Zet de camera aan en volg de aanwijzingen op het computerscherm om de opnames over te brengen. Zie de Helpfunctie van de HP Photosmart-software voor meer informatie. 18 HP Photosmart R725/R727 Digitale camera - HP Photosmart R727 | Quick Start Guide - Page 139
in de printer is geplaatst en of er geen foutmelding op de printer wordt weergegeven. 2. Sluit de camera en de printer op elkaar aan met de bij de camera geleverde USB- kabel. 3. Zet de camera aan. 4. Wanneer de camera op de printer is aangesloten, wordt het menu Afdrukinstellingen op de - HP Photosmart R727 | Quick Start Guide - Page 140
In dit hoofdstuk kunt u in één oogopslag zien welke mogelijkheden u met de camera hebt. Meer informatie over deze functies vindt u in de elektronische gebruikershandleiding. Liveweergave kunt het menu op elk moment afsluiten door op te drukken. 20 HP Photosmart R725/R727 Digitale camera - HP Photosmart R727 | Quick Start Guide - Page 141
-instellingen wijzigen die van invloed zijn op de kenmerken van foto's en videoclips die u in het vervolg met de camera maakt. Opnamemodi (Modus Auto, Landschap, Portret, Theater, Panorama Rechts, Panorama Links, Actie, Nachtportret, Nachttafereel, Strand, Sneeuw, Zonsondergang, Document - HP Photosmart R727 | Quick Start Guide - Page 142
● en tips voor het gebruik van de ● camera. ● ● Toptien handigste tips Camera-accessoires Cameraknoppen Opnamemodi gebruiken Ontwerpgalerie gebruiken Opnames delen Foto's afdrukken Audioclips opnemen Videoclips opnemen Foto's en video bekijken 22 HP Photosmart R725/R727 Digitale camera - HP Photosmart R727 | Quick Start Guide - Page 143
● Hulp en ondersteuning ● Camerasneltoetsen ● Info... Als u op drukt in de modus Liveweergave of Weergave, ziet u het Menu Photosmart Express. Menu Opties Met Photosmart ● Express kunt uw foto's delen ● met familie en vrienden. ● ● Afdrukken Afdrukken online kopen Alle opnames delen Menu - HP Photosmart R727 | Quick Start Guide - Page 144
Nederlands 24 HP Photosmart R725/R727 Digitale camera - HP Photosmart R727 | Quick Start Guide - Page 145
Câmera digital HP Photosmart R725/R727 Português - HP Photosmart R727 | Quick Start Guide - Page 146
Hewlett-Packard Development Company, L.P. As informações aqui contidas estão sujeitas a alterações sem aviso prévio. As únicas garantias para produtos e serviços da HP adicional. A HP se isenta de responsabilidade por erros técnicos ou editorais ou omissões aqui contidas. Windows® é uma marca - HP Photosmart R727 | Quick Start Guide - Page 147
10 Ligue a câmera 11 Escolher o idioma 11 Definir a região 11 Configurar data e hora 11 Instalar e formatar cartão de memória opcional 12 Instalar o software 13 3 Tirar fotos e gravar clipes de vídeo 15 Tirar uma foto estática 15 Gravar um clipe de vídeo 15 4 Rever e excluir imagens - HP Photosmart R727 | Quick Start Guide - Page 148
de todos os da câmera recursos da câmera ● Instalar o software ● Uma descrição dos HP Photosmart ícones do Visor de ● Conhecer os recursos da imagens câmera ● Solução de problemas ● Com obter assistência da HP ● Especificações da câmera Português 4 Câmera digital HP Photosmart R725/R727 - HP Photosmart R727 | Quick Start Guide - Page 149
eficiente, visite www.hp.com/photosmart (somente em inglês) ou www.hp.com. ● Para ajuda com seu produto, diagnósticos e download de drivers 24 horas por dia, visite www.hp.com/support. ● Para ajuda com o software HP Photosmart, consulte a ajuda online do software HP Photosmart. Português Primeiros - HP Photosmart R727 | Quick Start Guide - Page 150
Foco - As configurações são Normal, Macro, Macro automático e Infinito. 4 Botão Photosmart Express - As opções são: Imprimir, Encomendar impressões online e Config. Compartilhar. 5 6 Botão Obturador. 7 Botão Vídeo. 8 Luz de alimentação Português 6 Câmera digital HP Photosmart R725/R727 - HP Photosmart R727 | Quick Start Guide - Page 151
9 Botão . 10 Suporte da fita de pulso 11 Controle do Zoom (Digital e Óptico) - Em Exibição ao vivo, pressione para aumentar o zoom ou pressione para diminuir o zoom. Em Reproduzir, pressione para ampliar a imagem selecionada, ou pressione para visualizar - HP Photosmart R727 | Quick Start Guide - Page 152
Se você comprar uma estação de acoplamento opcional HP Photosmart, ela virá com vários suportes transparentes. Ao instalar a estação de acoplamento para uso com esta câmera, use o suporte da estação de acoplamento com a etiqueta redonda azul. Consulte o 8 Câmera digital HP Photosmart R725/R727 - HP Photosmart R727 | Quick Start Guide - Page 153
Guia do Usuário da estação de acoplamento para obter instruções. Português Primeiros passos 9 - HP Photosmart R727 | Quick Start Guide - Page 154
Carregar a bateria Você pode carregar a bateria dentro da câmera, utilizando o adaptador AC. Conecte o adaptador de alimentação AC à câmera e, em seguida, ligue-o a uma tomada elétrica. A luz e ficar constantemente acesa (de duas a três horas). Português 10 Câmera digital HP Photosmart R725/R727 - HP Photosmart R727 | Quick Start Guide - Page 155
Ligue a câmera Para ligar a câmera, pressione o botão desliga). Escolher o idioma Use para escolher o idioma desejado e, a seguir, pressione . (liga/ Português Definir a região Juntamente com a configuração Idioma, a configuração Região determina o formato padrão de data e o formato de - HP Photosmart R727 | Quick Start Guide - Page 156
de memória opcional Essa câmera é compatível com cartões de memória padrão e de alta velocidade Secure Digital (SD) de 8 MB até 2 GB. 1. Desligue a câmera e abra a porta da bateria/cartão de nela armazenadas, remova o cartão de memória. Português 12 Câmera digital HP Photosmart R725/R727 - HP Photosmart R727 | Quick Start Guide - Page 157
, entre outros). Se você tiver problemas para instalar ou usar o software HP Photosmart, consulte o site de Suporte ao Cliente HP para obter mais informações. www.hp.com/ support. Windows Se a versão do Windows no computador não cumprir os requisitos mínimos de sistema declarados na embalagem - HP Photosmart R727 | Quick Start Guide - Page 158
2. Na área de trabalho do computador, clique duas vezes no ícone do CD. 3. Clique duas vezes no ícone do instalador e siga as instruções da tela. Português 14 Câmera digital HP Photosmart R725/R727 - HP Photosmart R727 | Quick Start Guide - Page 159
3 Tirar fotos e gravar clipes de vídeo A Exibição ao vivo permite enquadrar fotos e clipes de vídeo no Visor de imagens. Tirar uma foto estática 1. Pressione até que seja exibido no canto superior direito do Visor. Isso indica que a câmera está na Exibição ao vivo. 2. Enquadre o objeto/pessoa - HP Photosmart R727 | Quick Start Guide - Page 160
3. Pressione e solte o botão Vídeo 4. Para interromper a gravação do vídeo, pressione e solte o botão Vídeo novamente. Português 16 Câmera digital HP Photosmart R725/R727 - HP Photosmart R727 | Quick Start Guide - Page 161
4 Rever e excluir imagens e clipes de vídeo Rever imagens e clipes de vídeo Você pode rever e trabalhar com imagens e clipes de vídeo em Reproduzir. 1. Pressione até que seja exibido no canto superior direito do Visor de imagens. Isso indica que você está em Reproduzir. 2. Use para percorrer - HP Photosmart R727 | Quick Start Guide - Page 162
que a acompanha. 2. Ligue a câmera e siga as instruções da tela do computador para transferir as imagens. Para obter mais informações, consulte o recurso Ajuda do software HP Photosmart. Português 18 Câmera digital HP Photosmart R725/R727 - HP Photosmart R727 | Quick Start Guide - Page 163
Imprimir imagens diretamente da câmera Você pode conectar a câmera a qualquer impressora compatível com PictBridge para imprimir imagens estáticas e quadros salvos a partir de um clipe de vídeo. 1. Verifique se a impressora está ligada, se há papel e se não há mensagens de erro da impressora. 2. - HP Photosmart R727 | Quick Start Guide - Page 164
é o menu desejado. Dentro de um menu, use para ir até as seleções específicas. Para sair do menu, pressione a qualquer hora. Português 20 Câmera digital HP Photosmart R725/R727 - HP Photosmart R727 | Quick Start Guide - Page 165
Os menus e as opções são: Menu Opções Capturar permite ajustar ● as configurações da câmera que afetam as características de futuras imagens e clipes de vídeo capturadas com a câmera. ● ● ● Modos Fotografia (Modo Automático, Paisagem, Retrato, Teatro, Panorama direita, Panorama esquerda, - HP Photosmart R727 | Quick Start Guide - Page 166
câmera.' ● Luz auxiliar de foco ● Tempo de espera do visor ● Revisão instantânea ● Zoom digital ● Data e hora ● Configuração USB ● Configuração de TV ● Idioma ● Restaurar configurações Ajuda clipes de vídeo Rever imagens e vídeos Português 22 Câmera digital HP Photosmart R725/R727 - HP Photosmart R727 | Quick Start Guide - Page 167
assistência ● Atalhos da câmera ● Sobre... Ao se pressionar em Exibição ao vivo ou em Reproduzir, vê-se o menu Photosmart Express. Menu Opções Photosmart Express ● permite que você compartilhe ● suas fotos com amigos e parentes. ● ● Imprimir Encomendar impressões online Compart. todas as - HP Photosmart R727 | Quick Start Guide - Page 168
Português 24 Câmera digital HP Photosmart R725/R727 - HP Photosmart R727 | Quick Start Guide - Page 169
- HP Photosmart R727 | Quick Start Guide - Page 170
● Share Menu Setup 23 HP Photosmart R725/R727 - HP Photosmart R727 | Quick Start Guide - Page 171
Recording Video Clips Reviewing Images and ● Videos Extracting Prints from Video Deleting Images Transferring Images Managing Batteries Getting Assistance Camera Shortcuts About... ● Live View Photosmart Express Playback .(Photosmart Express menu Print - HP Photosmart R727 | Quick Start Guide - Page 172
USB ● ) TV Configuration ● ) Language Reset Settings ● ) Top Ten Tips Camera ) Accessories ● ) Camera Buttons ● Using Shooting Modes Using Design Gallery Sharing Images Printing Images ) Help 21 HP Photosmart R725/R727 - HP Photosmart R727 | Quick Start Guide - Page 173
Date & Time Imprint ● ) Image Advice ● ) Image Info View Slideshow Stitch Panorama Record Audio Move Images to Card ) Playback ● Apply Artistic Effects Modify Color ● ) Add Borders ● Remove Red Eyes ● ) Rotate Crop ) Design Gallery Display - HP Photosmart R727 | Quick Start Guide - Page 174
Self-Timer Red-Eye Removal Exposure Compensation Adaptive Lighting Bracketing Image Quality Video Quality ● ) Burst White Balance ● ) Auto Focus Area ● ) AE Metering ● ) ISO Speed ISO Saturation ) Capture 19 HP Photosmart R725/R727 - HP Photosmart R727 | Quick Start Guide - Page 175
6 ● ) Live View Live View ● ) Playback Playback Playback Live View 18 - HP Photosmart R727 | Quick Start Guide - Page 176
.2 ה USB .3 4 Print Setup Menu 5 17 HP Photosmart R725/R727 - HP Photosmart R727 | Quick Start Guide - Page 177
5 HP Photosmart HP Photosmart HP Photosmart .1 USB .2 Help HP Photosmart PictBridge .1 16 - HP Photosmart R727 | Quick Start Guide - Page 178
4 Playback .1 Playback .2 Playback .1 Playback .2 .3 Delete .4 This Image 15 HP Photosmart R725/R727 - HP Photosmart R727 | Quick Start Guide - Page 179
.4 14 - HP Photosmart R727 | Quick Start Guide - Page 180
3 ) Live View .1 Live View .2 .3 .4 5 60 .1 Live View .2 .3 13 HP Photosmart R725/R727 - HP Photosmart R727 | Quick Start Guide - Page 181
HP Photosmart HP www.hp.com/support : Windows Windows HP Photosmart Essential HP Photosmart Premier .1 .2 HP Photosmart Start Run D:\Setup.exe D OK .3 Macintosh .1 HP Photosmart .2 3 12 - HP Photosmart R727 | Quick Start Guide - Page 182
Secure SD) Digital HP 8MBעד .2GB .1 .2 .3 .1 ) Playback .2 Delete .3 Format Card .4 Yes HP Photosmart 11 HP Photosmart R725/R727 - HP Photosmart R727 | Quick Start Guide - Page 183
Language Region .1 .2 1 .3 10 - HP Photosmart R727 | Quick Start Guide - Page 184
2 .1 2 3 AC AC 2 3 9 HP Photosmart R725/R727 - HP Photosmart R727 | Quick Start Guide - Page 185
123 4 5 6 98 7 1 2 3 4 5 6 7 8 USB 9 HP Photosmart 8 - HP Photosmart R727 | Quick Start Guide - Page 186
Mode Landscape Portrait Theatre , Panorama Right Panorama Left Action Night Portrait Night Scenery Beach Snow Sunset Document 13 14 15 16 Delete Delete Playback 17 7 HP Photosmart R725/R727 - HP Photosmart R727 | Quick Start Guide - Page 187
89 10 11 12 13 14 17 16 15 1 Auto Flash On 2 Flash Off Normal Macro 3 ) Auto Macro Infinity Photosmart Express 4 ) Print Buy Prints Online Share Setup Live View/Playback 5 Live View Playback 18 - HP Photosmart R727 | Quick Start Guide - Page 188
HP Photosmart Windows HP Solution Center Help and Support Macintosh HP Device Manager User Guide Information and Settings www.hp.com/photosmart www.hp.com 7 24 www.hp.com/support HP Photosmart HP Photosmart 5 HP Photosmart R725/R727 - HP Photosmart R727 | Quick Start Guide - Page 189
1 HP Photosmart HP HP Photosmart .1 HP Photosmart .2 Windows View User Guide Macintosh readme docs 4 - HP Photosmart R727 | Quick Start Guide - Page 190
1 4 4 6 8 8 2 9 9 9 9 10 10 10 11 11 3 13 13 13 4 15 15 15 5 16 16 16 6 18 3 HP Photosmart R725/R727 - HP Photosmart R727 | Quick Start Guide - Page 191
© Copyright 2006 Hewlett-Packard Development Company L.P HP HP ® Windows Microsoft Corporation SD - HP Photosmart R727 | Quick Start Guide - Page 192
HP Photosmart R725/R727
-
 1
1 -
 2
2 -
 3
3 -
 4
4 -
 5
5 -
 6
6 -
 7
7 -
8
-
9
-
10
-
11
-
12
-
13
-
14
-
15
-
16
-
17
-
18
-
19
-
20
-
21
-
22
-
23
-
24
-
25
-
26
-
27
-
28
-
29
-
30
-
31
-
32
-
33
-
34
-
35
-
36
-
37
-
38
-
39
-
40
-
41
-
42
-
43
-
44
-
45
-
46
-
47
-
48
-
49
-
50
-
51
-
52
-
53
-
54
-
55
-
56
-
57
-
58
-
59
-
60
-
61
-
62
-
63
-
64
-
65
-
66
-
67
-
68
-
69
-
70
-
71
-
72
-
73
-
74
-
75
-
76
-
77
-
78
-
79
-
80
-
81
-
82
-
83
-
84
-
85
-
86
-
87
-
88
-
89
-
90
-
91
-
92
-
93
-
94
-
95
-
96
-
97
-
98
-
99
-
100
-
101
-
102
-
103
-
104
-
105
-
106
-
107
-
108
-
109
-
110
-
111
-
112
-
113
-
114
-
115
-
116
-
117
-
118
-
119
-
120
-
121
-
122
-
123
-
124
-
125
-
126
-
127
-
128
-
129
-
130
-
131
-
132
-
133
-
134
-
135
-
136
-
137
-
138
-
139
-
140
-
141
-
142
-
143
-
144
-
145
-
146
-
147
-
148
-
149
-
150
-
151
-
152
-
153
-
154
-
155
-
156
-
157
-
158
-
159
-
160
-
161
-
162
-
163
-
164
-
165
-
166
-
167
-
168
-
169
-
170
-
171
-
172
-
173
-
174
-
175
-
176
-
177
-
178
-
179
-
180
-
181
-
182
-
183
-
184
-
185
-
186
-
187
-
188
-
189
-
190
-
191
-
192
 |
 |

HP Photosmart R725/R727 Digital
Camera
English