HP Photosmart R827 Quick Start Guides - Page 9
Setting up your, camera - power adapter
 |
View all HP Photosmart R827 manuals
Add to My Manuals
Save this manual to your list of manuals |
Page 9 highlights
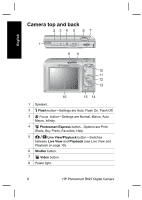
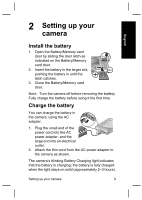
2 Setting up your camera English Install the battery 1. Open the Battery/Memory card door by sliding the door latch as indicated on the Battery/Memory card door. 2. Insert the battery in the larger slot, pushing the battery in until the latch catches. 3. Close the Battery/Memory card door. Note Turn the camera off before removing the battery. Fully charge the battery before using it the first time. Charge the battery You can charge the battery in the camera, using the AC adapter. 1. Plug the small end of the power cord into the AC power adapter, and the large end into an electrical outlet. 2. Attach the thin cord from the AC power adapter to the camera as shown. The camera's blinking Battery Charging light indicates that the battery is charging; the battery is fully charged when the light stays on solid (approximately 2-3 hours). Setting up your camera 9
-
 1
1 -
2
-
3
-
 4
4 -
 5
5 -
 6
6 -
 7
7 -
 8
8 -
 9
9 -
 10
10 -
 11
11 -
 12
12 -
 13
13 -
 14
14 -
15
-
16
-
17
-
18
-
19
-
20
-
21
-
22
-
23
-
24
-
25
-
26
-
27
-
28
-
29
-
30
-
31
-
32
-
33
-
34
-
35
-
36
-
37
-
38
-
39
-
40
-
41
-
42
-
43
-
44
-
45
-
46
-
47
-
48
-
49
-
50
-
51
-
52
-
53
-
54
-
55
-
56
-
57
-
58
-
59
-
60
-
61
-
62
-
63
-
64
-
65
-
66
-
67
-
68
-
69
-
70
-
71
-
72
-
73
-
74
-
75
-
76
-
77
-
78
-
79
-
80
-
81
-
82
-
83
-
84
-
85
-
86
-
87
-
88
-
89
-
90
-
91
-
92
-
93
-
94
-
95
-
96
-
97
-
98
-
99
-
100
-
101
-
102
-
103
-
104
-
105
-
106
-
107
-
108
-
109
-
110
-
111
-
112
-
113
-
114
-
115
-
116
-
117
-
118
-
119
-
120
-
121
-
122
-
123
-
124
-
125
-
126
-
127
-
128
-
129
-
130
-
131
-
132
-
133
-
134
-
135
-
136
-
137
-
138
-
139
-
140
-
141
-
142
-
143
-
144
-
145
-
146
-
147
-
148
-
149
-
150
-
151
-
152
-
153
-
154
-
155
-
156
-
157
-
158
-
159
-
160
-
161
-
162
-
163
-
164
-
165
-
166
-
167
-
168
-
169
-
170
-
171
-
172
-
173
-
174
-
175
-
176
-
177
-
178
-
179
-
180
-
181
-
182
-
183
-
184
-
185
-
186
-
187
-
188
-
189
-
190
-
191
-
192
-
193
-
194
-
195
-
196
 |
 |
