HP Presario S5000 Compaq Presario S0000/8000 User's Guide - Page 18
turning on your pc for the first time
 |
View all HP Presario S5000 manuals
Add to My Manuals
Save this manual to your list of manuals |
Page 18 highlights
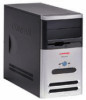
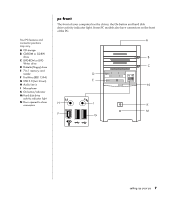
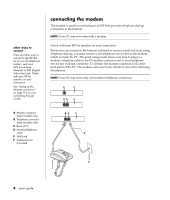
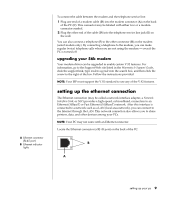
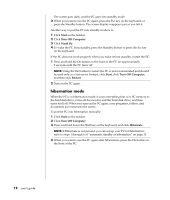
To connect the Ethernet connector to the network: 1 Plug the network cable into the Ethernet connector (A) on the back of the PC. WARNING: Do not plug the telephone service line cable or modem cable into the Ethernet connector. Although the plug looks similar to the plug on the Ethernet cable, they are not the same. 2 Plug the other end of the Ethernet cable into a 10BaseT or a 100BaseT port on the network hub. NOTE: Hubs are devices that can connect PCs to a network. 3 With the PC turned on, check the lights next to the Ethernet connector for status: • ACTIVITY - Lit yellow during network data transfer activity • LINK - Lit green with valid network connection turning on your pc for the first time After you have completed the steps on the quick setup poster, you are ready to turn on your PC. 1 Press the Power button on the monitor. 2 Press the On button (A) on the front of the PC (see the following figure). 3 Press the Power button on the speakers, if they are present. 10 user's guide A 4 Click an option to select your language (if applicable for your model). Click OK and then confirm your selection by clicking Yes. Wait until the PC makes preparations. (It may take up to 30 minutes to set up the language on the PC.) 5 Set up Microsoft® Windows® by following the onscreen instructions. 6 Refer to the following section, "registering your pc," for information on completing the registration process (select models only).
-
 1
1 -
2
-
3
-
4
-
5
-
6
-
7
-
8
-
9
-
10
-
11
-
12
-
 13
13 -
 14
14 -
 15
15 -
 16
16 -
 17
17 -
 18
18 -
 19
19 -
 20
20 -
 21
21 -
 22
22 -
 23
23 -
24
-
25
-
26
-
27
-
28
-
29
-
30
-
31
-
32
-
33
-
34
-
35
-
36
-
37
-
38
-
39
-
40
-
41
-
42
-
43
-
44
-
45
-
46
-
47
-
48
-
49
-
50
-
51
-
52
-
53
-
54
-
55
-
56
-
57
-
58
-
59
-
60
-
61
-
62
-
63
-
64
-
65
-
66
-
67
-
68
-
69
-
70
-
71
-
72
-
73
-
74
-
75
-
76
-
77
-
78
-
79
-
80
-
81
-
82
-
83
-
84
-
85
-
86
-
87
-
88
-
89
-
90
-
91
-
92
-
93
-
94
-
95
-
96
-
97
-
98
-
99
-
100
-
101
-
102
-
103
-
104
-
105
-
106
-
107
-
108
-
109
-
110
-
111
-
112
-
113
-
114
-
115
-
116
-
117
-
118
-
119
-
120
-
121
-
122
-
123
-
124
-
125
-
126
-
127
-
128
-
129
-
130
-
131
-
132
-
133
-
134
-
135
-
136
-
137
-
138
-
139
-
140
-
141
-
142
-
143
-
144
-
145
-
146
-
147
-
148
-
149
-
150
-
151
-
152
-
153
-
154
-
155
-
156
-
157
-
158
-
159
-
160
-
161
-
162
-
163
-
164
-
165
-
166
-
167
-
168
 |
 |