HP Presario V6100 Compaq Presario V6000 Notebook PC Maintenance and Service Gu - Page 146
Display Assembly, Display Assembly Spare Part Number Information
 |
View all HP Presario V6100 manuals
Add to My Manuals
Save this manual to your list of manuals |
Page 146 highlights
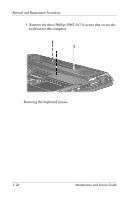
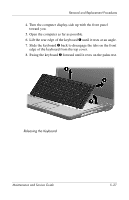
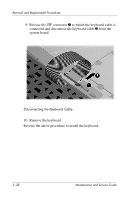
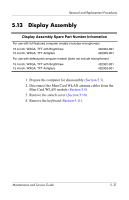
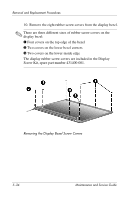
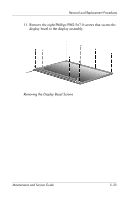
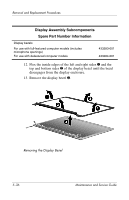
Removal and Replacement Procedures 5.13 Display Assembly Display Assembly Spare Part Number Information For use with full-featured computer models (includes microphones) 15.4-inch, WXGA, TFT with BrightView 15.4-inch, WXGA, TFT Antiglare 432304-001 432305-001 For use with defeatured computer models (does not include microphones) 15.4-inch, WXGA, TFT with BrightView 15.4-inch, WXGA, TFT Antiglare 432302-001 432303-001 1. Prepare the computer for disassembly (Section 5.3). 2. Disconnect the Mini Card WLAN antenna cables from the Mini Card WLAN module (Section 5.8). 3. Remove the switch cover (Section 5.10). 4. Remove the keyboard (Section 5.11). Maintenance and Service Guide 5-31
-
 1
1 -
2
-
3
-
4
-
5
-
6
-
7
-
8
-
9
-
10
-
11
-
12
-
13
-
14
-
15
-
16
-
17
-
18
-
19
-
20
-
21
-
22
-
23
-
24
-
25
-
26
-
27
-
28
-
29
-
30
-
31
-
32
-
33
-
34
-
35
-
36
-
37
-
38
-
39
-
40
-
41
-
42
-
43
-
44
-
45
-
46
-
47
-
48
-
49
-
50
-
51
-
52
-
53
-
54
-
55
-
56
-
57
-
58
-
59
-
60
-
61
-
62
-
63
-
64
-
65
-
66
-
67
-
68
-
69
-
70
-
71
-
72
-
73
-
74
-
75
-
76
-
77
-
78
-
79
-
80
-
81
-
82
-
83
-
84
-
85
-
86
-
87
-
88
-
89
-
90
-
91
-
92
-
93
-
94
-
95
-
96
-
97
-
98
-
99
-
100
-
101
-
102
-
103
-
104
-
105
-
106
-
107
-
108
-
109
-
110
-
111
-
112
-
113
-
114
-
115
-
116
-
117
-
118
-
119
-
120
-
121
-
122
-
123
-
124
-
125
-
126
-
127
-
128
-
129
-
130
-
131
-
132
-
133
-
134
-
135
-
136
-
137
-
138
-
139
-
140
-
 141
141 -
 142
142 -
 143
143 -
 144
144 -
 145
145 -
 146
146 -
 147
147 -
 148
148 -
 149
149 -
 150
150 -
 151
151 -
152
-
153
-
154
-
155
-
156
-
157
-
158
-
159
-
160
-
161
-
162
-
163
-
164
-
165
-
166
-
167
-
168
-
169
-
170
-
171
-
172
-
173
-
174
-
175
-
176
-
177
-
178
-
179
-
180
-
181
-
182
-
183
-
184
-
185
-
186
-
187
-
188
-
189
-
190
-
191
-
192
-
193
-
194
-
195
-
196
-
197
-
198
-
199
-
200
-
201
-
202
-
203
-
204
-
205
-
206
-
207
-
208
-
209
-
210
-
211
-
212
-
213
-
214
-
215
-
216
-
217
-
218
-
219
-
220
-
221
-
222
-
223
-
224
-
225
-
226
-
227
-
228
-
229
-
230
-
231
-
232
-
233
-
234
-
235
-
236
-
237
-
238
-
239
-
240
-
241
-
242
-
243
-
244
-
245
-
246
-
247
-
248
-
249
-
250
-
251
-
252
-
253
-
254
-
255
-
256
-
257
-
258
-
259
-
260
-
261
-
262
-
263
-
264
-
265
-
266
-
267
-
268
-
269
-
270
-
271
-
272
-
273
-
274
-
275
-
276
-
277
-
278
 |
 |

Removal and Replacement Procedures
Maintenance and Service Guide
5–31
5.13
Display Assembly
1. Prepare the computer for disassembly (
Section 5.3
).
2. Disconnect the Mini Card WLAN antenna cables from the
Mini Card WLAN module (
Section 5.8
).
3. Remove the switch cover (
Section 5.10
).
4. Remove the keyboard (
Section 5.11
).
Display Assembly Spare Part Number Information
For use with full-featured computer models (includes microphones)
15.4-inch, WXGA, TFT with BrightView
15.4-inch, WXGA, TFT Antiglare
432304-001
432305-001
For use with defeatured computer models (does not include microphones)
15.4-inch, WXGA, TFT with BrightView
15.4-inch, WXGA, TFT Antiglare
432302-001
432303-001