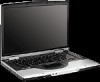
HP Presario X1000 Compaq Presario X1000, X1100, and X1200 notebook series PC -
HP Presario X1000 - Notebook PC Manual
 |
View all HP Presario X1000 manuals
Add to My Manuals
Save this manual to your list of manuals |
HP Presario X1000 manual content summary:
- HP Presario X1000 | Compaq Presario X1000, X1100, and X1200 notebook series PC - - Page 1
2003 3:55 PM b Startup and Reference Guide Compaq Notebook Series Document Part Number: 311245-001 June 2003 Part 1: Startup The Startup part of this guide explains how to set up your notebook for the first time. Part 2: Reference The Reference part of this guide explains how to identify and use the - HP Presario X1000 | Compaq Presario X1000, X1100, and X1200 notebook series PC - - Page 2
CPQ-311245-001.book Page ii Tuesday, April 1, 2003 3:55 PM Contents 1 Startup 2 Hardware 3 Keyboard 4 Power 5 Drives and Drive Media 6 Multimedia 7 Communications 8 Hardware Options and Upgrades 9 Software Updates, Restorations and Utilities A Specifications Index - HP Presario X1000 | Compaq Presario X1000, X1100, and X1200 notebook series PC - - Page 3
hardware and software for the first time, follow the procedures in this "Startup" part. ■ To learn more about using your notebook, refer to the remaining "Reference" part of this book. To find information about a specific topic: ❏ Refer to the chapter Contents on the first page of each chapter - HP Presario X1000 | Compaq Presario X1000, X1100, and X1200 notebook series PC - - Page 4
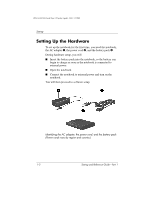
to external power. ■ Open the notebook. ■ Connect the notebook to external power and turn on the notebook. You will then proceed to software setup. Identifying the AC adapter, the power cord, and the battery pack (Power cords vary by region and country.) 1-2 Startup and Reference Guide-Part 1 - HP Presario X1000 | Compaq Presario X1000, X1100, and X1200 notebook series PC - - Page 5
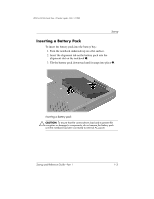
until it snaps into place 2. Inserting a battery pack Ä CAUTION: To ensure that the correct drivers load and to prevent file corruption or damage to components, do not remove the battery pack until the notebook has been connected to external AC power. Startup and Reference Guide-Part 1 1-3 - HP Presario X1000 | Compaq Presario X1000, X1100, and X1200 notebook series PC - - Page 6
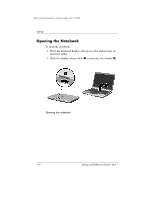
side up on a flat surface near an electrical outlet. 2. Slide the display release latch 1 as you raise the display 2. Opening the notebook 1-4 Startup and Reference Guide-Part 1 - HP Presario X1000 | Compaq Presario X1000, X1100, and X1200 notebook series PC - - Page 7
1. 2. Plug the power cord into the AC adapter 2, then into an electrical outlet 3. When the notebook is receiving external power, the battery light 4 turns on. Connecting the notebook to external power (Power cords and outlets vary by region and country.) Startup and Reference Guide-Part 1 1-5 - HP Presario X1000 | Compaq Presario X1000, X1100, and X1200 notebook series PC - - Page 8
light is on and green when a battery pack inserted into the notebook is fully charged. Compaq recommends that you leave the notebook connected to external power until the battery pack is fully charged and the battery light turns green. (A partially charged new battery pack can run the notebook after - HP Presario X1000 | Compaq Presario X1000, X1100, and X1200 notebook series PC - - Page 9
.) ■ If you have installed a battery pack, make sure that the battery pack is firmly seated. ■ Refer to the Worldwide Telephone Numbers booklet (English only) included with the notebook to contact a Compaq authorized dealer, reseller, or service provider. Startup and Reference Guide-Part 1 1-7 - HP Presario X1000 | Compaq Presario X1000, X1100, and X1200 notebook series PC - - Page 10
drivers are installed, install software only when the notebook is connected to external power through the AC adapter. During the installation: ■ Do not unplug the notebook from external power , or cord. Installing Basic Software When the notebook is connected to external power and turned Guide-Part 1 - HP Presario X1000 | Compaq Presario X1000, X1100, and X1200 notebook series PC - - Page 11
that is displayed, select the Cancel button. ■ To install a preloaded item, select the check box for the item, select the Next button, then follow the instructions on the screen. Startup and Reference Guide-Part 1 1-9 - HP Presario X1000 | Compaq Presario X1000, X1100, and X1200 notebook series PC - - Page 12
Down button, then select Shut down from the drop down list. ■ Press and hold down the power button for at least 4 seconds. ■ Unplug the notebook from external power and remove the battery pack. For instructions see "Replacing a Battery Pack" in Chapter 4. 1-10 Startup and Reference Guide-Part 1 - HP Presario X1000 | Compaq Presario X1000, X1100, and X1200 notebook series PC - - Page 13
storm, run the notebook on battery power or shut down the notebook and disconnect the power cord. Protecting the Notebook Against instructions and more information about virus updates, refer to the Help file within the application or select Start > Help and Support. Startup and Reference Guide-Part - HP Presario X1000 | Compaq Presario X1000, X1100, and X1200 notebook series PC - - Page 14
and mechanical safety information. This guide is available on the Web at http://www.compaq.com/ergo, on the hard drive, or on the Documentation Library CD that is included with the product. Å WARNING: This notebook is designed to run demanding applications at full power. As a result of increased - HP Presario X1000 | Compaq Presario X1000, X1100, and X1200 notebook series PC - - Page 15
CPQ-311245-001.book Page 1 Tuesday, April 1, 2003 3:55 PM Part 2 Reference Startup and Reference Guide-Part 2 - HP Presario X1000 | Compaq Presario X1000, X1100, and X1200 notebook series PC - - Page 16
CPQ-311245-001.book Page 2 Tuesday, April 1, 2003 3:55 PM Startup and Reference Guide-Part 2 - HP Presario X1000 | Compaq Presario X1000, X1100, and X1200 notebook series PC - - Page 17
Antenna 2-4 Power Controls 2-5 Lights 2-6 Audio Buttons and Memory Compartment 2-13 Docking Connector and Vents 2-14 Labels 2-15 Additional Standard Components 2-16 Cables and Cord 2-16 Adapters and Battery Pack 2-17 Restoration and Documentation CDs 2-18 Startup and Reference Guide-Part - HP Presario X1000 | Compaq Presario X1000, X1100, and X1200 notebook series PC - - Page 18
CPQ-311245-001.book Page 2 Tuesday, April 1, 2003 3:55 PM Hardware Display Display Display release latch Opens the notebook. 2-2 Startup and Reference Guide-Part 2 - HP Presario X1000 | Compaq Presario X1000, X1100, and X1200 notebook series PC - - Page 19
external mouse. *This table describes default settings. For information about changing the functions of TouchPad features, see "Setting TouchPad Preferences" in Chapter 3. Startup and Reference Guide-Part 2 2-3 - HP Presario X1000 | Compaq Presario X1000, X1100, and X1200 notebook series PC - - Page 20
second is on the right side of the notebook. For optimal transmissions, keep the areas immediately over the antennas free from obstructions. 2-4 Startup and Reference Guide-Part 2 - HP Presario X1000 | Compaq Presario X1000, X1100, and X1200 notebook series PC - - Page 21
is opened while in Standby, turns on the notebook (resumes from Standby). *This table describes default settings. For information about changing the function of the power button or display switch, see "Setting Power Control Preferences" in Chapter 4. Startup and Reference Guide-Part 2 2-5 - HP Presario X1000 | Compaq Presario X1000, X1100, and X1200 notebook series PC - - Page 22
is charging. ■ On green: A battery pack is fully charged. ■ Flashing: A battery pack is malfunctioning and may need to be replaced. On: The internal hard drive or optical drive is being accessed. On: Notebook is turned on. Flashing: Notebook is in Standby. 2-6 Startup and Reference Guide-Part 2 - HP Presario X1000 | Compaq Presario X1000, X1100, and X1200 notebook series PC - - Page 23
PM Audio Buttons and Speakers Hardware Top: Audio Buttons and Speakers 1 Increase volume button Increases system volume. 2 Decrease volume button Decreases system volume. 3 Mute button Mutes or restores volume. 4 Stereo speakers (2) Produce stereo sound. Startup and Reference Guide-Part - HP Presario X1000 | Compaq Presario X1000, X1100, and X1200 notebook series PC - - Page 24
cards). Connects an optional monaural or stereo microphone. Connects optional headphones or powered stereo speakers. Also connects the audio function of an audio/video device such as a television or VCR. Turns an optional internal wireless device on or off. 2-8 Startup and Reference Guide-Part - HP Presario X1000 | Compaq Presario X1000, X1100, and X1200 notebook series PC - - Page 25
external monitor or projector. 2 S-Video jack Connects an optional S-Video device, such as a television, VCR, camcorder, projector, or video capture card. 3 USB connectors (3) Connect optional Connects an optional 1394 device such as a camcorder. Startup and Reference Guide-Part 2 2-9 - HP Presario X1000 | Compaq Presario X1000, X1100, and X1200 notebook series PC - - Page 26
Hardware Vent Rear Panel: Vent Exhaust vent* Provides airflow to cool internal components. Ä To prevent overheating, do not obstruct vents. Do not allow a hard surface, such as a printer, or a soft surface, such as pillows or thick rugs or clothing, to block airflow. *The notebook has 3 vents - HP Presario X1000 | Compaq Presario X1000, X1100, and X1200 notebook series PC - - Page 27
3 Optical drive* Supports an optional Type I or Type II 32-bit (CardBus) or 16-bit PC Card. Ejects an optional PC Card from the PC Card slot. Supports an optical disc. *The type of optical drive, for example a CD, DVD, or combination CD/DVD drive, varies by model. Startup and Reference Guide-Part - HP Presario X1000 | Compaq Presario X1000, X1100, and X1200 notebook series PC - - Page 28
the notebook)* 2 Infrared port 3 Power connector Provides wireless communication between the notebook and an optional IrDA-compliant device. Connects an AC adapter cable. 4 Security cable slot Attaches immediately over the antennas free from obstructions. 2-12 Startup and Reference Guide-Part 2 - HP Presario X1000 | Compaq Presario X1000, X1100, and X1200 notebook series PC - - Page 29
Contains 1 memory slot for an optional 128-MB, 256-MB, 512-MB, or 1024-MB memory module. As shipped, the memory slot may be filled with a replaceable memory module or vacant, depending on the notebook model. 4 Hard drive bay Holds the internal hard drive. Startup and Reference Guide-Part 2 2-13 - HP Presario X1000 | Compaq Presario X1000, X1100, and X1200 notebook series PC - - Page 30
2 Vents (3) Allow airflow to cool internal components. Ä To prevent overheating, use the notebook only on hard surfaces which cannot obstruct the vents. Do not allow a soft surface, such as bedding, clothing or a when the connector is not in use. 2-14 Startup and Reference Guide-Part 2 - HP Presario X1000 | Compaq Presario X1000, X1100, and X1200 notebook series PC - - Page 31
when troubleshooting system problems or traveling internationally with the notebook. ■ The Microsoft Certificate of Authenticity label contains the Product Key number. You may need this number to update or troubleshoot if you call customer support. ■ The modem which are specific to various - HP Presario X1000 | Compaq Presario X1000, X1100, and X1200 notebook series PC - - Page 32
select models) Connects the notebook to an Ethernet network jack. ✎ A network cable has an 8-pin, RJ-45 network connector at each end. 3 Power cord* Connects an AC adapter to an AC electrical outlet. *Power cords vary in appearance by region and country. 2-16 Startup and Reference Guide-Part 2 - HP Presario X1000 | Compaq Presario X1000, X1100, and X1200 notebook series PC - - Page 33
required) Adapts the modem cable to a non-RJ-11 telephone jack. 3 Japan-specific outlet adapter Connects the AC adapter to a 2-prong (Japan only) electrical outlet. 4 Battery pack Runs the notebook when the notebook is not connected to external power. Startup and Reference Guide-Part 2 2-17 - HP Presario X1000 | Compaq Presario X1000, X1100, and X1200 notebook series PC - - Page 34
and Travel ■ Solving notebook problems yourself ■ Getting help Troubleshooting ■ Governmental and safety information ■ Protecting the notebook from static electricity Regulatory and Safety Notices Ergonomic and safety information Safety & Comfort Guide General instructions for using modem AT - HP Presario X1000 | Compaq Presario X1000, X1100, and X1200 notebook series PC - - Page 35
3-4 Identifying Hotkeys 3-4 Hotkey Quick Reference 3-5 Hotkey Procedures 3-5 Hotkey Commands 3-6 Keypad 3-8 Turning the Keypad On and Off 3-9 Switching the Functions of Keypad Keys 3-9 Startup and Reference Guide-Part 2 3-1 - HP Presario X1000 | Compaq Presario X1000, X1100, and X1200 notebook series PC - - Page 36
includes the following components: 1 TouchPad 2 Left and right TouchPad buttons 3 TouchPad scroll zones (2) 4 TouchPad on/off button 5 TouchPad light Identifying TouchPad components 3-2 Startup and Reference Guide-Part 2 - HP Presario X1000 | Compaq Presario X1000, X1100, and X1200 notebook series PC - - Page 37
in the operating system Mouse Properties window. To access Mouse Properties, select Start > Control Panel > Printers and Other Hardware icon > Mouse icon. Startup and Reference Guide-Part 2 3-3 - HP Presario X1000 | Compaq Presario X1000, X1100, and X1200 notebook series PC - - Page 38
keys 2. The icons on the function keys F1 and F3 through F12 represent the hotkey functions available on the notebook. Identifying hotkeys 3-4 Startup and Reference Guide-Part 2 - HP Presario X1000 | Compaq Presario X1000, X1100, and X1200 notebook series PC - - Page 39
the "Setting Power Control Preferences" section in Chapter 4. Default Function Hotkeys Open Help and Support window. Fn+F1 audio CD or DVD. Fn+F9 Stop an audio CD or DVD. Fn+F10 Play the previous track or chapter on an audio CD Fn+F11 or DVD. Play the next track on an audio Guide-Part 2 3-5 - HP Presario X1000 | Compaq Presario X1000, X1100, and X1200 notebook series PC - - Page 40
Support Window" section in Chapter 9, "Software Updates, Restorations and Utilities." Open Internet Explorer (Fn+F3) The Fn+F3 hotkeys open Internet Explorer. After you have set up your Internet or network services Hibernation before you can initiate Standby. 3-6 Startup and Reference Guide-Part 2 - HP Presario X1000 | Compaq Presario X1000, X1100, and X1200 notebook series PC - - Page 41
power button. For more information about using Standby and Hibernation, refer to Chapter 4, "Power "Setting Power Control Windows system password. For instructions, refer to your operating Audio CD or DVD (Fn+F9) The Fn+F9 hotkeys function only when an audio CD or DVD is inserted. If the audio - HP Presario X1000 | Compaq Presario X1000, X1100, and X1200 notebook series PC - - Page 42
April 1, 2003 3:55 PM Keyboard Stop an Audio CD or DVD (Fn+F10) The Fn+F10 hotkeys stop the play of an audio CD or DVD that is playing. Play Previous Track of an Audio CD or DVD (Fn+F11) The Fn+F11 upper right corner of the key. Identifying the keypad keys 3-8 Startup and Reference Guide-Part 2 - HP Presario X1000 | Compaq Presario X1000, X1100, and X1200 notebook series PC - - Page 43
returns to its keypad function if the keypad is turned on or to its standard function if the keypad is turned off. Startup and Reference Guide-Part 2 3-9 - HP Presario X1000 | Compaq Presario X1000, X1100, and X1200 notebook series PC - - Page 44
CPQ-311245-001.book Page 10 Tuesday, April 1, 2003 3:55 PM Keyboard 3-10 Startup and Reference Guide-Part 2 - HP Presario X1000 | Compaq Presario X1000, X1100, and X1200 notebook series PC - - Page 45
in a Battery Pack 4-12 Managing Low-Battery Conditions 4-13 Calibrating a Battery Pack 4-14 Storing a Battery Pack 4-16 Battery Conservation Settings and Procedures . . . . 4-17 Replacing a Battery Pack 4-18 Recycling or Disposing of a Used Battery Pack 4-19 Startup and Reference Guide-Part - HP Presario X1000 | Compaq Presario X1000, X1100, and X1200 notebook series PC - - Page 46
in Standby, the power/standby light flashes. When you resume from Standby, your work returns to the screen where you left off. Hibernation Hibernation saves system memory to the hard drive, takes a snapshot usually necessary, but is a recommended precaution. 4-2 Startup and Reference Guide-Part 2 - HP Presario X1000 | Compaq Presario X1000, X1100, and X1200 notebook series PC - - Page 47
external power and also protects your work during a power outage. ■ A battery pack in the notebook discharges more quickly, even when the notebook is turned off, than a battery pack that has been removed from the notebook and stored in a cool, dry location. Startup and Reference Guide-Part 2 4-3 - HP Presario X1000 | Compaq Presario X1000, X1100, and X1200 notebook series PC - - Page 48
to your place manually after restarting the notebook. A fully charged new battery pack can typically support Hibernation for several weeks. If you plan to resume within 2 weeks: Shut down the notebook. If possible, connect the notebook to external power to keep an inserted battery pack fully charged - HP Presario X1000 | Compaq Presario X1000, X1100, and X1200 notebook series PC - - Page 49
the display on or off. Identifying Power Controls and Indicators Standby, Hibernation, shutdown Power button 2 Display switch 3 Fn+F5 hotkeys (to initiate Standby) 4 Power/standby light Identifying Standby, Hibernation, shutdown, and display controls and indicators Startup and Reference Guide-Part - HP Presario X1000 | Compaq Presario X1000, X1100, and X1200 notebook series PC - - Page 50
the drop down list. ■ Press and hold down the power button for at least 4 seconds. ■ Unplug the notebook from external power and remove the battery pack. For battery pack removal instructions see the "Replacing a Battery Pack" section, later in this chapter. 4-6 Startup and Reference Guide-Part 2 - HP Presario X1000 | Compaq Presario X1000, X1100, and X1200 notebook series PC - - Page 51
on external power, the system does not initiate Standby. If the notebook is running on battery power, the Power/standby light flashes. ■ Screen clears. ■ Power/standby light flashes. ■ Screen clears. ■ Power/standby light turns on. ■ Your work returns to the screen. Startup and Reference Guide-Part - HP Presario X1000 | Compaq Presario X1000, X1100, and X1200 notebook series PC - - Page 52
the power button. ✎ If the system initiated Hibernation because of a critical low-battery condition, connect external power or insert a charged battery pack before you press the power button. ■ Power/standby light turns on. ■ Your work returns to the screen. 4-8 Startup and Reference Guide-Part 2 - HP Presario X1000 | Compaq Presario X1000, X1100, and X1200 notebook series PC - - Page 53
function of the power button, the Fn+F5 hotkeys, or the display switch Power Options icon > Advanced tab. ❏ To change the power button function, select a function from the drop-down list for When I Press The Power available in the power button, sleep button, and display switch drop- - HP Presario X1000 | Compaq Presario X1000, X1100, and X1200 notebook series PC - - Page 54
-311245-001.book Page 10 Tuesday, April 1, 2003 3:55 PM Power Using Battery Power Identifying the Battery and Power/Standby Lights Battery pack procedures refer to the: 1 Power/standby light 2 Battery light Identifying the battery and power/standby lights 4-10 Startup and Reference Guide-Part 2 - HP Presario X1000 | Compaq Presario X1000, X1100, and X1200 notebook series PC - - Page 55
the notebook switches to battery power only if the AC adapter or DC cable is disconnected from the notebook. The Power Meter icon in the system tray changes shape whenever the power source changes between battery power and external power. Charging a Battery Pack The battery pack charges whenever the - HP Presario X1000 | Compaq Presario X1000, X1100, and X1200 notebook series PC - - Page 56
indicates the approximate running time remaining on the battery pack if the battery pack continues to provide power at the current level. For example, the time remaining will decrease if you start playing a DVD and will increase if you stop playing a DVD. 4-12 Startup and Reference Guide-Part 2 - HP Presario X1000 | Compaq Presario X1000, X1100, and X1200 notebook series PC - - Page 57
turns off, and the notebook cannot save system memory to the hard drive. Resolving Low-Battery Conditions Ä CAUTION: If the notebook has reached a critical low-battery condition and has begun to initiate Hibernation, do not restore power until Hibernation is complete. When Hibernation is complete - HP Presario X1000 | Compaq Presario X1000, X1100, and X1200 notebook series PC - - Page 58
is in use. To charge the battery pack: 1. Insert the battery pack into the notebook. For instructions, see "Replacing a Battery Pack" later in this chapter. 2. Connect the notebook to external power. (The battery light is on and amber as the battery pack charges.) 3. Leave the notebook connected - HP Presario X1000 | Compaq Presario X1000, X1100, and X1200 notebook series PC - - Page 59
notebook from the external power source, but do not turn off the notebook. 6. Run the notebook on battery power until the battery pack is fully discharged. When the battery pack is fully discharged, the battery light turns off and the notebook shuts down. Startup and Reference Guide-Part 2 4-15 - HP Presario X1000 | Compaq Presario X1000, X1100, and X1200 notebook series PC - - Page 60
of a stored battery pack. To prolong the charge of a stored battery pack, place it in a location that is cool and dry. To maintain the accuracy of battery charge displays, calibrate a battery pack that has been stored for one month or more before using it. 4-16 Startup and Reference Guide-Part 2 - HP Presario X1000 | Compaq Presario X1000, X1100, and X1200 notebook series PC - - Page 61
power from the notebook. Battery run time is not affected by external devices that are plugged into an external power source. ■ Stop or remove a PC Card the image from the S-Video device to the notebook display Performance and Maintenance icon > Power Options icon > Power Meter tab. Select a short - HP Presario X1000 | Compaq Presario X1000, X1100, and X1200 notebook series PC - - Page 62
the battery pack. To replace the battery pack: 1. Turn the notebook underside up. ❏ To remove a battery pack, slide the battery release latch 1. (The battery pack tilts upward.) Then pull the battery pack out of the battery bay 2. Removing a battery pack 4-18 Startup and Reference Guide-Part 2 - HP Presario X1000 | Compaq Presario X1000, X1100, and X1200 notebook series PC - - Page 63
notebook, press the power button. Recycling or Disposing of a Used Battery Pack For information about recycling or disposing of a used battery pack, refer on the Documentation Library CD to the Regulatory and Safety Notices guide, "Battery Notice" section. Startup and Reference Guide-Part 2 4-19 - HP Presario X1000 | Compaq Presario X1000, X1100, and X1200 notebook series PC - - Page 64
CPQ-311245-001.book Page 20 Tuesday, April 1, 2003 3:55 PM Power 4-20 Startup and Reference Guide-Part 2 - HP Presario X1000 | Compaq Presario X1000, X1100, and X1200 notebook series PC - - Page 65
5-5 Removing a Disc (With Power 5-6 Removing a Disc (Without Power 5-7 Playing a Disc 5-8 Displaying Media Contents 5-8 Protecting Playback 5-9 Observing the Copyright Warning 5-9 Setting the Boot Order 5-10 Replacing the Internal Hard Drive 5-10 Startup and Reference Guide-Part 2 5-1 - HP Presario X1000 | Compaq Presario X1000, X1100, and X1200 notebook series PC - - Page 66
are for the permanent storage of data files and of software such as system files, applications, and drivers. A hard drive is sometimes called a hard disk drive. Diskette drives support diskettes, which are used to store or transport data. The notebook can read or write to any diskette. A diskette - HP Presario X1000 | Compaq Presario X1000, X1100, and X1200 notebook series PC - - Page 67
1, 2003 3:55 PM Drives and Drive Media Caring for Drives and Drive Media Ä CAUTION: To prevent damage to the notebook or a drive and loss of work: ■ Do not remove the internal hard drive except for repair or replacement. For instructions, see the"Replacing the Internal Hard Drive" section later in - HP Presario X1000 | Compaq Presario X1000, X1100, and X1200 notebook series PC - - Page 68
PC Card. An SD Card or MMC (multimedia card) can provide additional data storage. Using the IDE Drive Light The IDE (Integrated Drive Electronics) light turns on when the internal hard drive or optical drive is being accessed. Identifying the IDE drive light 5-4 Startup and Reference Guide-Part 2 - HP Presario X1000 | Compaq Presario X1000, X1100, and X1200 notebook series PC - - Page 69
Disc Inserting a Disc 1. Turn on the notebook. 2. Press the release button 1 on the drive bezel to release the media tray, then pull the tray outward until it is fully extended 2. position.) 5. Close the media tray 4. Inserting a disc into the optical drive Startup and Reference Guide-Part 2 5-5 - HP Presario X1000 | Compaq Presario X1000, X1100, and X1200 notebook series PC - - Page 70
not fully extended, tilt the disc as you remove it. 4. Close the media tray 4. 5. Place the disc in a protective case. Removing a disc from the optical drive when power is available 5-6 Startup and Reference Guide-Part 2 - HP Presario X1000 | Compaq Presario X1000, X1100, and X1200 notebook series PC - - Page 71
not fully extended, tilt the disc as you remove it. 4. Close the media tray 4. 5. Place the disc in a protective case. Removing a disc from the optical drive when power is not available Startup and Reference Guide-Part 2 5-7 - HP Presario X1000 | Compaq Presario X1000, X1100, and X1200 notebook series PC - - Page 72
the contents of a drive medium when the contents are not displayed by AutoPlay: 1.Insert the medium into the drive. 2. Select Start > Run, then type: explorer x: (where x = the drive designation of the drive containing the medium). 3. Select the OK button. 5-8 Startup and Reference Guide-Part 2 - HP Presario X1000 | Compaq Presario X1000, X1100, and X1200 notebook series PC - - Page 73
No. (Audio and video may resume or you may need to restart the drive medium.) ■ If Standby or Hibernation initiates and no warning message is displayed, resume from Hibernation or Standby by briefly pressing the power Guide-Part 2 5-9 - HP Presario X1000 | Compaq Presario X1000, X1100, and X1200 notebook series PC - - Page 74
hard drive only for repair or replacement. Ä CAUTION: To prevent an unresponsive system and loss of work, do not begin this procedure until you have: ■ Saved your work, closed all open applications, and shut down the notebook. ■ Disconnected the notebook from external power and removed the battery - HP Presario X1000 | Compaq Presario X1000, X1100, and X1200 notebook series PC - - Page 75
CPQ-311245-001.book Page 11 Tuesday, April 1, 2003 3:55 PM Drives and Drive Media 5. Turn the notebook underside up. 6. Remove the 2 hard drive retaining screws. Removing the hard drive retaining screws Startup and Reference Guide-Part 2 5-11 - HP Presario X1000 | Compaq Presario X1000, X1100, and X1200 notebook series PC - - Page 76
drive assembly (the hard drive, the hard drive cover, and the hard drive bracket) using the hard drive recess 1. Tilt the hard drive assembly upward 2, then pull the assembly from the hard drive bay 3. Removing an internal hard drive from the hard drive bay 5-12 Startup and Reference Guide-Part - HP Presario X1000 | Compaq Presario X1000, X1100, and X1200 notebook series PC - - Page 77
a hard drive, insert the 2 alignment tabs on the hard drive cover into the 2 alignment slots on the hard drive bay 1, then tilt the hard drive assembly downward into the hard drive bay until it is seated 2. Inserting an internal hard drive into the hard drive bay Startup and Reference Guide-Part - HP Presario X1000 | Compaq Presario X1000, X1100, and X1200 notebook series PC - - Page 78
1, 2003 3:55 PM Drives and Drive Media 9. If you have inserted a hard drive, reinsert the 2 hard drive retaining screws. (If you removed but did not replace a hard drive, put the retaining screws in a safe place.) Replacing the hard drive retaining screw 5-14 Startup and Reference Guide-Part 2 - HP Presario X1000 | Compaq Presario X1000, X1100, and X1200 notebook series PC - - Page 79
an S-Video Device 6-5 Connecting the Audio 6-5 Connecting the Video 6-5 Turning a Video Device On and Off 6-6 Changing the Color Television Format 6-6 Using Multimedia Software 6-7 Using Windows Media Player 6-7 Using WinDVD 6-7 Using Easy CD Creator 6-9 Startup and Reference Guide-Part - HP Presario X1000 | Compaq Presario X1000, X1100, and X1200 notebook series PC - - Page 80
software. The mute button overrides all software volume settings. To adjust volume using the audio buttons: ■ To increase volume, press the increase volume button 1. ■ To restored, the mute light turns off. Identifying the audio buttons and mute light 6-2 Startup and Reference Guide-Part 2 - HP Presario X1000 | Compaq Presario X1000, X1100, and X1200 notebook series PC - - Page 81
an Audio Device Å WARNING: To reduce the risk of personal injury, adjust the volume before putting on headphones or a headset. Ä CAUTION: To prevent possible damage to an external device, do not plug a monaural (single sound channel) plug into the audio-out jack. Startup and Reference Guide-Part - HP Presario X1000 | Compaq Presario X1000, X1100, and X1200 notebook series PC - - Page 82
The audio-out jack is also used to connect the audio functions of an audio/video device such as a television or VCR. When you connect a device to the audio-out jack: ❏ Use only a 3.5-mm plug. ❏ The internal speakers are disabled. Identifying the audio jacks 6-4 Startup and Reference Guide-Part 2 - HP Presario X1000 | Compaq Presario X1000, X1100, and X1200 notebook series PC - - Page 83
-001.book Page 5 Tuesday, April 1, 2003 3:55 PM Multimedia Connecting an S-Video Device Connecting the Audio The S-Video jack supports video signals only. If you are setting up a configuration that combines audio and video functions, such as playing a DVD movie on your notebook and displaying it on - HP Presario X1000 | Compaq Presario X1000, X1100, and X1200 notebook series PC - - Page 84
Video Device On and Off To turn on a video video device turns on the video device. ■ Switching the image to the notebook display only turns off the video device. Changing the Color Television Format Color television formats are modes by which television video Region-specific formats are support - HP Presario X1000 | Compaq Presario X1000, X1100, and X1200 notebook series PC - - Page 85
primarily for playing audio CDs. Although video CDs can be played video CD: 1. Insert the DVD or video CD into the optical drive. 2. Assign WinDVD to play the video: ❏ If the Microsoft Windows XP AppPicker window is displayed, select Play Video By Using WinDVD. Startup and Reference Guide-Part - HP Presario X1000 | Compaq Presario X1000, X1100, and X1200 notebook series PC - - Page 86
> InterVideo WinDVD > InterVideo WinDVD. 3. Follow the instructions on the screen. Managing DVD Region Settings Most DVDs you must change the region setting on your DVD drive. Ä CAUTION: The region setting on your DVD drive can be changed only 5 times. ■ The region Startup and Reference Guide-Part 2 - HP Presario X1000 | Compaq Presario X1000, X1100, and X1200 notebook series PC - - Page 87
and a CD or DVD or between your hard drive and a network drive. DirectCD is often used to back up data files or to share them with other people. Although DirectCD can be used with most application data files, including Microsoft Office data files, it cannot be used with audio files such as MP3 files - HP Presario X1000 | Compaq Presario X1000, X1100, and X1200 notebook series PC - - Page 88
, DVD, or a network drive to your hard drive, then copy from your hard drive to the CD or DVD. ■ Do not type on the notebook keyboard or move the notebook while the notebook is writing to a CD or DVD. The write process is sensitive to vibration. Choosing Recording Media Compaq recommends using high - HP Presario X1000 | Compaq Presario X1000, X1100, and X1200 notebook series PC - - Page 89
CD or DVD can be used with Easy CD Creator or CD Copier: 1. Insert the CD or DVD into the optical drive. 2. Select Start > All Programs > Easy CD Creator Basic > CD-RW Eraser. 3. Select the Erase button. 4. and Enable Track-at-Once Disable Disk-at-Once Startup and Reference Guide-Part 2 6-11 - HP Presario X1000 | Compaq Presario X1000, X1100, and X1200 notebook series PC - - Page 90
-at-Once is already enabled. ◆ If Disk-at-Once is selected, double-click Disk-at-Once to enable Track-at-Once. 6-12 Startup and Reference Guide-Part 2 - HP Presario X1000 | Compaq Presario X1000, X1100, and X1200 notebook series PC - - Page 91
On 7-12 Accessing the Network at Startup 7-12 Infrared 7-12 Setting Up an Infrared Transmission 7-13 Avoiding Standby While Using Infrared 7-14 Startup and Reference Guide-Part 2 7-1 - HP Presario X1000 | Compaq Presario X1000, X1100, and X1200 notebook series PC - - Page 92
compliant digital sources. Maximum achievable download rates are currently unknown, may not reach 56 Kbps, and will vary with line conditions. Maximum achievable upload rates are limited to 48 Kbps, may not reach 48 Kbps, and will vary with line conditions. 7-2 Startup and Reference Guide-Part 2 - HP Presario X1000 | Compaq Presario X1000, X1100, and X1200 notebook series PC - - Page 93
can purchase adapters specific for the countries on your itinerary from most computer or electronics retailers. For information about using country-specific software configurations, see "Using the Modem While Traveling Internationally" later in this section. Startup and Reference Guide-Part 2 7-3 - HP Presario X1000 | Compaq Presario X1000, X1100, and X1200 notebook series PC - - Page 94
reduce the risk of electric shock, disconnect the modem from the telephone network before accessing an internal compartment of the notebook. Internal compartments include the memory compartment and the battery and hard drive bays. 7-4 Startup and Reference Guide-Part 2 - HP Presario X1000 | Compaq Presario X1000, X1100, and X1200 notebook series PC - - Page 95
cable into the country-specific modem adapter 4. 5. Plug the country-specific modem adapter into the telephone jack 5. Connecting a modem with a modem adapter (Telephone wall jacks include the memory compartment and the battery and hard drive bays. Startup and Reference Guide-Part 2 7-5 - HP Presario X1000 | Compaq Presario X1000, X1100, and X1200 notebook series PC - - Page 96
internal modem in other countries, you must add country-specific modem configurations. Displaying the Current Country Configuration To display current country configuration, do not delete or replace your current country configuration. Additional country configurations can and Reference Guide-Part 2 - HP Presario X1000 | Compaq Presario X1000, X1100, and X1200 notebook series PC - - Page 97
that is not supported by the modem, the country configuration defaults to USA or UK. 5. Select the OK button > OK button. Solving Travel Connection Problems If you experience connection problems while using a radio button. 5. Select the OK button > OK button. Startup and Reference Guide-Part 2 7-7 - HP Presario X1000 | Compaq Presario X1000, X1100, and X1200 notebook series PC - - Page 98
your location, then select the Edit button. 4. Select your location from the Country/Region list. If you select a country or region that is not supported by the modem, the country configuration defaults to USA or UK. 5. Select the OK button. 6. In the Phone and Modem Options window, select the - HP Presario X1000 | Compaq Presario X1000, X1100, and X1200 notebook series PC - - Page 99
, and using AT commands. ■ The Lucent/Agere Command Set (Advanced Users Only) guide for the AT commands supported by a Lucent/Agere modem. If your notebook shipped with an internal modem, that modem supports the Lucent/Agere command set. For command updates and supplementary information about your - HP Presario X1000 | Compaq Presario X1000, X1100, and X1200 notebook series PC - - Page 100
line. If your notebook is connected to a network, you may want to confer with your network administrator before changing network settings. The notebook supports network speeds up to 10 Mbps when connected to a 10BaseT network and 100 Mbps when connected to a 100BaseTX network. 7-10 Startup and - HP Presario X1000 | Compaq Presario X1000, X1100, and X1200 notebook series PC - - Page 101
cable Å WARNING: To reduce the risk of electric shock, disconnect the network cable before accessing an internal compartment of the notebook. Internal compartments include the memory compartment and the battery and hard drive bays. Startup and Reference Guide-Part 2 7-11 - HP Presario X1000 | Compaq Presario X1000, X1100, and X1200 notebook series PC - - Page 102
On To conserve power, turn off a the Network Service Boot prompt the Network Service Boot prompt support the TouchPad. For more information about using the Setup utility, refer to the "Using the Setup Utility" section in Chapter 9 of this guide. ■ To respond to the Network Service port supports low- - HP Presario X1000 | Compaq Presario X1000, X1100, and X1200 notebook series PC - - Page 103
maximum capture angle is 30 degrees, so the ports must be aligned no more than 15 degrees off center vertically or horizontally. Startup and Reference Guide-Part 2 7-13 - HP Presario X1000 | Compaq Presario X1000, X1100, and X1200 notebook series PC - - Page 104
remote control or other wireless device (such as a cell phone, a headset, or an audio device) do not aim at either port. ■ During the transmission, do not move either stops. To resume from Standby, briefly press the power button. The transmission resumes when the notebook resumes from Standby. - HP Presario X1000 | Compaq Presario X1000, X1100, and X1200 notebook series PC - - Page 105
8-6 Inserting an SD Card or MMC 8-7 Removing an SD Card or MMC 8-8 Disabling or Restarting an SD Card or MMC 8-8 Increasing Memory 8-9 Displaying Memory Information 8-9 Removing or Inserting a Memory Module 8-10 Connecting an Optional Cable Lock 8-15 Startup and Reference Guide-Part 2 8-1 - HP Presario X1000 | Compaq Presario X1000, X1100, and X1200 notebook series PC - - Page 106
in the system. ■ Powered hubs must be connected to external power. ■ Unpowered hubs must be connected either to a USB connector on the notebook or to a port on a powered hub. The USB connectors on the notebook support USB 2.0- and 1.1-compliant devices. 8-2 Startup and Reference Guide-Part 2 - HP Presario X1000 | Compaq Presario X1000, X1100, and X1200 notebook series PC - - Page 107
both 32-bit CardBus and 16-bit PC Cards. PC Cards can be used to add modem, sound, storage, wireless communication, or digital camera functions to the notebook. Selecting a PC Card A Type I or Type II PC Card can be used. Zoomed video cards are not supported. Startup and Reference Guide-Part 2 8-3 - HP Presario X1000 | Compaq Presario X1000, X1100, and X1200 notebook series PC - - Page 108
Options and Upgrades Configuring a PC Card Ä CAUTION: If you install all of the software or any of the enablers provided by a PC Card manufacturer, you may not be able to use other PC Cards. If you are instructed by the documentation included with your PC Card to install device drivers: ■ Install - HP Presario X1000 | Compaq Presario X1000, X1100, and X1200 notebook series PC - - Page 109
Options and Upgrades Stopping and Removing a PC Card Ä CAUTION: To prevent loss of work or an unresponsive system, stop the PC Card before removing it. ✎ Stopping a PC Card, even if it is not in use, conserves power. 1. Close all applications and complete all activities that are supported by the - HP Presario X1000 | Compaq Presario X1000, X1100, and X1200 notebook series PC - - Page 110
. SD (Secure Digital) Cards and MMCs (multimedia cards) are flash memory cards that provide secure data storage and convenient data sharing. These cards are often used with SD-equipped cameras and PDAs as well as notebooks. The SD Card features on the notebook support both SD Cards and MMCs. Using - HP Presario X1000 | Compaq Presario X1000, X1100, and X1200 notebook series PC - - Page 111
insert an SD Card or MMC: 1. Hold the card label-side up with the connectors facing the notebook. 2. Gently push the card into the SD Card slot until the card is seated. (The card will extend outward slightly beyond the notebook.) Inserting an SD Card or MMC Startup and Reference Guide-Part 2 8-7 - HP Presario X1000 | Compaq Presario X1000, X1100, and X1200 notebook series PC - - Page 112
to the card, then select Eject. (The card is stopped but is not released from the SD Card slot.) To restart the card, remove, then reinsert, the card. For instructions, see "Inserting an SD Card or MMC" and "Removing an SD Card or MMC" in this chapter. 8-8 Startup and Reference Guide-Part 2 - HP Presario X1000 | Compaq Presario X1000, X1100, and X1200 notebook series PC - - Page 113
module that can be replaced at any time. Displaying Memory Information When RAM is increased, the operating system increases the hard drive space reserved for the hibernation file. If you experience problems with Hibernation after increasing RAM, verify that your hard drive has enough free space - HP Presario X1000 | Compaq Presario X1000, X1100, and X1200 notebook series PC - - Page 114
to access should be opened only by a Compaq authorized service provider. Å WARNING: To prevent exposure to electrical shock and damage to the notebook, shut down the notebook, unplug the power cord, and remove the battery pack before installing a memory module. Ä CAUTION: To prevent electrostatic - HP Presario X1000 | Compaq Presario X1000, X1100, and X1200 notebook series PC - - Page 115
CPQ-311245-001.book Page 11 Tuesday, April 1, 2003 3:55 PM Hardware Options and Upgrades 5. Turn the notebook underside up. 6. Remove the memory compartment screw 1, then lift up and remove the memory compartment cover 2. Opening the memory compartment Startup and Reference Guide-Part 2 8-11 - HP Presario X1000 | Compaq Presario X1000, X1100, and X1200 notebook series PC - - Page 116
3:55 PM Hardware Options and Upgrades 7. Remove or insert the memory module. To remove a memory module: a. Pull away the memory slot 2. c. To protect a memory module after removal, place it in an electrostatic-safe container. Removing a memory module 8-12 Startup and Reference Guide-Part - HP Presario X1000 | Compaq Presario X1000, X1100, and X1200 notebook series PC - - Page 117
in the memory slot 1. b. With the module at a 45-degree angle from the surface of the memory compartment, press the module into the memory slot until it is seated 2. c. Push the module downward until the retention clips snap into place 3. Inserting a memory module Startup and Reference Guide-Part - HP Presario X1000 | Compaq Presario X1000, X1100, and X1200 notebook series PC - - Page 118
1. 9. Reinsert and tighten the memory compartment screw 2. 10. Replace the battery pack (if you removed a battery pack at the beginning of this procedure), reconnect the notebook to external power, then restart the notebook. Closing the memory compartment 8-14 Startup and Reference Guide-Part 2 - HP Presario X1000 | Compaq Presario X1000, X1100, and X1200 notebook series PC - - Page 119
CPQ-311245-001.book Page 15 Tuesday, April 1, 2003 3:55 PM Hardware Options and Upgrades Connecting an Optional Cable Lock ✎ The purpose of security solutions is to act as a deterrent 2 and lock it with the cable lock key 3. Connecting an optional cable lock Startup and Reference Guide-Part 2 8-15 - HP Presario X1000 | Compaq Presario X1000, X1100, and X1200 notebook series PC - - Page 120
CPQ-311245-001.book Page 16 Tuesday, April 1, 2003 3:55 PM Hardware Options and Upgrades 8-16 Startup and Reference Guide-Part 2 - HP Presario X1000 | Compaq Presario X1000, X1100, and X1200 notebook series PC - - Page 121
Preparing for a Software Update 9-2 Downloading and Installing an Update 9-4 Backing Operating System 9-9 Reinstalling Device Drivers and Other Software 9-10 Support Utilities 9-13 Using the Help and Support Window 9-13 Using Support Telephone Numbers 9-14 Startup and Reference Guide-Part - HP Presario X1000 | Compaq Presario X1000, X1100, and X1200 notebook series PC - - Page 122
the updates at the Compaq Web site. 3. Download and install the updates. ✎ The notebook ROM stores the BIOS (basic input-output system). The BIOS determines how the notebook hardware interacts with the operating system and external devices and also supports such notebook services as time and date - HP Presario X1000 | Compaq Presario X1000, X1100, and X1200 notebook series PC - - Page 123
is displayed in the Setup utility. The Setup utility is a non-Windows utility that does not support the TouchPad. For complete information about using the Setup utility, see the "Using the Setup Utility" select Ignore changes and exit, then press enter. Startup and Reference Guide-Part 2 9-3 - HP Presario X1000 | Compaq Presario X1000, X1100, and X1200 notebook series PC - - Page 124
or cord. Downloading a ROM Update: 1. Access the page at the Compaq Web site that provides software for your notebook: Select Start > Help and Support, then select a software update link. Or, visit the Compaq Web Site at: http://www.compaq.com/consumersupport 9-4 Startup and Reference Guide-Part 2 - HP Presario X1000 | Compaq Presario X1000, X1100, and X1200 notebook series PC - - Page 125
to the default or custom location on the hard drive to which the ROM package will download. (You may need to access the ROM package after it has been downloaded.) c. Follow the online instructions to download your selection to the hard drive. Installing a ROM Update ROM installation procedures vary - HP Presario X1000 | Compaq Presario X1000, X1100, and X1200 notebook series PC - - Page 126
, for example, Filename.exe. (The installation begins.) 8. To complete the installation, follow the instructions on the screen. ✎ After a message on the screen reports a successful installation, you can delete the downloaded file from the Compaq folder. 9-6 Startup and Reference Guide-Part 2 - HP Presario X1000 | Compaq Presario X1000, X1100, and X1200 notebook series PC - - Page 127
manually provides additional protection for your system files and settings. Compaq Support > Tools. (Notebook and diagnostic information is displayed.) 2. Select System Restore, then follow the on-screen instructions for restoring the notebook to a Restore Point. Startup and Reference Guide-Part - HP Presario X1000 | Compaq Presario X1000, X1100, and X1200 notebook series PC - - Page 128
operating system has been reinstalled, all device drivers must also be reinstalled. Compaq recommends that you try to restore your the notebook) into the optical drive. 3. Press and hold the power button for 5 seconds to turn off the notebook. 4. Briefly press the power button to start the notebook. - HP Presario X1000 | Compaq Presario X1000, X1100, and X1200 notebook series PC - - Page 129
the optical drive. 3. Press and hold the power button for 5 seconds to turn off the notebook. 4. Briefly press the power button to start the notebook. 5. When prompted, press any key to boot from CD. (After a few minutes, the Welcome to Setup screen is displayed.) Startup and Reference Guide-Part - HP Presario X1000 | Compaq Presario X1000, X1100, and X1200 notebook series PC - - Page 130
, insert the Driver Recovery CD into the optical drive. If the CD does not open within several seconds, select Start > Run. Then type D:\SWSETUP\APPINSTL\SETUP.EXE (where D indicates the optical drive). 2. Follow the on-screen instructions for installing drivers. After the drivers are reinstalled - HP Presario X1000 | Compaq Presario X1000, X1100, and X1200 notebook series PC - - Page 131
Compaq. The Compaq enhancements add power and security features and provide supplementary support for external devices such as drives and PC Cards. Ä CAUTION: Replacing an operating system enhanced by Compaq to access the settings for a hard drive password. Startup and Reference Guide-Part 2 9-11 - HP Presario X1000 | Compaq Presario X1000, X1100, and X1200 notebook series PC - - Page 132
Navigating and Selecting in the Setup Utility Because the Setup utility is not Windows-based, it does not support the TouchPad. Navigation and selection are by keystroke. ■ To navigate, use the up and down arrow session, select Ignore changes and exit. 9-12 Startup and Reference Guide-Part 2 - HP Presario X1000 | Compaq Presario X1000, X1100, and X1200 notebook series PC - - Page 133
service event with a support specialist. ■ Download the latest drivers, utilities, and software updates for your notebook. ■ Obtain information about your notebook such as specifications, white papers, customer advisories, and all documentation included with your notebook. ■ Subscribe to the Compaq - HP Presario X1000 | Compaq Presario X1000, X1100, and X1200 notebook series PC - - Page 134
notebook to contact a Compaq authorized dealer, reseller, or service provider. Preparing to Call Technical Support To provide the fastest possible resolution of your problem, have the notebook and icon > General tab. ■ Brand and model of an optional printer. 9-14 Startup and Reference Guide-Part 2 - HP Presario X1000 | Compaq Presario X1000, X1100, and X1200 notebook series PC - - Page 135
CPQ-311245-001.book Page 1 Tuesday, April 1, 2003 3:55 PM A Specifications The information in this appendix may be helpful if you plan to use or transport the notebook internationally ft Metric 10° to 35° C -20° to 60° C 10% to 90% 5% to 95% 3,048 m 9,144 m Startup and Reference Guide-Part 2 A-1 - HP Presario X1000 | Compaq Presario X1000, X1100, and X1200 notebook series PC - - Page 136
recommends that the notebook be powered only with an AC adapter or DC cable supplied or approved by Compaq. An AC adapter provided by Compaq for use with this notebook is capable of accepting AC power within the following specifications: Input Power Operating voltage Operating current Operating - HP Presario X1000 | Compaq Presario X1000, X1100, and X1200 notebook series PC - - Page 137
battery packs, see the "Storing a Battery Pack" section in Chapter 4. ■ For information about exposing the notebook to sunlight, ultraviolet light, x-rays, or magnetic fields, refer on the Documentation Library CD to the Maintenance, Shipping and Travel guide. Startup and Reference Guide-Part - HP Presario X1000 | Compaq Presario X1000, X1100, and X1200 notebook series PC - - Page 138
CPQ-311245-001.book Page 4 Tuesday, April 1, 2003 3:55 PM Specifications A-4 Startup and Reference Guide-Part 2 - HP Presario X1000 | Compaq Presario X1000, X1100, and X1200 notebook series PC - - Page 139
, April 1, 2003 3:55 PM Index 1394 connector 2-9 A AC adapter 4-11 connecting 1-5, 4-11 disconnecting 4-11 identifying 2-17 power connector 2-12 AC power 1-12, 4-11 adapter AC 1-5, 2-17, 4-11 country-specific modem 2-17, 7-3, 7-5 Japan-specific outlet 2-17 Agere modem AT commands 7-9 airport - HP Presario X1000 | Compaq Presario X1000, X1100, and X1200 notebook series PC - - Page 140
AC adapter 1-5 audio 6-5 DC 2-12 modem 2-9, 2-16, 7-2 network 2-16, 7-11 S-Video 6-5 See also cord, power cable lock, connecting 8-15 calibration, battery 4-14 caps lock light 2-6 card and socket services, PC Card 8-4 card. See memory, modules supported; PC Card; SD Card CD drive. See drives CD - HP Presario X1000 | Compaq Presario X1000, X1100, and X1200 notebook series PC - - Page 141
5-2 drivers, reinstalling 9-10 drives adding to system 5-4 affected by airport security 5-3 avoiding Standby and Hibernation while using optical 5-9 IDE drive light 5-4 inserting, removing media 5-5 shipping 5-3 starting from 5-10 types and terms 5-2 USB 8-2 See also hard drive, internal DVD drive - HP Presario X1000 | Compaq Presario X1000, X1100, and X1200 notebook series PC - - Page 142
drive) 5-2 flash memory card 8-6 flash RAM card 8-6 Fn key changing Standby function 4-9 hotkeys function 3-4 identifying 2-4 keypad functions 3-9 Standby function 4-5 video device function 6-6 function keys 2-4, 3-4 H hard drive bay identifying 2-13 replacing hard drive 5-10 hard drive, internal - HP Presario X1000 | Compaq Presario X1000, X1100, and X1200 notebook series PC - - Page 143
CDs and DVDs 6-7 ITU (International Telecommunications Union) 7-2 J jack audio-out 2-8, 6-4 microphone 2-8, 6-4 RJ-11 2-9, 7-3 RJ-45 2-9, 7-11 S-Video 2-8, 2-9, 6-5 Japan-specific modem adapter 2-17 K key applications 2-4 Fn 2-4 function (F1, F2, etc.) 2-4 hotkeys 3-4 keypad 2-4, 3-8 Microsoft - HP Presario X1000 | Compaq Presario X1000, X1100, and X1200 notebook series PC - - Page 144
15 cable 2-16 connecting 7-3 country configurations 7-6 country-specific adapter 2-17 Lucent/Agere Command Set (Advanced Users Only) guide 2-18 Modem Command Guidelines (Advanced Users Only) guide 2-18 specifications 7-2 speed 7-2 troubleshooting travel connections 7-7 virus protection 1-11 monitor - HP Presario X1000 | Compaq Presario X1000, X1100, and X1200 notebook series PC - - Page 145
12, 7-12 power button 2-5 connecting the notebook to external 1-5 conservation 4-2, 4-17 controls 4-5 cord 2-16 emergency shutdown procedures 4-6 Hibernation procedures 4-6 low-battery conditions 4-13 power connector 2-12 power/standby light 2-6 rated input A-2 Startup and Reference Guide Index-7 - HP Presario X1000 | Compaq Presario X1000, X1100, and X1200 notebook series PC - - Page 146
4-12 power, AC 1-12 power/standby light 4-5 Preboot eXecution Environment (PXE) 7-12 preloaded utilities displaying descriptions 1-9 Product Key number 2-15 projector connecting 2-9, 8-2 switching display 3-6 PXE (Preboot eXecution Environment) 7-12 R RAM (Random Access Memory) 8-9 recovery CD - HP Presario X1000 | Compaq Presario X1000, X1100, and X1200 notebook series PC - - Page 147
button 3-7, 4-9 Sleep. See Standby slot memory 8-9 PC Card 2-11 SD Card 8-6 security cable 2-12 socket services, PC Card 8-4 SoftPaq described 9-4 downloading and installing 9-6 software antivirus protection 1-11 AutoPlay 5-8 Easy CD Creator 6-9 Help and Support window 9-13 infrared 7-12 installing - HP Presario X1000 | Compaq Presario X1000, X1100, and X1200 notebook series PC - - Page 148
) jack connecting 7-3 identifying 2-9 modem cable 2-16 telephone numbers, service and support 9-13 television changing color format 6-6 connecting audio 6-4 connecting video 6-5 temperature notebook surface 1-12 specifications A-1 storage, battery pack 4-16 1394 connector 2-9 time, settting the 1-10 - HP Presario X1000 | Compaq Presario X1000, X1100, and X1200 notebook series PC - - Page 149
PM V VCR audio-out jack function 6-4 connecting 6-5 vents, fan 2-10, 2-14 video CDs, DVDs. See CD(s); DVD(s) video device connecting audio 6-5 S-Video jack 6-5 turning on with Digital Audio button 6-7 using with audio CDs WinDVD error message 6-7 managing region settings 6-8 playing video CDs and - HP Presario X1000 | Compaq Presario X1000, X1100, and X1200 notebook series PC - - Page 150
CPQ-311245-001.book Page 12 Tuesday, April 1, 2003 3:55 PM Index Index-12 Startup and Reference Guide - HP Presario X1000 | Compaq Presario X1000, X1100, and X1200 notebook series PC - - Page 151
. HP shall HP products are set forth in the express limited warranty statements accompanying such products. Nothing herein should be construed as constituting an additional warranty. Startup and Reference Guide Compaq Notebook Series First Edition June 2003 Reference Number: X1000 Document Part - HP Presario X1000 | Compaq Presario X1000, X1100, and X1200 notebook series PC - - Page 152
CPQ-311245-001.book Page i Tuesday, April 1, 2003 3:55 PM
-
 1
1 -
 2
2 -
 3
3 -
 4
4 -
 5
5 -
 6
6 -
 7
7 -
8
-
9
-
10
-
11
-
12
-
13
-
14
-
15
-
16
-
17
-
18
-
19
-
20
-
21
-
22
-
23
-
24
-
25
-
26
-
27
-
28
-
29
-
30
-
31
-
32
-
33
-
34
-
35
-
36
-
37
-
38
-
39
-
40
-
41
-
42
-
43
-
44
-
45
-
46
-
47
-
48
-
49
-
50
-
51
-
52
-
53
-
54
-
55
-
56
-
57
-
58
-
59
-
60
-
61
-
62
-
63
-
64
-
65
-
66
-
67
-
68
-
69
-
70
-
71
-
72
-
73
-
74
-
75
-
76
-
77
-
78
-
79
-
80
-
81
-
82
-
83
-
84
-
85
-
86
-
87
-
88
-
89
-
90
-
91
-
92
-
93
-
94
-
95
-
96
-
97
-
98
-
99
-
100
-
101
-
102
-
103
-
104
-
105
-
106
-
107
-
108
-
109
-
110
-
111
-
112
-
113
-
114
-
115
-
116
-
117
-
118
-
119
-
120
-
121
-
122
-
123
-
124
-
125
-
126
-
127
-
128
-
129
-
130
-
131
-
132
-
133
-
134
-
135
-
136
-
137
-
138
-
139
-
140
-
141
-
142
-
143
-
144
-
145
-
146
-
147
-
148
-
149
-
150
-
151
-
152
 |
 |

b
Startup and Reference Guide
Compaq
Notebook Series
Document Part Number: 311245-001
June 2003
Part 1: Startup
The Startup part of this guide explains how to set up your
notebook for the first time.
Part 2: Reference
The Reference part of this guide explains how to identify and use
the hardware and software features on your notebook.
CPQ-311245-001.book
Page i
Tuesday, April 1, 2003
3:55 PM