HP Pro Tower 400 G9 PCI Desktop PC Maintenance and Service Guide - Page 39
To remove the hard drive under the drive cage, 5 inch drive
 |
View all HP Pro Tower 400 G9 PCI Desktop PC manuals
Add to My Manuals
Save this manual to your list of manuals |
Page 39 highlights
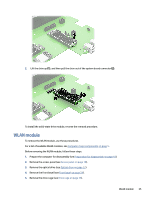
To remove the hard drive under the drive cage: 1. Disconnect the power and data cables from the back of the hard drive (1). 2. While holding the drive, remove the three screws that secure the drive to the cage (2) and then remove the drive from the bottom of the drive cage (3). You can install 3.5 inch and 2.5 inch hard drives into the drive cage. (1) 3.5 inch drive (2) 2.5 inch drive 32 Chapter 4 Removal and replacement procedures
-
 1
1 -
2
-
3
-
4
-
5
-
6
-
7
-
8
-
9
-
10
-
11
-
12
-
13
-
14
-
15
-
16
-
17
-
18
-
19
-
20
-
21
-
22
-
23
-
24
-
25
-
26
-
27
-
28
-
29
-
30
-
31
-
32
-
33
-
 34
34 -
 35
35 -
 36
36 -
 37
37 -
 38
38 -
 39
39 -
 40
40 -
 41
41 -
 42
42 -
 43
43 -
 44
44 -
45
-
46
-
47
-
48
-
49
-
50
-
51
-
52
-
53
-
54
-
55
-
56
-
57
-
58
-
59
-
60
-
61
-
62
-
63
-
64
-
65
-
66
-
67
-
68
-
69
-
70
-
71
-
72
-
73
-
74
-
75
-
76
-
77
-
78
-
79
-
80
-
81
-
82
-
83
-
84
-
85
-
86
-
87
-
88
-
89
-
90
-
91
-
92
-
93
-
94
-
95
-
96
-
97
-
98
-
99
-
100
-
101
-
102
-
103
-
104
-
105
-
106
-
107
-
108
-
109
-
110
-
111
-
112
-
113
-
114
-
115
-
116
-
117
-
118
-
119
-
120
-
121
-
122
 |
 |

To remove the hard drive under the drive cage:
1.
Disconnect the power and data cables from the back of the hard drive
(1)
.
2.
While holding the drive, remove the three screws that secure the drive to the cage
(2)
and then remove
the drive from the bottom of the drive cage
(3)
.
You can install 3.5 inch and 2.5 inch hard drives into the drive cage.
(1)
3.5 inch drive
(2)
2.5 inch drive
32
Chapter 4
Removal and replacement procedures