HP Q1581A HP StorageWorks DAT 320 and 160 SAS Internal tape drive Start Here ( - Page 2
Option 2: Connect to a spare port on the host, SAS controller - software
 |
UPC - 882780612716
View all HP Q1581A manuals
Add to My Manuals
Save this manual to your list of manuals |
Page 2 highlights
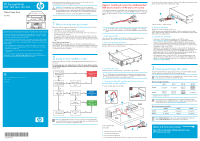
Option 2: Connect to a spare port on the host SAS controller (some HP ProLiant servers only) The following instructions are valid ONLY IF the host SAS controller on your HP ProLiant server has a spare SAS connector. • If the internal port on the host SAS controller has a mini-SAS connector, use the supplied cable. This is a split cable, but the second branch is not required. Do NOT remove the tie wrap and cover on the spare connector. • If the internal port has an Infiniband-style SAS connector, you must purchase a separate cable. Refer to http://www.hp.com/go/connect to find out which cable is appropriate. TIP: The CD-ROM contains a driver install package for Windows. We recommend that you use the installer package to install the drivers BEFORE you connect the tape drive. 1. Attach the mounting hardware If required, appropriate mounting hardware may be supplied with your server or with the tape drive. Refer to your server documentation. 2. Install the tape drive Install the tape drive, as described in the "User Guide" on the CD-ROM. TIP: If cable access for the tape drive bay is awkward, it may be easier to access power and other connections if the tape drive is installed in the top bay. You may need to move other devices to lower bays to achieve this. 3. Connect the SAS cable to the spare SAS port on the host SAS controller. D A C FRONT B REAR 1 Host SAS controller (HBA) A 2 SAS cable to hard disk bays 3 SAS Cable B C D A = Connector on host SAS controller B = Unused branch of cable (do NOT remove tie wrap or cover on the spare connector) C = SAS Connector for tape drive D = Power connector for tape drive 4. Connect the SAS (with power) cable to the tape drive. 1 Power connector 2 SAS connector 5. Power up the server Replace server covers and power up the server. Watch the boot screen carefully after installation. Check to see that the new SAS tape drive is listed in the boot sequence. If there are any error or unexpected messages go back and check the SAS cabling carefully. Now go to "Options 2 and 3: Completing the installation" Option 3: Replace existing cable and connect to port on the host HBA (some HP ProLiant servers only) The following instructions apply ONLY IF the host SAS controller on your HP ProLiant server does not have a spare SAS connector AND www.hp.com/go/connect advises that connection is supported. If the internal port on the host SAS controller has a mini-SAS connector, use the supplied cable. If the internal port has an Infiniband-style SAS connector, you must purchase a separate cable. Refer to http://www.hp.com/go/connect to find out which cable is appropriate. IMPORTANT: Remove the tie wrap and dust cover on the second branch of the cable. You will need to use the second mini-SAS connector in this installation. CAUTION: Be aware that this option will disconnect the highest-numbered disk bay because it diverts the wiring from the highest-numbered hard disk bay to the tape drive. Do NOT use this cabling option, if the hard disk drive bay is already occupied or will be required for future use. You will not be able to use the highest-numbered disk bay after installation. If you install a hard disk in this bay, the disk will not work. This does not mean there is a fault with either the hard disk or the server. You may need to remove components, such as fan banks, while you work with the cable. Cable routing varies from one server to another. Always refer to your server documentation to identify the location and orientation of SAS connectors and for specific advice on cable routing. TIP: The CD-ROM contains a driver install package for Windows. We recommend that you use the installer package to install the drivers BEFORE you connect the tape drive. 1. Attach the mounting hardware If required, appropriate mounting hardware may be supplied with your server or with the tape drive. Refer to your server documentation. 2. Install the tape drive Install the tape drive, as described in the "User Guide" on the CD-ROM. TIP: If cable access for the tape drive bay is awkward, it may be easier to access power and other connections if the tape drive is installed in the top bay. You may need to move other devices to lower bays to achieve this. 3. Locate existing SAS cable and determine whether a hard disk drive bay will be lost Refer to www.hp.com/go/connect to find out which cable must be removed and whether you will lose the use of a hard disk drive bay. CAUTION: If the hard disk drive bay is in use, STOP. Even if other hard disk drive bays are empty, the installation will not work. (Do not move a hard disk to create an empty bay because you may damage your server configuration.) You must purchase and install a new HBA. Locate the cable that connects the hard disk drive bay to the SAS controller (HBA) and remove it completely (the existing cable will be replaced by the supplied cable). FRONT REAR 1 Host SAS controller (HBA) 4. Connect the SAS cable to the server D A C FRONT REAR B B A C D 1 Host SAS controller (HBA) 2 SAS cable to hard disk bays 3 SAS Cable A = Connector on host SAS controller B = Spare SAS connector on cable, remove tie wrap and cover and connect to highest-numbered disk bays (for example slots 4-7) C = SAS connector for tape drive D = Power connector for tape drive 5. Connect the SAS (with power) cable to the tape drive. 1 Power connector 2 SAS connector 6. Power up the server Replace server covers and power up the server. Watch the boot screen carefully after installation. Check to see that the new SAS tape drive is listed in the boot sequence. If there are any error or unexpected messages go back and check the SAS cabling carefully. Now go to "Options 2 and 3: Completing the installation" Options 2 and 3: Completing the installation • Install drivers. The HP Tape driver (available on the CD-ROM or from http: www.hp.com/support) is recommended for use with Windows operating systems, but always check whether your software application requires you to use its own driver. For other operating systems patch to the latest version of the operating system and following the instructions in the patch documentation. See also the "UNIX Configuration Guide" on the CD-ROM. • Upgrade your software application to ensure it works correctly with the tape drive. When selecting the media to use with the backup application, you should select 8mm media with DAT 320 and DAT 160 tape drives. We do NOT recommend native backup applications, such as Windows Backup, because they do not support the full features of the tape drive and may cause performance problems. • HP StorageWorks Library & Tape Tools (L&TT) is the recommended diagnostic and support tool for your HP tape drive. Use it to verify installation and confirm that your tape drive is functioning correctly before you use it for backup. It is available free at www.hp.com/support/tapetools. 4 Understanding the front panel LEDs DAT 320 and DAT 160 Clean - amber • Off: the drive does not require cleaning • Flashing: the drive needs cleaning Tape - amber • Off: no fault has been detected • Flashing: the cartridge currently in the drive is faulty (damaged or unsupported). Drive - amber • Off: no fault has been detected • Flashing: the drive mechanism has detected a hardware error Ready - green • On: the drive is ready for use and there is media in the drive • Off: drive power is off or there is no media loaded • Flashing: the drive is busy DAT 320 drives only Encrypt - blue • Off: no encryption activity, encryption parameters are not loaded • On: encryption parameters loaded, drive is ready to read/write encrypted data • Flashing: reading/writing encrypted data • Fast flash (with Drive LED): encryption related error NOTE: The DAT 320 tape drive includes hardware capable of supporting data encryption and decryption. To make use of this feature you need a backup application that supports hardware encryption and DAT 320 media. For detailed information about other LED sequences and how to operate your DAT tape drive refer to the "User Guide" on the CD-ROM. 5 Other sources of information • The HP StorageWorks Tape CD-ROM for HP StorageWorks Library & Tape Tools (L&TT) and full Installation and User instructions in English and 12 other languages. • www.hp.com/support/tapetools for updates, compatibility information and the latest version of L&TT. • www.hp.com/support/dat for up-to-date product information. • www.hp.com/go/connect for recommended products and configurations. • www.hp.com/go/obdr for detailed information about HP One-Button Disaster Recovery. • If necessary, specialist technical help can be obtained from the HP Customer Call Centers. Contact details can be found at www.hp.com.
-
 1
1 -
 2
2
 |
 |
