HP Q3723A HP LaserJet 9040/9050 - User Guide - Page 100
Clearing jams, Jam locations
 |
View all HP Q3723A manuals
Add to My Manuals
Save this manual to your list of manuals |
Page 100 highlights
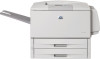
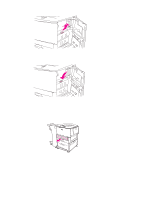
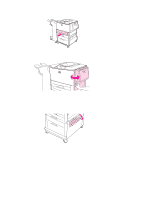
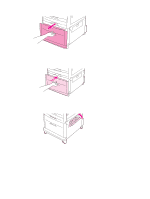
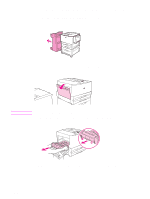
Clearing jams Note If a paper-jam message appears on the printer control panel, look for paper in the locations that are indicated in the following graphic. You might need to look for paper in locations other than those that are indicated in the paper-jam message. If the location of the paper jam is not obvious, look first in the front-door area. After looking at the graphic, you can go to the procedure for clearing the jam. When clearing jams, be very careful not to tear the paper. If a small piece of paper is left in the printer, it could cause additional jams. If jams are a recurring problem, see Solving repeated paper jams. Loose toner might remain in the printer after a paper jam and cause output quality problems. These should clear up within a few pages. Jam locations 112 111 110 19 18 1 12 13 14 17 16 15 1. Standard top bin (face-down output bin) 2. Optional Tray 1 3. Right door 4. Vertical transfer door 5. Optional Tray 4 6. Tray 3 7. Tray 2 8. Left door (behind output accessory 9. Duplexer (inside the printer) 10. Optional output device 11. Front door and print cartridge area 12. Upper bin (face-up output bin) 98 Chapter 6 Problem solving ENWW
-
 1
1 -
2
-
3
-
4
-
5
-
6
-
7
-
8
-
9
-
10
-
11
-
12
-
13
-
14
-
15
-
16
-
17
-
18
-
19
-
20
-
21
-
22
-
23
-
24
-
25
-
26
-
27
-
28
-
29
-
30
-
31
-
32
-
33
-
34
-
35
-
36
-
37
-
38
-
39
-
40
-
41
-
42
-
43
-
44
-
45
-
46
-
47
-
48
-
49
-
50
-
51
-
52
-
53
-
54
-
55
-
56
-
57
-
58
-
59
-
60
-
61
-
62
-
63
-
64
-
65
-
66
-
67
-
68
-
69
-
70
-
71
-
72
-
73
-
74
-
75
-
76
-
77
-
78
-
79
-
80
-
81
-
82
-
83
-
84
-
85
-
86
-
87
-
88
-
89
-
90
-
91
-
92
-
93
-
94
-
 95
95 -
 96
96 -
 97
97 -
 98
98 -
 99
99 -
 100
100 -
 101
101 -
 102
102 -
 103
103 -
 104
104 -
 105
105 -
106
-
107
-
108
-
109
-
110
-
111
-
112
-
113
-
114
-
115
-
116
-
117
-
118
-
119
-
120
-
121
-
122
-
123
-
124
-
125
-
126
-
127
-
128
-
129
-
130
-
131
-
132
-
133
-
134
-
135
-
136
-
137
-
138
-
139
-
140
-
141
-
142
-
143
-
144
-
145
-
146
-
147
-
148
-
149
-
150
-
151
-
152
-
153
-
154
-
155
-
156
-
157
-
158
-
159
-
160
-
161
-
162
-
163
-
164
-
165
-
166
-
167
-
168
-
169
-
170
-
171
-
172
-
173
-
174
-
175
-
176
-
177
-
178
-
179
-
180
-
181
-
182
-
183
-
184
-
185
-
186
-
187
-
188
-
189
-
190
-
191
-
192
-
193
-
194
-
195
-
196
-
197
-
198
-
199
-
200
-
201
-
202
-
203
-
204
-
205
-
206
-
207
-
208
-
209
-
210
-
211
-
212
-
213
-
214
-
215
-
216
-
217
-
218
 |
 |