HP RP36000/3 HP 3 Phase ERM Installation Instructions - Page 5
Attaching the ERM front bezel, Connecting the ERM to the UPS, Switching on the ERM circuit breaker
 |
View all HP RP36000/3 manuals
Add to My Manuals
Save this manual to your list of manuals |
Page 5 highlights
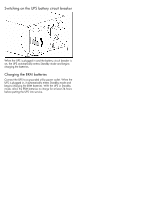
4. With one person on each side, lift the chassis to rail level and slide the chassis on the mounting rails. 5. Attach the chassis to the rack using the supplied screws. Connecting the ERM to the UPS 6. If using the rear mounting brackets, be sure that the bracket tabs are fully inserted into the rear panel cutouts, then tighten the brackets. The UPS auto-detects ERM installation by updating the system runtime. If the system runtime is not updated, verify installation or see "Troubleshooting" in the user guide. Attaching the ERM front bezel NOTE: To install a second ERM, plug the cable from the second ERM into the socket at the rear of the first ERM. Up to four ERM units can be connected. Switching on the ERM circuit breaker
-
 1
1 -
 2
2 -
 3
3 -
 4
4 -
 5
5 -
 6
6
 |
 |

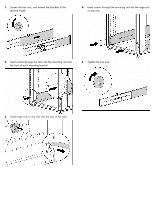
4.
With one person on each side, lift the chassis to rail level
and slide the chassis on the mounting rails.
5.
Attach the chassis to the rack using the supplied screws.
6.
If using the rear mounting brackets, be sure that the
bracket tabs are fully inserted into the rear panel cutouts,
then tighten the brackets.
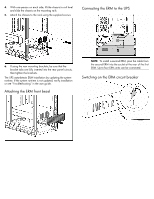
The UPS auto-detects ERM installation by updating the system
runtime. If the system runtime is not updated, verify installation
or see "Troubleshooting" in the user guide.
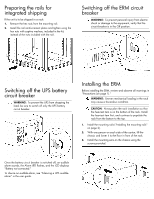
Attaching the ERM front bezel
Connecting the ERM to the UPS
NOTE:
To install a second ERM, plug the cable from
the second ERM into the socket at the rear of the first
ERM. Up to four ERM units can be connected.
Switching on the ERM circuit breaker