HP RP7 Maintenance & Service Guide HP RP7 Retail System Model 7800 - Page 15
Using the On-Screen Display Menu
 |
View all HP RP7 manuals
Add to My Manuals
Save this manual to your list of manuals |
Page 15 highlights
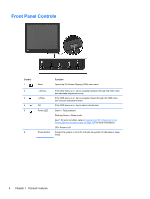
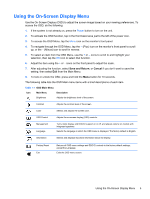
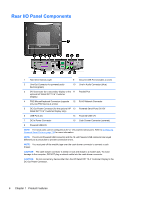
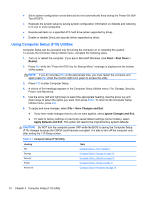
Using the On-Screen Display Menu Use the On-Screen Display (OSD) to adjust the screen image based on your viewing preferences. To access the OSD, do the following: 1. If the system is not already on, press the Power button to turn on the unit. 2. To activate the OSD function, tap in the front bezel area just to the left of the power icon. 3. To access the OSD Menu, tap the Menu icon on the monitor's front panel. 4. To navigate through the OSD Menu, tap the + (Plus) icon on the monitor's front panel to scroll up, or the - (Minus) icon to scroll in reverse. 5. To select an item from the OSD Menu, use the + or - icons to scroll to and highlight your selection, then tap the OK icon to select that function. 6. Adjust the item using the + or - icons on the front panel to adjust the scale. 7. After adjusting the function, select Save and Return, or Cancel if you don't want to save the setting, then select Exit from the Main Menu. 8. To lock or unlock the OSD, press and hold the Menu button for 10 seconds. The following table lists the OSD Main menu items with a brief descriptions of each item. Table 1-1 OSD Main Menu Icon Main Menu Description Brightness Adjusts the brightness level of the screen. Contrast Adjusts the contrast level of the screen. Color Selects and adjusts the screen color. OSD Control Adjusts the on-screen display (OSD) controls. Management Language Turns mode display and DDC/CI support on or off, and adjusts volume on models with integrated speakers. Selects the language in which the OSD menu is displayed. The factory default is English. Information Selects and displays important information about the display. Factory Reset Exit Returns all OSD menu settings and DDC/CI controls to the factory default settings, except the Language. Exits the OSD menu screen. Using the On-Screen Display Menu 5
-
 1
1 -
2
-
3
-
4
-
5
-
6
-
7
-
8
-
9
-
 10
10 -
 11
11 -
 12
12 -
 13
13 -
 14
14 -
 15
15 -
 16
16 -
 17
17 -
 18
18 -
 19
19 -
 20
20 -
21
-
22
-
23
-
24
-
25
-
26
-
27
-
28
-
29
-
30
-
31
-
32
-
33
-
34
-
35
-
36
-
37
-
38
-
39
-
40
-
41
-
42
-
43
-
44
-
45
-
46
-
47
-
48
-
49
-
50
-
51
-
52
-
53
-
54
-
55
-
56
-
57
-
58
-
59
-
60
-
61
-
62
-
63
-
64
-
65
-
66
-
67
-
68
-
69
-
70
-
71
-
72
-
73
-
74
-
75
-
76
-
77
-
78
-
79
-
80
-
81
-
82
-
83
-
84
-
85
-
86
-
87
-
88
-
89
-
90
-
91
-
92
-
93
-
94
-
95
-
96
-
97
-
98
-
99
-
100
-
101
-
102
-
103
-
104
-
105
-
106
-
107
-
108
-
109
-
110
-
111
-
112
-
113
-
114
-
115
-
116
-
117
-
118
-
119
-
120
-
121
-
122
-
123
-
124
-
125
-
126
-
127
-
128
-
129
-
130
-
131
-
132
-
133
-
134
-
135
-
136
-
137
-
138
-
139
-
140
-
141
-
142
-
143
-
144
-
145
-
146
-
147
-
148
-
149
-
150
-
151
-
152
-
153
-
154
-
155
-
156
-
157
-
158
-
159
-
160
-
161
-
162
-
163
-
164
-
165
-
166
-
167
-
168
-
169
-
170
-
171
-
172
-
173
-
174
 |
 |
