HP Slate 21-s100 HP Slate 21 All-in-One User Guide - Page 12
It is important to verify that the manufacturer's mounting solution is compliant with the VESA
 |
View all HP Slate 21-s100 manuals
Add to My Manuals
Save this manual to your list of manuals |
Page 12 highlights
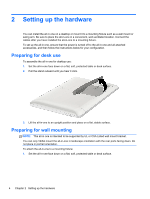
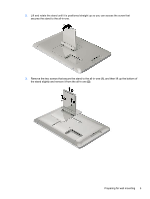
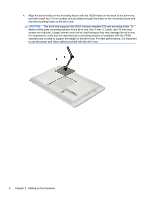
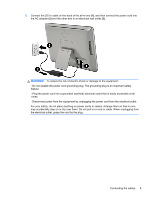
4. Align the screw holes on the mounting fixture with the VESA holes on the back of the all-in-one, and then insert four 10 mm screws (not provided) through the holes on the mounting fixture and into the mounting holes on the all-in-one. CAUTION: This all-in-one supports the VESA industry standard 100 mm mounting holes. To attach a third-party mounting solution to the all-in-one, four 4 mm, 0.7 pitch, and 10 mm long screws are required. Longer screws must not be used because they may damage the all-in-one. It is important to verify that the manufacturer's mounting solution is compliant with the VESA standard and is rated to support the weight of the all-in-one. For best performance, it is important to use the power and video cables provided with the all-in-one. 6 Chapter 2 Setting up the hardware
-
 1
1 -
2
-
3
-
4
-
5
-
6
-
 7
7 -
 8
8 -
 9
9 -
 10
10 -
 11
11 -
 12
12 -
 13
13 -
 14
14 -
 15
15 -
 16
16 -
 17
17 -
18
-
19
-
20
-
21
-
22
-
23
-
24
-
25
-
26
-
27
-
28
-
29
-
30
-
31
-
32
-
33
-
34
-
35
-
36
-
37
-
38
-
39
-
40
 |
 |
