HP Slimline 260-a100 Hard Drive Replacement Instructions 1 - Page 2
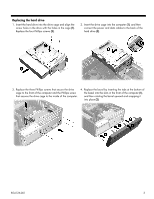
drive to the hard drive cage
 |
View all HP Slimline 260-a100 manuals
Add to My Manuals
Save this manual to your list of manuals |
Page 2 highlights
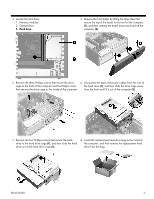
3. Locate the hard drive: 1. Memory modules 2. Optical drive 3. Hard drive 4. Remove the front bezel by lifting the three tabs that secure the top of the bezel to the front of the computer (1), and then rotating the bezel downward and off the computer (2). 5. Remove the three Phillips screws that secure the drive 6. Disconnect the data and power cables from the rear of cage to the front of the computer and the Phillips screw the hard drive (1), and then slide the drive cage away that secures the drive cage to the inside of the computer. from the front and lift it out of the computer (2). 7. Remove the four Phillips screws that secure the hard drive to the hard drive cage (1), and then slide the hard drive out of the hard drive cage (2). 8. Touch the replacement hard drive bag to the metal of the computer, and then remove the replacement hard drive from the bag. 854126-001 2
-
 1
1 -
 2
2 -
 3
3 -
 4
4
 |
 |
