HP Slimline 260-a100 Hard Drive Replacement Instructions 1 - Page 3
Replacing the hard drive
 |
View all HP Slimline 260-a100 manuals
Add to My Manuals
Save this manual to your list of manuals |
Page 3 highlights
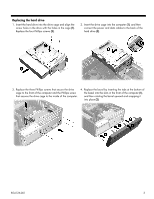
Replacing the hard drive 1. Insert the hard drive into the drive cage and align the screw holes in the drive with the holes in the cage (1). Replace the four Phillips screws (2). 2. Insert the drive cage into the computer (1), and then connect the power and data cables to the back of the hard drive (2). 3. Replace the three Phillips screws that secure the drive cage to the front of the computer and the Phillips screw that secures the drive cage to the inside of the computer. 4. Replace the bezel by inserting the tabs at the bottom of the bezel into the slots in the front of the computer (1), and then rotating the bezel upward and snapping it into place (2). 854126-001 3
-
 1
1 -
 2
2 -
 3
3 -
 4
4
 |
 |

854126-001
3
Replacing the hard drive
1.
Insert the hard drive into the drive cage and align the
screw holes in the drive with the holes in the cage
(1)
.
Replace the four Phillips screws
(2)
.
2.
Insert the drive cage into the computer
(1)
, and then
connect the power and data cables to the back of the
hard drive
(2)
.
3.
Replace the three Phillips screws that secure the drive
cage to the front of the computer and the Phillips screw
that secures the drive cage to the inside of the computer.
4.
Replace the bezel by inserting the tabs at the bottom of
the bezel into the slots in the front of the computer
(1)
,
and then rotating the bezel upward and snapping it
into place
(2)
.