HP Surestore 64 Installation Guide - Page 5
Step 8: Prepare the back rack columns, Step 9: Install the rack mount kit on the switch
 |
View all HP Surestore 64 manuals
Add to My Manuals
Save this manual to your list of manuals |
Page 5 highlights
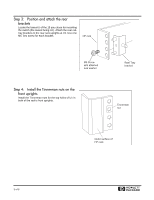
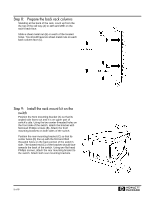
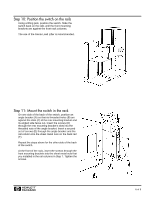
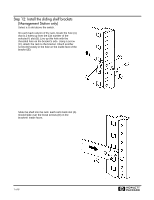
Step 8: Prepare the back rack columns Standing at the back of the rack, count up from the the top of the rail tray (A) to 12th and 28th on the rack's back face. Slide a sheet metal nut (B) on each of the located holes. You should have two sheet metal nuts on each back column face (C). Step 9: Install the rack mount kit on the switch Position the front mounting bracket (A) so that its angled side faces out and it is on upper part of switch's side. Using the two center threaded holes on the front side of the switch, attach the bracket with flat-head Phillips screws (B). Attach the front mounting brackets on both sides of the switch. Position the rear mounting bracket (C) so that its center holes (D) line up with the first and third threaded holes on the back portion of the switch's side. The slotted end (E) of the bracket should face towards the back of the switch. Using two flat-head Phillips screws, attach the rear mounting bracket to the switch. Attach both rear mounting brackets. 5 of 8 H
-
 1
1 -
 2
2 -
 3
3 -
 4
4 -
 5
5 -
 6
6 -
 7
7 -
 8
8 -
 9
9 -
 10
10
 |
 |
