HP Surestore 64 Installation Guide - Page 7
Step 12: Install the sliding shelf brackets (Management Station only), bracket E.
 |
View all HP Surestore 64 manuals
Add to My Manuals
Save this manual to your list of manuals |
Page 7 highlights
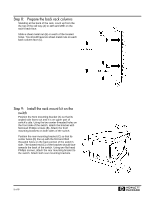
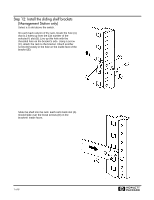
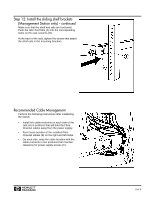
Step 12: Install the sliding shelf brackets (Management Station only) Select a U slot above the switch. On each back column of the rack, locate the hole (A) that is 2 holes up from the EIA number of the selected U slot (B). Line up this hole with the threaded hole on the bracket's side. Using a screw (C), attach the rack to the bracket. Attach another screw (D) loosely in the hole on the inside face of the bracket (E). Slide the shelf into the rack. Each rail's back slot (A) should slide over the loose screws (B) on the brackets' inside faces. 7 of 8 H
-
 1
1 -
 2
2 -
 3
3 -
 4
4 -
 5
5 -
 6
6 -
 7
7 -
 8
8 -
 9
9 -
 10
10
 |
 |

7 of 8
H
Step 12: Install the sliding shelf brackets
(Management Station only)
Select a U slot above the switch.
On each back column of the rack, locate the hole (A)
that is 2 holes up from the EIA number of the
selected U slot (B). Line up this hole with the
threaded hole on the bracket's side. Using a screw
(C), attach the rack to the bracket. Attach another
screw (D) loosely in the hole on the inside face of the
bracket (E).
Slide the shelf into the rack. Each rail's back slot (A)
should slide over the loose screws (B) on the
brackets' inside faces.