HP Surestore Archive Server 100st 32/64/76 Slot, 5.2 Gbyte Drive Optical Jukeb - Page 42
Add Cartridge Magazines C5131J/K/L Kits
 |
View all HP Surestore Archive Server 100st manuals
Add to My Manuals
Save this manual to your list of manuals |
Page 42 highlights
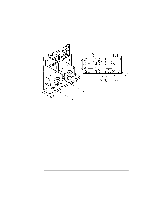
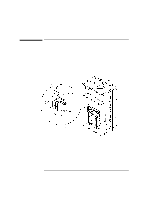
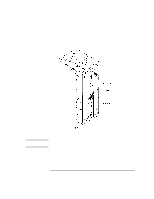
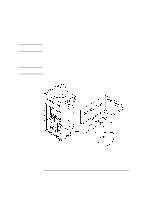
CAUTION Converting 2.6 Gb Drive Jukeboxes to 5.2 Gb Drive Jukeboxes Add Cartridge Magazines (C5131J/K/L Kits Only) Add Cartridge Magazines (C5131J/K/L Kits Only) When adding magazines into the chassis, do not move the customer's disks from the their current locations. If the event that you must move a cartridge, record the cartridge location and orientation so the cartridge can be replaced to its original position later. 1. Clip the cartridge magazines into the area shown in Figure 3-13. a. Slide the magazine in with the tabs facing the wall. Slide the tabs into the slots in the wall of the magazine. b. Push the magazine forward and towards the wall at the same time to snap the magazine in. c. Repeat steps a. and b. for the magazine on the opposite wall. d. Repeat steps a. through c. for four sets of 8-slot magazines. 2. Confirm that all magazines are firmly snapped into the chassis walls. 3. Go to Chapter 4, "Downloading Firmware." 3- 16
-
 1
1 -
2
-
3
-
4
-
5
-
6
-
7
-
8
-
9
-
10
-
11
-
12
-
13
-
14
-
15
-
16
-
17
-
18
-
19
-
20
-
21
-
22
-
23
-
24
-
25
-
26
-
27
-
28
-
29
-
30
-
31
-
32
-
33
-
34
-
35
-
36
-
 37
37 -
 38
38 -
 39
39 -
 40
40 -
 41
41 -
 42
42 -
 43
43 -
 44
44 -
 45
45 -
 46
46 -
 47
47 -
48
-
49
-
50
-
51
-
52
-
53
-
54
-
55
-
56
-
57
-
58
 |
 |
