HP TouchSmart 9100 Maintenance and Service Guide: HP TouchSmart 9100 Business - Page 32
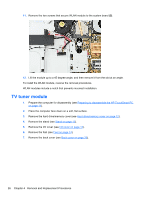
TV tuner module
 |
View all HP TouchSmart 9100 manuals
Add to My Manuals
Save this manual to your list of manuals |
Page 32 highlights
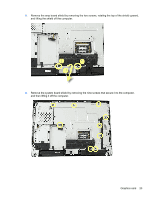
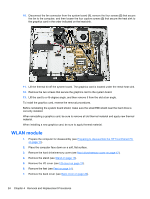
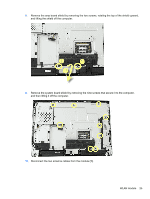
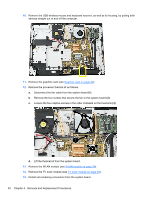
11. Remove the two screws that secure WLAN module to the system board (2). 12. Lift the module up to a 45 degree angle, and then remove it from the slot at an angle. To install the WLAN module, reverse the removal procedures. WLAN modules include a notch that prevents incorrect installation. TV tuner module 1. Prepare the computer for disassembly (see Preparing to disassemble the HP TouchSmart PC on page 11). 2. Place the computer face down on a soft, flat surface. 3. Remove the hard drive/memory cover (see Hard drive/memory cover on page 12). 4. Remove the stand (see Stand on page 15). 5. Remove the I/O cover (see I/O cover on page 13). 6. Remove the feet (see Feet on page 14). 7. Remove the back cover (see Back cover on page 20). 26 Chapter 4 Removal and Replacement Procedures
-
 1
1 -
2
-
3
-
4
-
5
-
6
-
7
-
8
-
9
-
10
-
11
-
12
-
13
-
14
-
15
-
16
-
17
-
18
-
19
-
20
-
21
-
22
-
23
-
24
-
25
-
26
-
 27
27 -
 28
28 -
 29
29 -
 30
30 -
 31
31 -
 32
32 -
 33
33 -
 34
34 -
 35
35 -
 36
36 -
 37
37 -
38
-
39
-
40
-
41
-
42
-
43
-
44
-
45
-
46
-
47
-
48
-
49
-
50
-
51
-
52
-
53
-
54
-
55
-
56
-
57
-
58
-
59
-
60
-
61
-
62
 |
 |
