HP Workstation x1000 hp workstation x1000 - removing and replacing the process
HP Workstation x1000 Manual
 |
View all HP Workstation x1000 manuals
Add to My Manuals
Save this manual to your list of manuals |
HP Workstation x1000 manual content summary:
- HP Workstation x1000 | hp workstation x1000 - removing and replacing the process - Page 1
removing and replacing the processor hp workstation x1000 A7777- I E003 Printed in USA Manufacturing Part Number:A7777-IE003 Edition E0901 © Copyright 2001 Hewlett-Packard Company - HP Workstation x1000 | hp workstation x1000 - removing and replacing the process - Page 2
HP PRODUCT DURATION OF WARRANTY HP Workstation x1000 Product 1 Year 1. HP warrants HP new. 2. HP warrants that HP software will not fail to execute its programming instructions, for HP, (c) unauthorized modification or misuse, (d) operation outside of the published environmental specifications - HP Workstation x1000 | hp workstation x1000 - removing and replacing the process - Page 3
by a court of competent jurisdiction to have been directly caused by a defective HP product. 3. TO THE EXTENT ALLOWED BY LOCAL LAW, THE REMEDIES IN THIS ' SOLE AND EXCLUSIVE REMEDIES. EXCEPT AS INDICATED ABOVE, IN NO EVENT WILL HP OR ITS SUPPLIERS BE LIABLE FOR LOSS OF DATA OR FOR DIRECT, SPECIAL, - HP Workstation x1000 | hp workstation x1000 - removing and replacing the process - Page 4
4 - HP Workstation x1000 | hp workstation x1000 - removing and replacing the process - Page 5
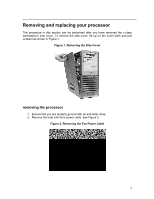
Removing and replacing your processor The procedure in this section can be performed after you have removed the c-class workstation's side cover. To remove the side cover, lift up on the cover latch and pull outward as shown in Figure 1. Figure 1. Removing the Side Cover - HP Workstation x1000 | hp workstation x1000 - removing and replacing the process - Page 6
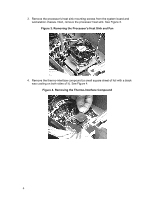
3. Remove the processor's heat sink mounting screws from the system board and workstation chassis. Next, remove the processor heat sink. See Figure 3. Figure 3. Removing the Processor's Heat Sink and Fan 4. Remove the thermo-interface compound (a small square sheet - HP Workstation x1000 | hp workstation x1000 - removing and replacing the process - Page 7
5. Lift up on the processor socket's release lever. This releases the processor for removal from its socket. See Figure 5. Figure 5. Lifting Up on the Processor Socket's Release Lever 6. Remove the processor from its socket. See Figure 6. Figure 6. Removing the Process from Its Socket 7 - HP Workstation x1000 | hp workstation x1000 - removing and replacing the process - Page 8
replacing the processor 1. Ensure that you are properly ground with an anti-static strap. 2. Replace the processor in its socket. To properly replace the processor in its socket, you must align the beveled corner of the processor with the corner of the socket closest to the socket release lever. See - HP Workstation x1000 | hp workstation x1000 - removing and replacing the process - Page 9
4. Place a new thermo-interface compound on top of the processor. This is a small square sheet of foil with a black wax coating on both sides of it. See Figure 9. Figure 9. Replacing the Thermo-Interface Compound 5. Replace the processor's heat sink and fan on the system board by aligning the fan - HP Workstation x1000 | hp workstation x1000 - removing and replacing the process - Page 10
6. Replace the fan power cable. See Figure 11. Note that the fan's power cable connector is keyed for proper connection on the system board. Figure 11. Replacing the Fan Power Cable 10
-
 1
1 -
 2
2 -
 3
3 -
 4
4 -
 5
5 -
 6
6 -
 7
7 -
8
-
9
-
10
 |
 |
removing and replacing the processor
hp workstation x1000
A7777- I E003
Printed in USA
Manufacturing Part Number:
A7777-IE003
Edition E0901
© Copyright
2001 Hewlett-Packard Company