HP Workstation x1000 hp workstation x1000 - removing and replacing the process - Page 8
replacing the processor
 |
View all HP Workstation x1000 manuals
Add to My Manuals
Save this manual to your list of manuals |
Page 8 highlights
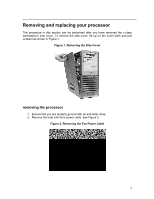
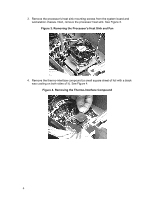
replacing the processor 1. Ensure that you are properly ground with an anti-static strap. 2. Replace the processor in its socket. To properly replace the processor in its socket, you must align the beveled corner of the processor with the corner of the socket closest to the socket release lever. See Figure 7. Figure 7. Replacing the Processor in Its Socket 3. Pull down on the processor socket's release lever until it snaps in place. This secures the processor in its socket. See Figure 8. Figure 8. Pull Down on the Processor Socket's Release Lever 8
-
 1
1 -
2
-
 3
3 -
 4
4 -
 5
5 -
 6
6 -
 7
7 -
 8
8 -
 9
9 -
 10
10
 |
 |

8
replacing the processor
1.
Ensure that you are properly ground with an anti-static strap.
2.
Replace the processor in its socket. To properly replace the processor in its
socket, you must align the beveled corner of the processor with the corner of the
socket closest to the socket release lever. See Figure 7.
Figure 7. Replacing the Processor in Its Socket
3.
Pull down on the processor socket’s release lever until it snaps in place. This
secures the processor in its socket. See Figure 8.
Figure 8. Pull Down on the Processor Socket’s Release Lever