HP Workstation xw4000 HP xw4000 Series and Z400 Workstations - Rack mount tray - Page 4
Step 3-Mounting the workstation rack
 |
View all HP Workstation xw4000 manuals
Add to My Manuals
Save this manual to your list of manuals |
Page 4 highlights
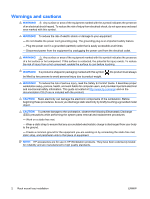
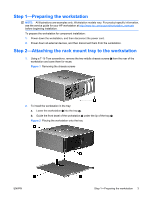
3. Align the screw holes in the tray with the screw holes at the rear of the workstation . Figure 3 Fastening the tray to the workstation 4. Use a T-15 Torx screwdriver to fasten the tray to the workstation with the two chassis screws saved earlier. Step 3-Mounting the workstation rack 1. Attach the rails to the rack. See the rail installation instructions in this kit. 2. Remove the adhesive backing from the back of the glide strips. 3. Apply a glide strip to the top surface of each rail. Figure 4 Applying glide strips 4 Rack mount tray installation ENWW
-
 1
1 -
 2
2 -
 3
3 -
 4
4 -
 5
5
 |
 |

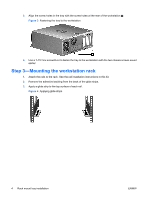
3.
Align the screw holes in the tray with the screw holes at the rear of the workstation
.
Figure 3
Fastening the tray to the workstation
4.
Use a T-15 Torx screwdriver to fasten the tray to the workstation with the two chassis screws saved
earlier.
Step 3—Mounting the workstation rack
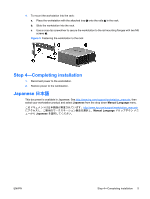
1.
Attach the rails to the rack. See the rail installation instructions in this kit.
2.
Remove the adhesive backing from the back of the glide strips.
3.
Apply a glide strip to the top surface of each rail.
Figure 4
Applying glide strips
4
Rack mount tray installation
ENWW