HP Xw25p ProLiant BL25p Server Blade Maintenance and Service Guide - Page 24
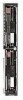
Power button/LED board
 |
View all HP Xw25p manuals
Add to My Manuals
Save this manual to your list of manuals |
Page 24 highlights
4. Release the latches and lift the DC filter module away from the system board while pushing the power connector into the chassis. To replace the component, reverse the removal procedure. Power button/LED board To remove the component: 1. Power down the server blade and remove it from the server blade enclosure ("Server blade preparation" on page 11). 2. Remove the access panel ("Access panel" on page 12). 3. Remove any hot-plug SCSI hard drives or hard drive blanks ("Hard drives" on page 12). 4. With a T-6 Torx screwdriver, remove the two retaining screws from the bottom of the chassis. 5. Disconnect the power button/LED cable from the rear left side of the power button/LED board. 6. Slide the power button/LED board toward the left outside edge of the chassis. 7. Tilt the front edge of the power button/LED board down until the keyholes on the rear of the board clear the alignment pins. Removal and replacement procedures 24
-
 1
1 -
2
-
3
-
4
-
5
-
6
-
7
-
8
-
9
-
10
-
11
-
12
-
13
-
14
-
15
-
16
-
17
-
18
-
 19
19 -
 20
20 -
 21
21 -
 22
22 -
 23
23 -
 24
24 -
 25
25 -
 26
26 -
 27
27 -
 28
28 -
 29
29 -
30
-
31
-
32
-
33
-
34
-
35
-
36
-
37
-
38
-
39
-
40
-
41
-
42
-
43
 |
 |
