HP Xw6600 HP xw and Z Series Workstations - Front fan and fan holder installat - Page 3
Step 1-Preparing for component installation, Step 2-Installing the front fan and fan holder
 |
UPC - 883585731121
View all HP Xw6600 manuals
Add to My Manuals
Save this manual to your list of manuals |
Page 3 highlights
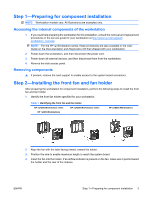
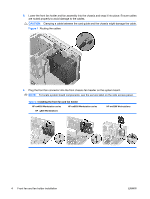
Step 1-Preparing for component installation NOTE: Workstation models vary. All illustrations are examples only. Accessing the internal components of the workstation 1. If you need help preparing the workstation for this installation, consult the removal and replacement procedures in the service guide for your workstation at http://www.hp.com/support/ workstation_manuals. NOTE: For the HP Workstation series, these procedures are also available in the User Guide on the Documentation and Diagnostics CD that shipped with your workstation. 2. Power down the workstation, and then disconnect the power cord. 3. Power down all external devices, and then disconnect them from the workstation. 4. Remove the side access panel. Removing components ▲ If present, remove the card support to enable access to the system board connectors. Step 2-Installing the front fan and fan holder After preparing the workstation for component installation, perform the following steps to install the front fan and fan holder. 1. Identify the front fan holder specified for your workstation. Table 1 Identifying the front fan and fan holder HP xw4000 Workstation series HP xw6000 Workstation series HP 400 Workstations HP xw9300 Workstations 2. Align the fan with the label facing inward, toward the holder. 3. Position the wire to enable maximum length to reach the system board. 4. Insert the fan into the holder. If an airflow indicator is present on the fan, make sure it points toward the holder and the rear of the chassis. ENWW Step 1-Preparing for component installation 3
-
 1
1 -
 2
2 -
 3
3 -
 4
4 -
 5
5
 |
 |