HP Xw6600 HP xw Workstation Series - Diskette drive installation - Page 4
Step 1-Preparing the workstation, Step 2-Installing the diskette drive - workstation specifications
 |
UPC - 883585731121
View all HP Xw6600 manuals
Add to My Manuals
Save this manual to your list of manuals |
Page 4 highlights
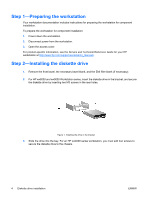
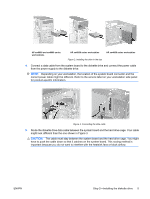
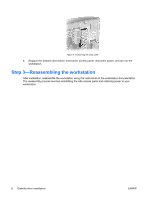
Step 1-Preparing the workstation Your workstation documentation includes instructions for preparing the workstation for component installation. To prepare the workstation for component installation: 1. Power down the workstation. 2. Disconnect power from the workstation. 3. Open the access cover. For product-specific information, see the Service and Technical Reference Guide for your HP workstation at http://www.hp.com/support/workstation_manuals. Step 2-Installing the diskette drive 1. Remove the front bezel, the necessary bezel blank, and the EMI filler blank (if necessary). 2. For HP xw8000 and xw9000 Workstation series, insert the diskette drive in the bracket, and secure the diskette drive by inserting two M3 screws in the rear holes. Figure 1. Installing the drive in the bracket 3. Slide the drive into the bay. For an HP xw4000 series workstation, you must add four screws to secure the diskette drive to the chassis. 4 Diskette drive installation ENWW
-
 1
1 -
 2
2 -
 3
3 -
 4
4 -
 5
5 -
 6
6
 |
 |
