HP Xw6600 HP xw Workstation series - SAS/SATA hard drive installation - Page 4
Installing the hard drive
 |
UPC - 883585731121
View all HP Xw6600 manuals
Add to My Manuals
Save this manual to your list of manuals |
Page 4 highlights
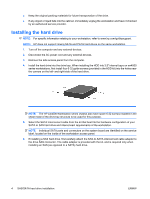
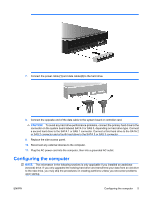
● Keep the original packing materials for future transportation of the drive. ● If any object or liquid falls into the cabinet, immediately unplug the workstation and have it checked by an authorized service provider. Installing the hard drive NOTE: For specific information relating to your workstation, refer to www.hp.com/go/bizsupport. NOTE: HP does not support mixing SATA and PATA hard drives on the same workstation. 1. Turn off the computer and any external devices. 2. Disconnect the AC power cord and any external devices. 3. Remove the side access panel from the computer. 4. Install the hard drive into the drive bay. When installing the HDD into 3.5" internal bays on xw4000 series workstations, first install four 6-32 guide screws (provided in the HDD kit) into the holes near the corners on the left- and right-side of the hard drive. NOTE: The HP xw4000 Workstation series chassis also have spare 6-32 screws installed in the sheet metal of the drive bay structure to be used for this purpose. 5. Select the SATA interconnect cable from the kit that best fits the hardware configuration of your SATA or SAS hard drive and interconnect requirements of the workstation. NOTE: Individual SATA ports and connectors on the system board are identified on the service label, located on the inside of the workstation access panel. 6. If installing a SAS hard drive, first carefully attach the SAS-to-SATA interconnect cable adapter to the drive SAS connector. The cable adapter is provided with the kit, and is required only when installing an SAS (as opposed to a SATA) hard drive. 4 SAS/SATA hard drive installation ENWW
-
 1
1 -
 2
2 -
 3
3 -
 4
4 -
 5
5 -
 6
6
 |
 |
