HP Z1 HP Z1 Workstation User Guide - Page 25
HP Z1 Manual
 |
View all HP Z1 manuals
Add to My Manuals
Save this manual to your list of manuals |
Page 25 highlights
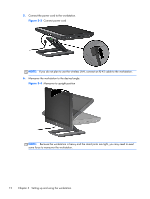
4. Install the receiver in the internal USB port on the rear I/O assembly. Figure 3-12 Install receiver NOTE: An outline around the internal USB port identifies the maximum area allowed for an internal USB device. The receiver must fit within this area. 5. Close the workstation and maneuver it to an upright position. Plug in the power cord and turn on the workstation. 6. Turn on the power on the bottom of the wireless mouse (1) and remove the battery tab on the bottom of the wireless keyboard. Make sure the mouse and keyboard are within 30 cm (12 in) of the workstation and away from interference from other devices. Press the connect button on the mouse (2) for five seconds, then press the connect button on the keyboard (3) for five seconds. Place them in front of the workstation. Figure 3-13 Activate wireless keyboard and mouse Setting up the workstation 17
-
 1
1 -
2
-
3
-
4
-
5
-
6
-
7
-
8
-
9
-
10
-
11
-
12
-
13
-
14
-
15
-
16
-
17
-
18
-
19
-
 20
20 -
 21
21 -
 22
22 -
 23
23 -
 24
24 -
 25
25 -
 26
26 -
 27
27 -
 28
28 -
 29
29 -
 30
30 -
31
-
32
-
33
-
34
-
35
-
36
-
37
-
38
-
39
-
40
-
41
-
42
-
43
-
44
-
45
-
46
 |
 |
