HP Z3100 HP Designjet Z3100 Printing Guide [PS Driver] - Proof another printer - Page 2
Working Spaces > CMYK
 |
UPC - 882780677531
View all HP Z3100 manuals
Add to My Manuals
Save this manual to your list of manuals |
Page 2 highlights
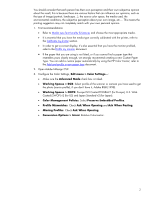
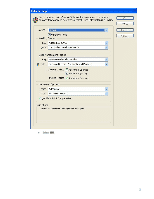
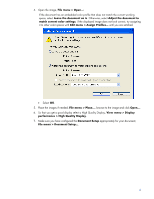
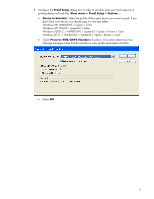
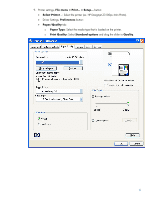
You should consider that each person has their own perception and their own subjective opinion about the result; this is because there are various factors that can influence our opinions, such as the type of image (portrait, landscape...), the source color space, the media used, the environmental conditions, the subjective perception about your own image, etc.... This means the printing suggestion may not completely match with your own personal opinion. 1. First recommendations: • Refer to Media type functionality & features and choose the most appropriate media. • It is essential that you have the media type correctly calibrated with the printer, refer to the Calibrate my printer section. • In order to get a correct display, it's also essential that you have the monitor profiled, refer to the Profile my monitor document. • If the paper that you are using is not listed, or if you cannot find a paper type that resembles yours closely enough, we strongly recommend creating a new Custom Paper Type. You can add a custom paper automatically by using the HP Color Center; refer to the Add and profile a new paper type document. 2. Open Adobe InDesign CS2. 3. Configure the Color Settings, Edit menu > Color Settings...: • Make sure the Advanced Mode check box is ticked. • Working Spaces > RGB: Select profile of the scanner or camera you have used to get the photo (source profile), if you don't have it, Adobe RGB (1998). • Working Spaces > CMYK: Europe ISO Coated FOGRA27 (for Europe), U.S. Web Coated (SWOP) v2 (for US) and Japan Standard v2 (for Japan). • Color Management Policies: Select Preserve Embedded Profiles. • Profile Mismatches: Check Ask When Opening and Ask When Pasting. • Missing Profiles: Check Ask When Opening. • Conversion Options > Intent: Relative Colorimetric. 2
-
 1
1 -
 2
2 -
 3
3 -
 4
4 -
 5
5 -
 6
6 -
 7
7 -
 8
8 -
9
 |
 |
