HP Z420 PCI Express graphics or compute card with auxiliary power adapter inst - Page 1
HP Z420 Manual
 |
View all HP Z420 manuals
Add to My Manuals
Save this manual to your list of manuals |
Page 1 highlights
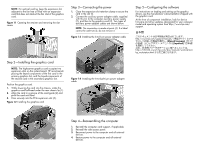
PCI Express graphics or compute card with auxiliary power adapter installation © 2012 Hewlett-Packard Development Company, L.P. Printed in the U.S. 688013-001 Introduction This document describes how to install the following in an HP Z series computer: • High-power graphics card with an auxiliary power adapter cable • Compute card with an auxiliary power adapter cable Throughout this document, graphics card references either type of card. Kit Contents • Graphics card or compute card • Auxiliary power adapter cable • Warranty information • Installation instructions (this document) Your responsibilities You are responsible for determining whether the product is appropriate for your use and will interface with other equipment without malfunction or damage. You are also responsible for backing up data before installing any product and for regularly backing up data after installing the product. HP is not liable for any damage to equipment or data loss resulting from the use of any product. In some HP Z series computers, a discrete graphics card is required for supported use of a compute card. To determine the compatibility of this product with your computer, view QuickSpecs at http://www.hp.com/go/ productbulletin. Before installing a high-power graphics card, review the QuickSpecs to ensure that your computer meets the correct power requirements to support the card. IMPORTANT: For step-by-step video instructions showing component removal and replacement procedures for your computer, refer to the Customer Self-Repair Services Media Library at: http://www.hp.com/go/sml. WARNING! Any surface or area of the equipment marked with this symbol indicates the presence of a hot surface or hot component. If this surface is contacted, the potential for injury exists. To reduce the risk of injury from a hot component, enable the surface to cool before touching. WARNING! Any surface or area of the equipment marked with this symbol indicates the presence of an electrical shock hazard. To reduce the risk of injury from electrical shock, do not open any enclosed area marked with this symbol. WARNING! To reduce the risk of electric shock or damage to your equipment: * Do not disable the power cord grounding plug. The grounding plug is an important safety feature. * Plug the power cord in a grounded (earthed) outlet that is easily accessible at all times. * Disconnect power from the equipment by unplugging the power cord from the electrical outlet. WARNING! To reduce the risk of serious injury, read the Safety & Comfort Guide. It describes proper computer setup, posture, health, and work habits for computer users, and provides important electrical and mechanical safety information. This guide is located at http://www.hp.com/ergo. WARNING! If a product is shipped in packaging marked with this symbol, the product must always be lifted by two persons to avoid personal injury due to product weight. CAUTION: Static electricity can damage the electronic components of the computer or optional equipment. Before beginning this procedure, ensure that you are static-free by briefly touching a grounded metal object. CAUTION: To prevent damage to the computer, observe the following Electrostatic Discharge (ESD) precautions while performing the system parts removal and replacement procedures: * Work on a static-free mat. * Wear a static strap to ensure that any accumulated electrostatic charge is discharged from your body to the ground. * Create a common ground for the equipment you are working on by connecting the static-free mat, static strap, and peripheral units to that piece of equipment. NOTE: HP accessories are for use in HP computer products. Accessories have been extensively tested for reliability and are manufactured to high quality standards. Step 1-Preparing for component installation NOTE: Computer models vary. All illustrations are examples only. Accessing the internal components of the computer 1. If you need help preparing the computer for this installation, refer to the: • Removal and replacement procedures in the Maintenance and Service Guide for your computer at http://www.hp.com/support/ computer manuals, or • Removal and replacement videos for your computer at http://www.hp.com/go/sml. 2. Power down the computer, then disconnect the power cord. 3. Power down all external devices, then disconnect them from the computer. 4. Remove the side access panel. Removing components 1. If present, remove the card support to enable access to the expansion slots and system board connectors. 2. Select a PCIe-x16 expansion slot. a. Open the expansion slot retention clamp (1). b. Remove the applicable expansion slot covers (2). NOTE: To identify a PCI Express (PCIe)-x16 expansion slot, see the service label on the side access panel.
-
 1
1 -
 2
2
 |
 |