HP Z800 Broadcom NetXtreme Gigabit Ethernet Plus Network Interface Card instal - Page 4
Step 2—Installing the PCIe NIC hardware,
 |
UPC - 884962082454
View all HP Z800 manuals
Add to My Manuals
Save this manual to your list of manuals |
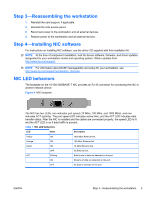
Page 4 highlights
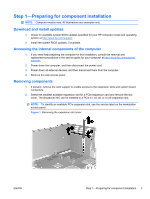
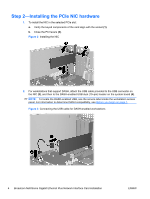
Step 2-Installing the PCIe NIC hardware 1. To install the NIC in the selected PCIe slot: a. Verify the keyed components of the card align with the socket (1). b. Close the PCI levers (2). Figure 2 Installing the NIC 2. For workstations that support DASH, attach the USB cable provided to the USB connector on the NIC (3), and then to the DASH-enabled USB dual (10-pin) header on the system board (4). NOTE: To locate the DASH-enabled USB, see the service label inside the workstation access panel. For information to determine DASH compatibility, see Before you begin on page 1. Figure 3 Connecting the USB cable for DASH-enabled workstations 4 Broadcom NetXtreme Gigabit Ethernet Plus Network Interface Card installation ENWW
-
 1
1 -
 2
2 -
 3
3 -
 4
4 -
 5
5 -
 6
6
 |
 |

Step 2—Installing the PCIe NIC hardware
1.
To install the NIC in the selected PCIe slot:
a.
Verify the keyed components of the card align with the socket
(1)
.
b.
Close the PCI levers
(2)
.
Figure 2
Installing the NIC
2.
For workstations that support DASH, attach the USB cable provided to the USB connector on
the NIC
(3)
, and then to the DASH-enabled USB dual (10–pin) header on the system board
(4)
.
NOTE:
To locate the DASH-enabled USB, see the service label inside the workstation access
panel. For information to determine DASH compatibility, see
Before you begin
on page
1
.
Figure 3
Connecting the USB cable for DASH-enabled workstations
4
Broadcom NetXtreme Gigabit Ethernet Plus Network Interface Card installation
ENWW