HP Z800 Broadcom NetXtreme Gigabit Ethernet Plus Network Interface Card instal - Page 5
Step 3—Reassembling the workstation, Step 4—Installing NIC software, NIC LED behaviors - firmware
 |
UPC - 884962082454
View all HP Z800 manuals
Add to My Manuals
Save this manual to your list of manuals |
Page 5 highlights
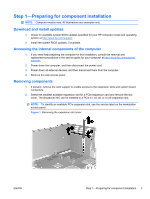
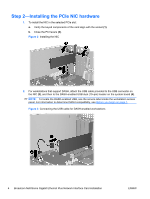
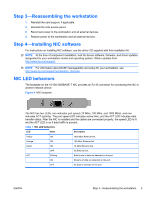
Step 3-Reassembling the workstation 1. Reinstall the card support, if applicable. 2. Reinstall the side access panel. 3. Reconnect power to the workstation and all external devices. 4. Restore power to the workstation and all external devices. Step 4-Installing NIC software For instructions on installing NIC software, see the driver CD supplied with this installation kit. NOTE: At the time of component installation, look for device software, firmware, and driver updates, designated for your workstation model and operating system. Obtain updates from http://www.hp.com/support. NOTE: For information about DASH manageability and setup for your workstation, see http://www.hp.com/support/workstation_manuals. NIC LED behaviors The faceplate on the 10/100/1000BASE-T NIC provides an RJ-45 connector for connecting the NIC to another network device. Figure 4 NIC faceplate The NIC has two LEDs, one indicates port speed (10 Mb/s, 100 Mb/s, and 1000 Mb/s), and one indicates ACT (activity). The port speed LED indicates active links, and the ACT LED indicates data transfer status. After the NIC is installed and the cables are connected properly, the speed LED is lit and the ACT LED is on if data traffic is present. Table 1 NIC LED behaviors LED State Description Yellow ON 1000-Mb/s Ethernet link. Orange ON 100-Mb/s Ethernet link. Green ON 10-Mb/s Ethernet link. OFF No Ethernet link. ACT Blinking Brief bursts of data are detected on the port. ON Streams of data are detected on the port. OFF No data is detected on the port. ENWW Step 3-Reassembling the workstation 5
-
 1
1 -
 2
2 -
 3
3 -
 4
4 -
 5
5 -
 6
6
 |
 |
