| Section |
Page |
| Parts Removal and Replacement Guide |
1 |
| Parts Removal and Replacement Guide |
1 |
| Parts Removal and Replacement Guide |
1 |
| HP B2600 Workstations |
1 |
| Manufacturing Part Number:� A6070-90010 |
1 |
| Edition E0601 |
1 |
| Notice |
2 |
| Notice |
2 |
| Restricted Rights Legend |
2 |
| Restricted Rights Legend |
2 |
| © Copyright 2001 |
2 |
| © Copyright 2001 |
2 |
| Hewlett-Packard Company. All Rights Reserved. This document contains proprietary information that... |
2 |
| © Copyright 1980, 1984 |
2 |
| © Copyright 1980, 1984 |
2 |
| AT&T, Inc. |
2 |
| © Copyright 1979, 1980, 1983 |
2 |
| © Copyright 1979, 1980, 1983 |
2 |
| The Regents of the University of California. This software and documentation is based in part on ... |
2 |
| Preface |
7 |
| Preface |
7 |
| Installation Notice |
7 |
| Installation Notice |
7 |
| Related Manuals |
7 |
| Related Manuals |
7 |
| • Installation Poster for the HP B2600 Workstation |
7 |
| • Installation Poster for the HP B2600 Workstation |
7 |
| • Installation Poster for the HP B2600 Workstation |
7 |
| • Getting Started Guide for the HP B2600 Workstation |
7 |
| • Getting Started Guide for the HP B2600 Workstation |
7 |
| • Technical Reference for the HP B2600 Workstation |
7 |
| • Technical Reference for the HP B2600 Workstation |
7 |
| • Common Desktop Environment (CDE) User’s Guide |
7 |
| • Common Desktop Environment (CDE) User’s Guide |
7 |
| • Common Desktop Environment (CDE) User’s Guide |
7 |
| • Configuring HP-UX for Peripherals |
7 |
| • Configuring HP-UX for Peripherals |
7 |
| • HP-UX System Administration Tasks |
7 |
| • HP-UX System Administration Tasks |
7 |
| • HP CDE Getting Started Guide |
7 |
| • HP CDE Getting Started Guide |
7 |
| • Managing Systems and Workgroups |
7 |
| • Managing Systems and Workgroups |
7 |
| • Using HP-UX |
7 |
| • Using HP-UX |
7 |
| • Using Your HP Workstation |
7 |
| • Using Your HP Workstation |
7 |
| Revision History |
8 |
| Revision History |
8 |
| Edition |
8 |
| Edition |
8 |
| Edition |
8 |
| Revision History |
8 |
| E0601 |
8 |
| E0601 |
8 |
| First Printing |
8 |
| Problems, Questions, and Suggestions |
8 |
| Problems, Questions, and Suggestions |
8 |
| Electrostatic Discharge (ESD) Precautions |
8 |
| Electrostatic Discharge (ESD) Precautions |
8 |
| ESD (electrostatic discharge) |
8 |
| Electrostatic discharge (ESD) |
8 |
| • Work on a static-free mat. |
8 |
| • Work on a static-free mat. |
8 |
| • Wear a static strap to ensure that any accumulated electrostatic charge is discharged from your... |
8 |
| • Create a common ground for the equipment you are working on by connecting the static-free mat, ... |
8 |
| • Keep uninstalled printed circuit boards in their protective antistatic bags. |
8 |
| • Handle printed circuit boards by their edges, once you have removed them from their protective ... |
8 |
| 1� Remove/Replace System Components |
9 |
| 1� Remove/Replace System Components |
9 |
| Chapter Overview |
10 |
| Chapter Overview |
10 |
| • Tools Required — a list of tools necessary for removing and replacing system components. |
10 |
| • Tools Required — a list of tools necessary for removing and replacing system components. |
10 |
| • Removing/Replacing System Components — a set of procedures for removing/replacing: front bezel,... |
10 |
| WARNING For most of the installation and removal procedures in this chapter, you must power off t... |
10 |
| NOTE To maintain FCC/EMI compliance, verify that all covers are replaced and that all screws are ... |
10 |
| Workstation Configurations |
10 |
| Workstation Configurations |
10 |
| http://www.hp.com/workstations |
10 |
| Tools Required |
11 |
| Tools Required |
11 |
| • Light-duty flat blade screwdriver with 6-inch (150 mm) blade |
11 |
| • Light-duty flat blade screwdriver with 6-inch (150 mm) blade |
11 |
| • Number 2 Phillips screwdriver with 6-inch (150mm) blade |
11 |
| • T-10 and T-15 Torx driver |
11 |
| • ESD equipment (see the “Electrostatic Discharge (ESD) Precautions” section later in this chapte... |
11 |
| Removing/Replacing System Components |
12 |
| Removing/Replacing System Components |
12 |
| NOTE If you need to install a new system component, simply follow the procedures for |
12 |
| Electrostatic Discharge (ESD) Precautions |
12 |
| Electrostatic Discharge (ESD) Precautions |
12 |
| • Work on a static-free mat. |
12 |
| • Work on a static-free mat. |
12 |
| • Wear a static strap to ensure that any accumulated electrostatic charge is discharged from your... |
12 |
| • Create a common ground for the equipment you are working on by connecting the static-free mat, ... |
12 |
| • Keep uninstalled printed circuit boards in their protective antistatic bags. |
12 |
| • Handle printed circuit boards by their edges, once you have removed them from their protective ... |
12 |
| Prerequisite for Using the Procedures in this Chapter |
13 |
| Prerequisite for Using the Procedures in this Chapter |
13 |
| 1. Power off the workstation (either by executing |
13 |
| 1. Power off the workstation (either by executing |
13 |
| 2. Unplug the workstation power cord and all peripheral devices from AC power outlets. If you are... |
13 |
| 3. Attach the static-grounding wrist strap by following the instructions on the package. Attach t... |
13 |
| NOTE To make access to the internal components easier, you may want to place the workstation on a... |
13 |
| CAUTION This workstation is designated for two-person lifting; it weighs approximately 35.0 pound... |
13 |
| Removing the Front Bezel and Top Cover |
14 |
| Removing the Front Bezel and Top Cover |
14 |
| Removing the Front Bezel and Top Cover |
14 |
| Removing the Front Bezel and Top Cover |
14 |
| 1. Turn your workstation off and unplug it. |
14 |
| 1. Turn your workstation off and unplug it. |
14 |
| 2. Lay your workstation on a soft anti-static surface with the HP logo text in the upright position. |
14 |
| 3. Press in on both release buttons found on the ends of the bezel and pull outward from the work... |
14 |
| Figure�1�1.� Front Bezel and Top Cover Removal |
14 |
| Figure�1�1.� Front Bezel and Top Cover Removal |
14 |
| <GRAPHIC> |
15 |
| Replacing the Front Bezel and Top Cover |
15 |
| Replacing the Front Bezel and Top Cover |
15 |
| Replacing the Front Bezel and Top Cover |
15 |
| 1. Slide the top cover back on the workstation and secure it by screwing in the captive screws. |
15 |
| 1. Slide the top cover back on the workstation and secure it by screwing in the captive screws. |
15 |
| 2. Next, push the bezel in place on the front of the workstation. See |
15 |
| Figure�1�2.� Front Bezel and Top Cover Replacement |
15 |
| Figure�1�2.� Front Bezel and Top Cover Replacement |
15 |
| <GRAPHIC> |
16 |
| Removing Memory DIMMs |
16 |
| 1. Complete the procedure in the section |
16 |
| 1. Complete the procedure in the section |
16 |
| 2. Press downward on the tabs that are located on both ends of the memory card slots. See |
16 |
| Figure�1�3.� Pressing Down on the Memory Slot Tabs |
16 |
| Figure�1�3.� Pressing Down on the Memory Slot Tabs |
16 |
| <GRAPHIC> |
16 |
| Figure�1�4.� Lifting a DIMM Card Out of the Memory Slot |
16 |
| Figure�1�4.� Lifting a DIMM Card Out of the Memory Slot |
16 |
| <GRAPHIC> |
17 |
| Memory Configuration |
17 |
| Figure�1�5.� Memory Loading Sequence in the HP B2600 |
17 |
| Figure�1�5.� Memory Loading Sequence in the HP B2600 |
17 |
| <GRAPHIC> |
18 |
| Replacing Memory DIMMs |
18 |
| 1. Remove the current DIMM(s) if you have not already done this. Otherwise, skip this step. To re... |
18 |
| 1. Remove the current DIMM(s) if you have not already done this. Otherwise, skip this step. To re... |
18 |
| 2. Determine the appropriate memory slot(s) for your DIMM card(s). See |
18 |
| Figure�1�6.� Memory Loading Sequence in the HP B2600 |
18 |
| Figure�1�6.� Memory Loading Sequence in the HP B2600 |
18 |
| <GRAPHIC> |
19 |
| Figure�1�7.� Inserting the DIMM Card into a Memory Slot |
19 |
| Figure�1�7.� Inserting the DIMM Card into a Memory Slot |
19 |
| <GRAPHIC> |
19 |
| 5. Connect and turn on the power to your system. |
19 |
| 6. Determine that your memory installation was successful by executing the |
19 |
| Removing the CD Drive |
20 |
| Removing the CD Drive |
20 |
| 1. Complete the procedure in the section |
20 |
| 1. Complete the procedure in the section |
20 |
| 2. Disconnect the CD drive control cable by pulling up on its pull tab and disconnect the power c... |
20 |
| Figure�1�8.� Disconnecting the CD Drive Control Cable |
20 |
| Figure�1�8.� Disconnecting the CD Drive Control Cable |
20 |
| <GRAPHIC> |
20 |
| 4. Press in on the retainer clips on both sides of the CD drive bay and pull toward you. See |
21 |
| 5. Take the back cover off the CD drive bay by lifting up on the raised portion of the back cover... |
21 |
| Figure�1�11.� Removing the CD Drive Bay’s Back Cover |
21 |
| Figure�1�11.� Removing the CD Drive Bay’s Back Cover |
21 |
| <GRAPHIC> |
22 |
| 7. Unscrew the four CD drive mounting screws located on both sides of the CD drive bay. See |
22 |
| Figure�1�13.� Unscrew the Four CD Drive Mounting Screws |
22 |
| Figure�1�13.� Unscrew the Four CD Drive Mounting Screws |
22 |
| <GRAPHIC> |
23 |
| Replacing the CD Drive |
24 |
| Replacing the CD Drive |
24 |
| 1. Remove the current CD drive if you have not already done this. Otherwise, skip this step. To r... |
24 |
| 1. Remove the current CD drive if you have not already done this. Otherwise, skip this step. To r... |
24 |
| 2. Slide the CD drive into the CD drive bay. See |
24 |
| 3. Screw the four CD drive mounting screws into their threaded holes located on both sides of the... |
24 |
| Figure�1�16.� Screw in the Four CD Drive Mounting Screws |
24 |
| Figure�1�16.� Screw in the Four CD Drive Mounting Screws |
24 |
| <GRAPHIC> |
25 |
| 5. Replace the back cover on the CD drive bay by inserting the hinge tabs located on the CD drive... |
25 |
| 6. Slide the CD drive bay and CD drive back into the workstation. You will hear the retainer clip... |
26 |
| 7. Connect the CD drive power cable by pushing it into its connector on the system board and conn... |
26 |
| Figure�1�20.� Connecting the CD Drive Power and Control Cables |
26 |
| Figure�1�20.� Connecting the CD Drive Power and Control Cables |
26 |
| <GRAPHIC> |
27 |
| 9. Complete the procedure in the section |
27 |
| 10. Connect and turn on the power to your system. |
27 |
| 11. Determine that your CD drive replacement was successful by executing the |
27 |
| Removing the PCI Cage, I/O Card and PCI Backplane Board |
28 |
| Removing the PCI Cage, I/O Card and PCI Backplane Board |
28 |
| PCI Cage Removal |
28 |
| PCI Cage Removal |
28 |
| 1. Complete the procedure in the section |
28 |
| 1. Complete the procedure in the section |
28 |
| 2. Complete the procedure in the section |
28 |
| 3. Lift up on the PCI cage handle ( |
28 |
| Figure�1�22.� Lifting Up on the PCI Cage Handle |
28 |
| Figure�1�22.� Lifting Up on the PCI Cage Handle |
28 |
| <GRAPHIC> |
28 |
| Figure�1�23.� Removing the PCI Cage from the System |
28 |
| Figure�1�23.� Removing the PCI Cage from the System |
28 |
| <GRAPHIC> |
29 |
| I/O Card Removal |
29 |
| 1. Set the PCI cage on an anti-static surface and remove the PCI cage cover. See |
29 |
| 1. Set the PCI cage on an anti-static surface and remove the PCI cage cover. See |
29 |
| Figure�1�24.� Removing the PCI Cage Cover |
29 |
| Figure�1�24.� Removing the PCI Cage Cover |
29 |
| <GRAPHIC> |
29 |
| Figure�1�25.� Unscrewing the I/O Card’s Bulkhead Screw |
29 |
| Figure�1�25.� Unscrewing the I/O Card’s Bulkhead Screw |
29 |
| <GRAPHIC> |
30 |
| Figure�1�26.� Removing the I/O Card from Its PCI Slot |
30 |
| Figure�1�26.� Removing the I/O Card from Its PCI Slot |
30 |
| <GRAPHIC> |
30 |
| PCI Backplane Board Removal |
30 |
| PCI Backplane Board Removal |
30 |
| 1. Unscrew the three T-15 Torx screws. See |
30 |
| 1. Unscrew the three T-15 Torx screws. See |
30 |
| Figure�1�27.� Unscrew the PCI Backplane’s Three T-15 Torx Screws |
30 |
| Figure�1�27.� Unscrew the PCI Backplane’s Three T-15 Torx Screws |
30 |
| <GRAPHIC> |
31 |
| Figure�1�28.� Removing the PCI Backplane Board |
31 |
| Figure�1�28.� Removing the PCI Backplane Board |
31 |
| <GRAPHIC> |
32 |
| PCI Card Guide Removal |
32 |
| 1. Push the card guide forward with your thumb in the direction of the large arrow and at the sam... |
32 |
| 1. Push the card guide forward with your thumb in the direction of the large arrow and at the sam... |
32 |
| Figure�1�29.� Pushing the Card Guide Forward and Down |
32 |
| Figure�1�29.� Pushing the Card Guide Forward and Down |
32 |
| <GRAPHIC> |
32 |
| Figure�1�30.� Removing the Card Guide from the PCI Cover |
32 |
| Figure�1�30.� Removing the Card Guide from the PCI Cover |
32 |
| <GRAPHIC> |
33 |
| Replacing the PCI Cage, I/O Card and PCI Backplane Board |
33 |
| PCI Backplane Board Replacement |
33 |
| PCI Backplane Board Replacement |
33 |
| 1. Remove the current CD drive, DAT drive or flexible disk drive if you have not already done thi... |
33 |
| 1. Remove the current CD drive, DAT drive or flexible disk drive if you have not already done thi... |
33 |
| 2. Slide the PCI backplane board onto the PCI cage’s standoffs. See |
33 |
| Figure�1�31.� Replacing the PCI Backplane Board |
33 |
| Figure�1�31.� Replacing the PCI Backplane Board |
33 |
| <GRAPHIC> |
33 |
| Figure�1�32.� Screw in the PCI Backplane Board’s Three Screws |
33 |
| Figure�1�32.� Screw in the PCI Backplane Board’s Three Screws |
33 |
| <GRAPHIC> |
34 |
| I/O Card Replacement |
34 |
| 1. Replace the PCI backplane board in the PCI cage if you have not already done this. Otherwise, ... |
34 |
| 1. Replace the PCI backplane board in the PCI cage if you have not already done this. Otherwise, ... |
34 |
| 2. Remove the I/O card from its anti-static bag, which protects it from any possible electro-stat... |
34 |
| 3. Grasp the I/O card’s bulkhead and the back edge and insert it into its PCI slot. See |
34 |
| Figure�1�33.� Inserting the I/O Card into its PCI Slot |
34 |
| Figure�1�33.� Inserting the I/O Card into its PCI Slot |
34 |
| <GRAPHIC> |
34 |
| Figure�1�34.� Screwing in the I/O Card’s Bulkhead Screw |
34 |
| Figure�1�34.� Screwing in the I/O Card’s Bulkhead Screw |
34 |
| <GRAPHIC> |
35 |
| Figure�1�35.� Replacing the PCI Cage Cover |
35 |
| Figure�1�35.� Replacing the PCI Cage Cover |
35 |
| <GRAPHIC> |
35 |
| PCI Cage Replacement |
35 |
| 1. Replace the I/O card(s) in the PCI cage if you have not already done this. Otherwise, skip thi... |
35 |
| 1. Replace the I/O card(s) in the PCI cage if you have not already done this. Otherwise, skip thi... |
35 |
| 2. Push down on the PCI cage handle and on the back of the PCI cage. Next, rotate the PCI cage ha... |
35 |
| Figure�1�36.� Placing the PCI Cage into the Workstation |
35 |
| Figure�1�36.� Placing the PCI Cage into the Workstation |
35 |
| <GRAPHIC> |
35 |
| 4. Complete the procedure in the section |
35 |
| 5. Connect and turn on the power to your system. |
35 |
| 6. Determine that your I/O cards were replaced successfully by executing this command as |
36 |
| PCI Card Guide Replacement |
36 |
| PCI Card Guide Replacement |
36 |
| 1. Locate the front of the card guide slot and the card guide lip. See |
36 |
| 1. Locate the front of the card guide slot and the card guide lip. See |
36 |
| Figure�1�37.� Pushing the Card Guide Forward and Down |
36 |
| Figure�1�37.� Pushing the Card Guide Forward and Down |
36 |
| <GRAPHIC> |
36 |
| Figure�1�38.� Replacing the Card Guide into the PCI Cage Cover |
36 |
| Figure�1�38.� Replacing the Card Guide into the PCI Cage Cover |
36 |
| <GRAPHIC> |
37 |
| Removing the Hard Disk Drive(s) |
37 |
| 1. Complete the procedure in the section |
37 |
| 1. Complete the procedure in the section |
37 |
| 2. Complete the procedure in the section |
37 |
| 3. Grasp the hard disk drive handle and pull it back, then lift up on the handle. See |
37 |
| Figure�1�39.� Removing the Hard Disk Drive and Its Mounting Bracket |
37 |
| Figure�1�39.� Removing the Hard Disk Drive and Its Mounting Bracket |
37 |
| <GRAPHIC> |
37 |
| Figure�1�40.� Removing the Hard Disk Drive from the Hard Disk Drive Bracket |
37 |
| Figure�1�40.� Removing the Hard Disk Drive from the Hard Disk Drive Bracket |
37 |
| <GRAPHIC> |
38 |
| Replacing the Hard Disk Drive(s) |
38 |
| 1. Remove the CD drive, DAT drive or flexible disk drive if you have not already done this. Other... |
38 |
| 1. Remove the CD drive, DAT drive or flexible disk drive if you have not already done this. Other... |
38 |
| 2. Remove the PCI cage if you have not already done this. Otherwise, skip this step. To remove th... |
38 |
| 3. Insert the hard disk drive into the hard disk drive bracket and align the holes in the disk dr... |
38 |
| Figure�1�41.� Installing the Hard Disk Drive into the Hard Disk Drive Bracket |
38 |
| Figure�1�41.� Installing the Hard Disk Drive into the Hard Disk Drive Bracket |
38 |
| <GRAPHIC> |
38 |
| Figure�1�42.� Replacing the Hard Disk Drive and Bracket in the Workstation |
38 |
| Figure�1�42.� Replacing the Hard Disk Drive and Bracket in the Workstation |
38 |
| <GRAPHIC> |
39 |
| 6. Complete the procedure in the section |
39 |
| 7. Complete the procedure in the section |
39 |
| 8. Connect and turn on the power to your system. |
39 |
| 9. Determine that your hard disk drive replacement was successful by executing the |
39 |
| Removing the Liquid Crystal Display (LCD) Module |
40 |
| Removing the Liquid Crystal Display (LCD) Module |
40 |
| 1. Complete the procedure in the section |
40 |
| 1. Complete the procedure in the section |
40 |
| 2. Disconnect the LCD control cable. See |
40 |
| Figure�1�43.� Disconnecting the LCD Control Cable |
40 |
| Figure�1�43.� Disconnecting the LCD Control Cable |
40 |
| <GRAPHIC> |
40 |
| Figure�1�44.� Removing the LCD Module |
40 |
| Figure�1�44.� Removing the LCD Module |
40 |
| <GRAPHIC> |
41 |
| Replacing the Liquid Crystal Display (LCD) Module |
41 |
| 1. Remove the front bezel if you have not already done this. Otherwise, skip this step. To remove... |
41 |
| 1. Remove the front bezel if you have not already done this. Otherwise, skip this step. To remove... |
41 |
| 2. Replace the LCD Module by inserting the left-side and right-side retainer clips in their slots... |
41 |
| Figure�1�45.� Replacing the LCD Module |
41 |
| Figure�1�45.� Replacing the LCD Module |
41 |
| <GRAPHIC> |
41 |
| Figure�1�46.� Connection the LCD Control Cable Connector |
41 |
| Figure�1�46.� Connection the LCD Control Cable Connector |
41 |
| <GRAPHIC> |
41 |
| 5. Connect and turn on the power to your system. |
41 |
| 6. Determine that your LCD Module replacement was successful by looking at the LCD and noticing i... |
41 |
| Removing the AC or DC Power Supply |
42 |
| Removing the AC or DC Power Supply |
42 |
| 1. Unplug the power cord from the system as stated in the WARNING at the beginning of this chapter. |
42 |
| 1. Unplug the power cord from the system as stated in the WARNING at the beginning of this chapter. |
42 |
| 2. Complete the procedure in the section |
42 |
| 3. Disconnect the power supply cables from the system board by pressing in on the latch releases ... |
42 |
| Figure�1�47.� Disconnect the Power Supply Cables |
42 |
| Figure�1�47.� Disconnect the Power Supply Cables |
42 |
| <GRAPHIC> |
43 |
| Figure�1�48.� Unscrewing the Four Power Supply Mounting Screws |
43 |
| Figure�1�48.� Unscrewing the Four Power Supply Mounting Screws |
43 |
| <GRAPHIC> |
43 |
| Figure�1�49.� Removing the AC Power Supply |
43 |
| Figure�1�49.� Removing the AC Power Supply |
43 |
| <GRAPHIC> |
44 |
| Replacing the AC or DC Power Supply |
44 |
| 1. Remove the AC power supply if you have not already done this. Otherwise, skip this step. To re... |
44 |
| 1. Remove the AC power supply if you have not already done this. Otherwise, skip this step. To re... |
44 |
| 2. Replace the AC power supply in the workstation. To do this, you will have to slide the power s... |
44 |
| Figure�1�50.� Replacing the AC Power Supply |
44 |
| Figure�1�50.� Replacing the AC Power Supply |
44 |
| <GRAPHIC> |
44 |
| Figure�1�51.� Screwing in the Four Power Supply Mounting Screws |
44 |
| Figure�1�51.� Screwing in the Four Power Supply Mounting Screws |
44 |
| <GRAPHIC> |
45 |
| Figure�1�52.� Connect the Power Supply Cables |
45 |
| Figure�1�52.� Connect the Power Supply Cables |
45 |
| <GRAPHIC> |
45 |
| 6. Connect and turn on the power to your system. |
45 |
| 7. Determine that your AC power supply replacement was successful by observing to see if the work... |
45 |
| Removing the System Board |
46 |
| Removing the System Board |
46 |
| 1. Complete the procedure in the section |
46 |
| 1. Complete the procedure in the section |
46 |
| 2. Complete the procedure in the section |
46 |
| 3. Complete the procedure in the section |
46 |
| 4. Complete the procedure in the section |
46 |
| 5. Disconnect the two fan power connectors from the system board by pressing in on the latch reta... |
46 |
| Figure�1�53.� Removing the Internal System Board Mounting Screws |
46 |
| Figure�1�53.� Removing the Internal System Board Mounting Screws |
46 |
| <GRAPHIC> |
46 |
| Figure�1�54.� Removing the System Boards Rear Mounting Screw |
46 |
| Figure�1�54.� Removing the System Boards Rear Mounting Screw |
46 |
| <GRAPHIC> |
47 |
| Figure�1�55.� Slide the System Board Off Its Standoffs |
47 |
| Figure�1�55.� Slide the System Board Off Its Standoffs |
47 |
| <GRAPHIC> |
47 |
| Figure�1�56.� Lifting the System Board Out of the Workstation |
47 |
| Figure�1�56.� Lifting the System Board Out of the Workstation |
47 |
| <GRAPHIC> |
48 |
| Replacing the System Board |
48 |
| 1. Remove the system board if you have not already done this. Otherwise, skip this step. To remov... |
48 |
| 1. Remove the system board if you have not already done this. Otherwise, skip this step. To remov... |
48 |
| 2. Use the system board’s turbo-cooler heatsink and handle to place it in the workstation. The sy... |
48 |
| Figure�1�57.� Placing the System Board in the Workstation |
48 |
| Figure�1�57.� Placing the System Board in the Workstation |
48 |
| <GRAPHIC> |
48 |
| Figure�1�58.� Sliding the System Board Onto Its Standoffs |
48 |
| Figure�1�58.� Sliding the System Board Onto Its Standoffs |
48 |
| <GRAPHIC> |
49 |
| Figure�1�59.� Screwing in the System Board’s Rear Mounting Screw |
49 |
| Figure�1�59.� Screwing in the System Board’s Rear Mounting Screw |
49 |
| <GRAPHIC> |
49 |
| Figure�1�60.� Replacing the Internal System Board Mounting Screws |
49 |
| Figure�1�60.� Replacing the Internal System Board Mounting Screws |
49 |
| <GRAPHIC> |
49 |
| 7. Complete the procedure in the section |
49 |
| 8. Complete the procedure in the section |
49 |
| 9. Complete the procedure in the section |
49 |
| 10. Complete the procedure in the section |
50 |
| 11. Connect and turn on the power to your system. |
50 |
| 12. Determine that your system board replacement was successful by observing to see if the workst... |
50 |
| Removing the Fan Modules |
51 |
| Removing the Fan Modules |
51 |
| <TABLE> |
51 |
| Table�1�1.� System Area and PCI area Fan Numbers |
51 |
| <TABLE HEADING> |
51 |
| <TABLE ROW> |
51 |
| Fan Number |
51 |
| Description |
51 |
| <TABLE BODY> |
51 |
| <TABLE ROW> |
51 |
| 1 |
51 |
| Power Supply Fan |
51 |
| <TABLE ROW> |
51 |
| 2 |
51 |
| Right System Area Fan (as you face the system’s front) |
51 |
| <TABLE ROW> |
51 |
| 3 |
51 |
| Left System Area Fan (as you face the system’s front) |
51 |
| <TABLE ROW> |
51 |
| 5 |
51 |
| Left PCI Area Fan (as you face the system’s front) |
51 |
| <TABLE ROW> |
51 |
| 6 |
51 |
| Right PCI Area Fan (as you face the system’s front) |
51 |
| <TABLE ROW> |
51 |
| 7 |
51 |
| CPU’s Turbo-Cooler Heatsink |
51 |
| Figure�1�61.� System and PCI Fan Areas |
51 |
| Figure�1�61.� System and PCI Fan Areas |
51 |
| <GRAPHIC> |
52 |
| System Area Fan Module Removal |
52 |
| 1. Complete the procedure in the section |
52 |
| 1. Complete the procedure in the section |
52 |
| 2. Complete the procedure in the section |
52 |
| 3. Unscrew the two LCD connector screws and remove the LCD connector from its opening in the chas... |
52 |
| Figure�1�62.� Removing the LCD Connector |
52 |
| Figure�1�62.� Removing the LCD Connector |
52 |
| <GRAPHIC> |
52 |
| Figure�1�63.� Disconnecting the Fan-Module Power Cables for the System Area |
52 |
| Figure�1�63.� Disconnecting the Fan-Module Power Cables for the System Area |
52 |
| <GRAPHIC> |
53 |
| Figure�1�64.� Removing the Fan-Module Mounting Screw |
53 |
| Figure�1�64.� Removing the Fan-Module Mounting Screw |
53 |
| <GRAPHIC> |
53 |
| Figure�1�65.� Removing the System Area Fan Module |
53 |
| Figure�1�65.� Removing the System Area Fan Module |
53 |
| <GRAPHIC> |
54 |
| PCI Area Fan Module Removal |
54 |
| 1. Complete the procedure in the section |
54 |
| 1. Complete the procedure in the section |
54 |
| 2. Complete the procedure in the section |
54 |
| 3. Disconnect the two fan-module power cables from the system board by pressing in on the latch r... |
54 |
| Figure�1�66.� Disconnecting the Fan-Module Power Cables |
54 |
| Figure�1�66.� Disconnecting the Fan-Module Power Cables |
54 |
| <GRAPHIC> |
54 |
| Figure�1�67.� Remove the Fan-Module Mounting Screw for the PCI Area |
54 |
| Figure�1�67.� Remove the Fan-Module Mounting Screw for the PCI Area |
54 |
| <GRAPHIC> |
55 |
| Figure�1�68.� Removing the PCI Area Fan Module |
55 |
| Figure�1�68.� Removing the PCI Area Fan Module |
55 |
| <GRAPHIC> |
56 |
| Replacing the Fan Modules |
56 |
| <TABLE> |
56 |
| Table�1�2.� System Area and PCI area Fan Numbers |
56 |
| <TABLE HEADING> |
56 |
| <TABLE ROW> |
56 |
| Fan Number |
56 |
| Description |
56 |
| <TABLE BODY> |
56 |
| <TABLE ROW> |
56 |
| 1 |
56 |
| Power Supply Fan |
56 |
| <TABLE ROW> |
56 |
| 2 |
56 |
| Right System Area Fan (as you face the system’s front) |
56 |
| <TABLE ROW> |
56 |
| 3 |
56 |
| Left System Area Fan (as you face the system’s front) |
56 |
| <TABLE ROW> |
56 |
| 5 |
56 |
| Left PCI Area Fan (as you face the system’s front) |
56 |
| <TABLE ROW> |
56 |
| 6 |
56 |
| Right PCI Area Fan (as you face the system’s front) |
56 |
| <TABLE ROW> |
56 |
| 7 |
56 |
| CPU’s Turbo-Cooler Heatsink |
56 |
| Figure�1�69.� System and PCI Fan Areas |
56 |
| Figure�1�69.� System and PCI Fan Areas |
56 |
| <GRAPHIC> |
57 |
| System Area Fan Module Replacement |
57 |
| 1. Remove the system area fan module if you have not done this. Otherwise, skip this step. To rem... |
57 |
| 1. Remove the system area fan module if you have not done this. Otherwise, skip this step. To rem... |
57 |
| 2. Replace the fan module in the workstation by tilting it back away from the workstation chassis... |
57 |
| Figure�1�70.� Replacing the System Area Fan Module |
57 |
| Figure�1�70.� Replacing the System Area Fan Module |
57 |
| <GRAPHIC> |
57 |
| Figure�1�71.� Screwing in the Fan-Module Mounting Screw |
57 |
| Figure�1�71.� Screwing in the Fan-Module Mounting Screw |
57 |
| <GRAPHIC> |
58 |
| Figure�1�72.� Plugging the Fan-Module Power Cables into the System Board |
58 |
| Figure�1�72.� Plugging the Fan-Module Power Cables into the System Board |
58 |
| <GRAPHIC> |
58 |
| Figure�1�73.� Replacing the LCD Connector |
58 |
| Figure�1�73.� Replacing the LCD Connector |
58 |
| <GRAPHIC> |
58 |
| 7. Complete the procedure in the section |
58 |
| 8. Connect and turn on the power to your system. |
58 |
| 9. Determine that your system area fan-module replacement was successful by checking the workstat... |
58 |
| PCI Area Fan Module Replacement |
59 |
| PCI Area Fan Module Replacement |
59 |
| 1. Remove the PCI area fan module if you have not done this. Otherwise, skip this step. To remove... |
59 |
| 1. Remove the PCI area fan module if you have not done this. Otherwise, skip this step. To remove... |
59 |
| 1. Remove the PCI area fan module if you have not done this. Otherwise, skip this step. To remove... |
59 |
| 2. Replace the fan module in the workstation by tilting it back away from the workstation chassis... |
59 |
| Figure�1�74.� Replacing the PCI Area Fan Module |
59 |
| Figure�1�74.� Replacing the PCI Area Fan Module |
59 |
| <GRAPHIC> |
59 |
| Figure�1�75.� Screw in the Fan-Module Mounting Screw for the PCI Area |
59 |
| Figure�1�75.� Screw in the Fan-Module Mounting Screw for the PCI Area |
59 |
| <GRAPHIC> |
60 |
| Figure�1�76.� Plugging in the Fan-Module Power Cables into the System Board |
60 |
| Figure�1�76.� Plugging in the Fan-Module Power Cables into the System Board |
60 |
| <GRAPHIC> |
60 |
| 6. Complete the procedure in the section |
60 |
| 7. Connect and turn on the power to your system. |
60 |
| 8. Determine that your PCI area fan-module replacement was successful by checking the workstation... |
60 |
| Removing the Audio Card |
61 |
| Removing the Audio Card |
61 |
| NOTE The audio card was originally installed in slot one of the system. This is the recommended P... |
61 |
| 1. Complete the procedure in the section |
61 |
| 1. Complete the procedure in the section |
61 |
| 2. Complete the procedure in the section |
61 |
| 3. Determine that the audio cable has been removed. This step should have been performed when the... |
61 |
| Figure�1�77.� Audio Cable Routing from the CD Drive to the PCI Cage |
61 |
| Figure�1�77.� Audio Cable Routing from the CD Drive to the PCI Cage |
61 |
| <GRAPHIC> |
62 |
| Figure�1�78.� Remove the PCI Cage Cover and the Audio-Extender Cable |
62 |
| Figure�1�78.� Remove the PCI Cage Cover and the Audio-Extender Cable |
62 |
| <GRAPHIC> |
62 |
| Figure�1�79.� Remove the PCI Card Bulkhead Screw and Audio Card |
62 |
| Figure�1�79.� Remove the PCI Card Bulkhead Screw and Audio Card |
62 |
| <GRAPHIC> |
62 |
| Figure�1�80.� Replace the Bulkhead Blank in the PCI Cage |
62 |
| Figure�1�80.� Replace the Bulkhead Blank in the PCI Cage |
62 |
| <GRAPHIC> |
63 |
| Replacing the Audio Card |
63 |
| NOTE PCI slot one is the recommended PCI card slot to use when installing the audio card. To dete... |
63 |
| 1. Remove the audio card if you have not already done this. Otherwise, skip this step. To remove ... |
63 |
| 1. Remove the audio card if you have not already done this. Otherwise, skip this step. To remove ... |
63 |
| 2. Remove the bulkhead blank from slot one of the PCI cage. You will have to unscrew its bulkhead... |
63 |
| Figure�1�81.� Remove the Bulkhead Blank from the PCI Cage |
63 |
| Figure�1�81.� Remove the Bulkhead Blank from the PCI Cage |
63 |
| <GRAPHIC> |
63 |
| Figure�1�82.� Insert the Audio Card into Slot One of the PCI Cage |
63 |
| Figure�1�82.� Insert the Audio Card into Slot One of the PCI Cage |
63 |
| <GRAPHIC> |
64 |
| Figure�1�83.� Secure the Audio Card in Slot 1 |
64 |
| Figure�1�83.� Secure the Audio Card in Slot 1 |
64 |
| <GRAPHIC> |
64 |
| Figure�1�84.� Replace the Audio-Extender Cable and the PCI Cage Cover |
64 |
| Figure�1�84.� Replace the Audio-Extender Cable and the PCI Cage Cover |
64 |
| <GRAPHIC> |
65 |
| Figure�1�85.� Insert the PCI Cage into the Workstation |
65 |
| Figure�1�85.� Insert the PCI Cage into the Workstation |
65 |
| <GRAPHIC> |
65 |
| Figure�1�86.� Connect the Audio Cable to the CD Drive |
65 |
| Figure�1�86.� Connect the Audio Cable to the CD Drive |
65 |
| <GRAPHIC> |
65 |
| Figure�1�87.� Dressing the CD Drive Cables |
66 |
| Figure�1�87.� Dressing the CD Drive Cables |
66 |
| <GRAPHIC> |
66 |
| Figure�1�88.� Insert the CD Drive into the Workstation and Connect Cables |
66 |
| Figure�1�88.� Insert the CD Drive into the Workstation and Connect Cables |
66 |
| <GRAPHIC> |
66 |
| 11. Determine that your audio card replacement was successful. To do this read the section “Using... |
66 |
| Converting Your System for Desktop or Rack-Mount Use |
67 |
| Converting Your System for Desktop or Rack-Mount Use |
67 |
| Converting Your Desktop System to a Rack-Mount System |
67 |
| Converting Your Desktop System to a Rack-Mount System |
67 |
| 1. Press in on the release buttons located on both ends of the bezel to remove it. See |
67 |
| 1. Press in on the release buttons located on both ends of the bezel to remove it. See |
67 |
| Figure�1�89.� Front Bezel Removal |
67 |
| Figure�1�89.� Front Bezel Removal |
67 |
| <GRAPHIC> |
67 |
| Figure�1�90.� Removing the Top and Bottom System Covers |
67 |
| Figure�1�90.� Removing the Top and Bottom System Covers |
67 |
| <GRAPHIC> |
68 |
| Figure�1�91.� Plastic Cover Locks and their Slots on the System Chassis |
68 |
| <GRAPHIC> |
68 |
| Figure�1�92.� Connecting the End Caps Onto the Front Bezel |
68 |
| Figure�1�92.� Connecting the End Caps Onto the Front Bezel |
68 |
| <GRAPHIC> |
68 |
| Figure�1�93.� Place the Bezel with End Caps on the System |
69 |
| Figure�1�93.� Place the Bezel with End Caps on the System |
69 |
| <GRAPHIC> |
69 |
| A. Turn on the system and press the Tab key until the select display message appears. You should ... |
69 |
| A. Turn on the system and press the Tab key until the select display message appears. You should ... |
69 |
| B. Stop the boot process by pressing any key before the ten-second limit. This gets you to the bch |
69 |
| C. Enter the following command at the |
69 |
| D. Return to the |
69 |
| Converting Your Rack-Mount System to a Desktop System |
70 |
| Converting Your Rack-Mount System to a Desktop System |
70 |
| 1. Unplug the workstation and reverse the procedure in the section “Converting Your Desktop Syste... |
70 |
| 1. Unplug the workstation and reverse the procedure in the section “Converting Your Desktop Syste... |
70 |
| 2. Complete step 5 in the section “Converting Your Desktop System to a Rack-Mount System” in this... |
70 |
| A� Regulatory Statements |
71 |
| A� Regulatory Statements |
71 |
| <GRAPHIC> |
73 |
| Electromagnetic Compatibility |
73 |
| Electromagnetic Compatibility |
73 |
| Federal Communications Commission (FCC) |
73 |
| Federal Communications Commission (FCC) |
73 |
| • This device may not cause harmful interference. |
73 |
| • This device may not cause harmful interference. |
73 |
| • This device must accept interference received, including interference that may cause undesired ... |
73 |
| • Cables used with this device must be properly shielded to comply with the requirement of the FCC. |
73 |
| • You are cautioned that any changes or modifications not expressly approved in this manual could... |
73 |
| VCCI Statement for Class A Products |
74 |
| VCCI Statement for Class A Products |
74 |
| <GRAPHIC> |
74 |
| Korea RRL Statement for Class A Product |
74 |
| <GRAPHIC> |
74 |
| Taiwan Class A Warning |
74 |
| <GRAPHIC> |
75 |
| Optical and Acoustical Statements |
75 |
| Visible LED Statement |
75 |
| Visible LED Statement |
75 |
| Laser Safety Statement for a Class 1 Laser Product |
75 |
| Laser Safety Statement for a Class 1 Laser Product |
75 |
| Regulation on Noise Declaration for Machines |
75 |
| Regulation on Noise Declaration for Machines |
75 |
| B DC Power Supply |
77 |
| B DC Power Supply |
77 |
| DC Power Supply Considerations |
78 |
| DC Power Supply Considerations |
78 |
| WARNING Disconnect power from the source before connecting power to the product or before accessi... |
78 |
| Connecting Wires |
78 |
| Connecting Wires |
78 |
| Grounding Your Workstation |
78 |
| Grounding Your Workstation |
78 |
| Figure�B�1 Physical Ground Connection |
78 |
| Figure�B�1 Physical Ground Connection |
78 |
| <GRAPHIC> |
78 |
| Location for Your DC Source and Workstation(s) |
78 |
| Removing the DC Power Supply |
79 |
| Removing the DC Power Supply |
79 |
| 1. Remove the DC connector cap located on the back side of your workstation. See |
79 |
| 1. Remove the DC connector cap located on the back side of your workstation. See |
79 |
| Figure�B�2 Removing the DC Connector Cap |
79 |
| Figure�B�2 Removing the DC Connector Cap |
79 |
| <GRAPHIC> |
79 |
| Figure�B�3 Disconnecting the DC Power Source |
79 |
| Figure�B�3 Disconnecting the DC Power Source |
79 |
| <GRAPHIC> |
80 |
| Figure�B�4 Disconnect the Power Supply Cables |
80 |
| Figure�B�4 Disconnect the Power Supply Cables |
80 |
| <GRAPHIC> |
80 |
| Figure�B�5 Unscrewing the Four Power Supply Mounting Screws |
80 |
| Figure�B�5 Unscrewing the Four Power Supply Mounting Screws |
80 |
| <GRAPHIC> |
81 |
| Figure�B�6 Removing the DC Power Supply |
81 |
| Figure�B�6 Removing the DC Power Supply |
81 |
| <GRAPHIC> |
82 |
| Replacing the DC Power Supply |
82 |
| 1. Remove the DC power supply if you have not already done this. Otherwise, skip this step. To re... |
82 |
| 1. Remove the DC power supply if you have not already done this. Otherwise, skip this step. To re... |
82 |
| 2. Replace the DC power supply in the workstation. To do this, you will have to slide the support... |
82 |
| Figure�B�7 Replacing the DC Power Supply |
82 |
| Figure�B�7 Replacing the DC Power Supply |
82 |
| <GRAPHIC> |
82 |
| Figure�B�8 Screw in the Four Power Supply Mounting Screws |
82 |
| Figure�B�8 Screw in the Four Power Supply Mounting Screws |
82 |
| <GRAPHIC> |
83 |
| Figure�B�9 Connect the Power Supply Cables |
83 |
| Figure�B�9 Connect the Power Supply Cables |
83 |
| <GRAPHIC> |
83 |
| Figure�B�10 Disconnecting the DC Power Source |
83 |
| Figure�B�10 Disconnecting the DC Power Source |
83 |
| <GRAPHIC> |
84 |
| Figure�B�11 Replacing the DC Connector Cap |
84 |
| Figure�B�11 Replacing the DC Connector Cap |
84 |
| <GRAPHIC> |
84 |
| 8. Connect and turn on the power to your system. |
84 |
| 9. Determine that your DC power supply replacement was successful by observing to see if the work... |
84 |
| C Remove/Replace DAT Drives |
85 |
| C Remove/Replace DAT Drives |
85 |
| Removing the DAT Drive |
86 |
| Removing the DAT Drive |
86 |
| 1. Complete the procedure in the section |
86 |
| 1. Complete the procedure in the section |
86 |
| 2. Disconnect the DAT drive power cable from the system board by pressing in on the connector’s l... |
86 |
| Figure�C�1 Disconnecting the DAT Drive Power Cable |
86 |
| Figure�C�1 Disconnecting the DAT Drive Power Cable |
86 |
| <GRAPHIC> |
86 |
| Figure�C�2 Remove the DAT Drive and DAT Drive Bay Area |
86 |
| Figure�C�2 Remove the DAT Drive and DAT Drive Bay Area |
86 |
| <GRAPHIC> |
87 |
| Figure�C�3 Removing the DAT Drive Bay and DAT Drive |
87 |
| Figure�C�3 Removing the DAT Drive Bay and DAT Drive |
87 |
| <GRAPHIC> |
87 |
| Figure�C�4 Removing the DAT Drive Bay’s Back Cover |
87 |
| Figure�C�4 Removing the DAT Drive Bay’s Back Cover |
87 |
| <GRAPHIC> |
88 |
| Figure�C�5 Disconnecting the DAT Drive’s Cables |
88 |
| Figure�C�5 Disconnecting the DAT Drive’s Cables |
88 |
| <GRAPHIC> |
88 |
| Figure�C�6 Unscrew the Four DAT Drive Bracket Mounting Screws |
88 |
| Figure�C�6 Unscrew the Four DAT Drive Bracket Mounting Screws |
88 |
| <GRAPHIC> |
89 |
| Removing the SCSI Cable |
89 |
| • The SCSI card can be installed in any of the unused slots in your workstation’s PCI cage; howev... |
89 |
| • The SCSI card can be installed in any of the unused slots in your workstation’s PCI cage; howev... |
89 |
| • The SCSI cable is long enough to allow you to run it through the DAT drive bay and out its fron... |
89 |
| • The connectors on both ends of the SCSI cable are keyed to allow for proper pin connection. |
89 |
| 1. Complete the procedure in the section |
89 |
| 1. Complete the procedure in the section |
89 |
| 2. Lift up on the PCI cage handle and remove the PCI cage from the workstation, |
89 |
| Figure�C�7 Removing the PCI Cage |
89 |
| Figure�C�7 Removing the PCI Cage |
89 |
| <GRAPHIC> |
90 |
| Figure�C�8 Disconnection the SCSI Cable |
90 |
| Figure�C�8 Disconnection the SCSI Cable |
90 |
| <GRAPHIC> |
91 |
| Replacing the DAT Drive |
91 |
| 1. Remove the current DAT drive if you have not already done this. Otherwise, skip this step. To ... |
91 |
| 1. Remove the current DAT drive if you have not already done this. Otherwise, skip this step. To ... |
91 |
| 2. Place the DAT drive brackets as shown in |
91 |
| Figure�C�9 Replace the DAT Drive Bracket on the DAT Drive |
91 |
| Figure�C�9 Replace the DAT Drive Bracket on the DAT Drive |
91 |
| <GRAPHIC> |
91 |
| Figure�C�10 Connect the DAT Drive’s Cables |
91 |
| Figure�C�10 Connect the DAT Drive’s Cables |
91 |
| <GRAPHIC> |
92 |
| Figure�C�11 Replacing the DAT Drive Bay’s Back Cover |
92 |
| Figure�C�11 Replacing the DAT Drive Bay’s Back Cover |
92 |
| <GRAPHIC> |
92 |
| Figure�C�12 Removing the DAT Drive Bay and DAT Drive |
92 |
| Figure�C�12 Removing the DAT Drive Bay and DAT Drive |
92 |
| <GRAPHIC> |
93 |
| Figure�C�13 Replace the DAT Drive and DAT Drive Bay Area |
93 |
| Figure�C�13 Replace the DAT Drive and DAT Drive Bay Area |
93 |
| <GRAPHIC> |
93 |
| Figure�C�14 Connecting the DAT Drive Power Cable |
93 |
| Figure�C�14 Connecting the DAT Drive Power Cable |
93 |
| <GRAPHIC> |
93 |
| 9. Connect and turn on the power to your system. |
93 |
| 10. Determine that your DAT drive replacement was successful by executing the |
93 |
| Replacing the SCSI Cable |
94 |
| Replacing the SCSI Cable |
94 |
| • The SCSI card can be installed in any of the unused slots in your workstation’s PCI cage; howev... |
94 |
| • The SCSI card can be installed in any of the unused slots in your workstation’s PCI cage; howev... |
94 |
| • The SCSI cable is long enough to allow you to run it through the DAT drive bay and out its fron... |
94 |
| • The connectors on both ends of the SCSI cable are keyed to allow for proper pin connection. |
94 |
| 1. Complete the procedures in the section |
94 |
| 1. Complete the procedures in the section |
94 |
| 2. Insert the SCSI card into a PCI card slot (preferably slot 4) and connect the SCSI cable as sh... |
94 |
| Figure�C�15 Connecting the SCSI Cable and Making Sure it is Folded Properly |
94 |
| Figure�C�15 Connecting the SCSI Cable and Making Sure it is Folded Properly |
94 |
| <GRAPHIC> |
95 |
| Figure�C�16 Routing the SCSI Cable and Installing the PCI Cage |
95 |
| Figure�C�16 Routing the SCSI Cable and Installing the PCI Cage |
95 |
| <GRAPHIC> |
97 |
| D Remove/Replace Flexible Disk Drives |
97 |
| Removing the Flexible Disk Drive |
98 |
| Removing the Flexible Disk Drive |
98 |
| 1. Complete the procedure in the section |
98 |
| 1. Complete the procedure in the section |
98 |
| 2. Disconnect the flexible disk drive power cable from the system board by pressing in on the pow... |
98 |
| Figure�D�1 Disconnecting the Flexible Disk Drive Power Cable |
98 |
| Figure�D�1 Disconnecting the Flexible Disk Drive Power Cable |
98 |
| <GRAPHIC> |
98 |
| Figure�D�2 Remove the Flexible Disk Drive and Flexible Disk Drive Bay |
98 |
| Figure�D�2 Remove the Flexible Disk Drive and Flexible Disk Drive Bay |
98 |
| <GRAPHIC> |
99 |
| Figure�D�3 Removing the Flexible Disk Drive Bay’s Mounting Screws |
99 |
| Figure�D�3 Removing the Flexible Disk Drive Bay’s Mounting Screws |
99 |
| <GRAPHIC> |
99 |
| Figure�D�4 Removing the Flexible Disk Drive Bay’s Back Cover |
99 |
| Figure�D�4 Removing the Flexible Disk Drive Bay’s Back Cover |
99 |
| <GRAPHIC> |
100 |
| Figure�D�5 Disconnecting the Flexible Disk Drive’s Cables |
100 |
| Figure�D�5 Disconnecting the Flexible Disk Drive’s Cables |
100 |
| <GRAPHIC> |
100 |
| Figure�D�6 Unscrewing the Flexible Disk Drive’s Bezel Mounting Screws |
100 |
| Figure�D�6 Unscrewing the Flexible Disk Drive’s Bezel Mounting Screws |
100 |
| <GRAPHIC> |
101 |
| Figure�D�7 Unscrew the Four Flexible Disk Drive Mounting Screws |
101 |
| Figure�D�7 Unscrew the Four Flexible Disk Drive Mounting Screws |
101 |
| <GRAPHIC> |
101 |
| Removing the SCSI Cable |
101 |
| • The SCSI card can be installed in any of the unused slots in your workstation’s PCI cage; howev... |
101 |
| • The SCSI card can be installed in any of the unused slots in your workstation’s PCI cage; howev... |
101 |
| • The SCSI cable is long enough to allow you to run it through the flexible disk drive bay and ou... |
101 |
| • The connectors on both ends of the SCSI cable are keyed to allow for proper pin connection. How... |
101 |
| 1. Complete the procedure in the section |
101 |
| 1. Complete the procedure in the section |
101 |
| 2. Lift up on the PCI cage handle and remove the PCI cage from the workstation, |
102 |
| Figure�D�8 Removing the PCI Cage |
102 |
| Figure�D�8 Removing the PCI Cage |
102 |
| <GRAPHIC> |
102 |
| Figure�D�9 Disconnection the SCSI Cable |
102 |
| Figure�D�9 Disconnection the SCSI Cable |
102 |
| <GRAPHIC> |
103 |
| Replacing the Flexible Disk Drive |
103 |
| 1. Remove the current flexible disk drive if you have not already done this. Otherwise skip this ... |
103 |
| 1. Remove the current flexible disk drive if you have not already done this. Otherwise skip this ... |
103 |
| 2. Place the new flexible disk drive in the flexible disk drive bracket and screw the bracket mou... |
103 |
| Figure�D�10 Unscrew the Four Flexible Disk Drive Mounting Screws |
103 |
| Figure�D�10 Unscrew the Four Flexible Disk Drive Mounting Screws |
103 |
| <GRAPHIC> |
103 |
| Figure�D�11 Screwing in the Flexible Disk Drive Bezel’s Mounting Screws |
103 |
| Figure�D�11 Screwing in the Flexible Disk Drive Bezel’s Mounting Screws |
103 |
| <GRAPHIC> |
104 |
| Figure�D�12 Running the SCSI and Power Cables through the Disk Drive’s Bay |
104 |
| Figure�D�12 Running the SCSI and Power Cables through the Disk Drive’s Bay |
104 |
| <GRAPHIC> |
104 |
| Figure�D�13 Connecting the Flexible Disk Drive’s Cables |
104 |
| Figure�D�13 Connecting the Flexible Disk Drive’s Cables |
104 |
| <GRAPHIC> |
105 |
| Figure�D�14 Screwing in the Flexible Disk Drive Bay’s Mounting Screws |
105 |
| Figure�D�14 Screwing in the Flexible Disk Drive Bay’s Mounting Screws |
105 |
| <GRAPHIC> |
105 |
| Figure�D�15 Replacing the Flexible Disk Drive Bay’s Back Cover |
105 |
| Figure�D�15 Replacing the Flexible Disk Drive Bay’s Back Cover |
105 |
| <GRAPHIC> |
106 |
| Figure�D�16 Replace the Flexible Disk Drive and Flexible Disk Drive Bay |
106 |
| Figure�D�16 Replace the Flexible Disk Drive and Flexible Disk Drive Bay |
106 |
| <GRAPHIC> |
106 |
| Figure�D�17 Connecting the Flexible Disk Drive Power Cable |
106 |
| Figure�D�17 Connecting the Flexible Disk Drive Power Cable |
106 |
| <GRAPHIC> |
106 |
| 11. Connect and turn on the power to your system. |
106 |
| 12. Determine that your DAT drive replacement was successful by executing the |
106 |
| Replacing the SCSI Cable |
107 |
| Replacing the SCSI Cable |
107 |
| • The SCSI card can be installed in any of the unused slots in your workstation’s PCI cage; howev... |
107 |
| • The SCSI card can be installed in any of the unused slots in your workstation’s PCI cage; howev... |
107 |
| • The SCSI cable is long enough to allow you to run it through the flexible disk drive bay and ou... |
107 |
| • The connectors on both ends of the SCSI cable are keyed to allow for proper pin connection. How... |
107 |
| 1. Complete the procedures in the section |
107 |
| 1. Complete the procedures in the section |
107 |
| 2. Insert the SCSI card into a PCI card slot (preferably slot 4) and connect the SCSI cable as sh... |
107 |
| Figure�D�18 Connecting the SCSI Cable and Making Sure it is Folded Properly |
107 |
| Figure�D�18 Connecting the SCSI Cable and Making Sure it is Folded Properly |
107 |
| <GRAPHIC> |
108 |
| Figure�D�19 Routing the SCSI Cable and Installing the PCI Cage |
108 |
| Figure�D�19 Routing the SCSI Cable and Installing the PCI Cage |
108 |
 1
1 38
38 39
39 40
40 41
41 42
42 43
43 44
44 45
45 46
46 47
47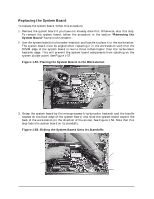 48
48

